Lenovo M58p User Guide - Page 29
Connecting, drive
 |
UPC - 884343322902
View all Lenovo M58p manuals
Add to My Manuals
Save this manual to your list of manuals |
Page 29 highlights
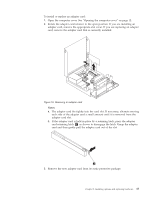
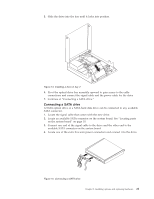
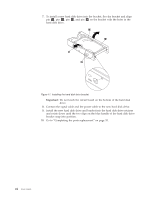
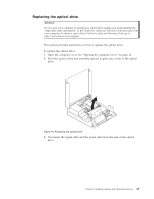
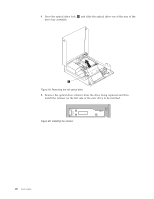
5. Slide the drive into the bay until it locks into position. Figure 14. Installing a drive in bay 2 6. Pivot the optical drive bay assembly upward to gain access to the cable connections and connect the signal cable and the power cable for the drive. 7. Continue at "Connecting a SATA drive." Connecting a SATA drive A SATA optical drive or a SATA hard disk drive can be connected to any available SATA connector. 1. Locate the signal cable that comes with the new drive. 2. Locate an available SATA connector on the system board. See "Locating parts on the system board" on page 10. 3. Connect one end of the signal cable to the drive and the other end to the available SATA connector on the system board. 4. Locate one of the extra five-wire power connectors and connect it to the drive. Figure 15. Connecting a SATA drive Chapter 2. Installing options and replacing hardware 21
-
 1
1 -
2
-
3
-
4
-
5
-
6
-
7
-
8
-
9
-
10
-
11
-
12
-
13
-
14
-
15
-
16
-
17
-
18
-
19
-
20
-
21
-
22
-
23
-
 24
24 -
 25
25 -
 26
26 -
 27
27 -
 28
28 -
 29
29 -
 30
30 -
 31
31 -
 32
32 -
 33
33 -
 34
34 -
35
-
36
-
37
-
38
-
39
-
40
-
41
-
42
-
43
-
44
-
45
-
46
-
47
-
48
-
49
-
50
-
51
-
52
-
53
-
54
-
55
-
56
-
57
-
58
-
59
-
60
-
61
-
62
-
63
-
64
-
65
-
66
-
67
-
68
-
69
-
70
-
71
-
72
-
73
-
74
-
75
-
76
-
77
-
78
-
79
-
80
 |
 |
