Lenovo M58p User Guide - Page 33
Replacing, optical, drive
 |
UPC - 884343322902
View all Lenovo M58p manuals
Add to My Manuals
Save this manual to your list of manuals |
Page 33 highlights
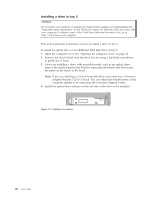
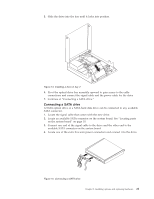
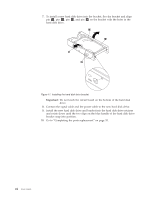
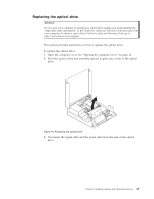
Replacing the optical drive Attention Do not open your computer or attempt any repair before reading and understanding the "Important safety information" in the ThinkCentre Safety and Warranty Guide that came with your computer. To obtain a copy of the ThinkCentre Safety and Warranty Guide, go to: http://www.lenovo.com/support This section provides instructions on how to replace the optical drive. To replace the optical drive: 1. Open the computer cover. See "Opening the computer cover" on page 12. 2. Pivot the optical drive bay assembly upward to gain easy access to the optical drive. Figure 18. Accessing the optical drive 3. Disconnect the signal cable and the power cable from the rear of the optical drive. Chapter 2. Installing options and replacing hardware 25
-
 1
1 -
2
-
3
-
4
-
5
-
6
-
7
-
8
-
9
-
10
-
11
-
12
-
13
-
14
-
15
-
16
-
17
-
18
-
19
-
20
-
21
-
22
-
23
-
24
-
25
-
26
-
27
-
 28
28 -
 29
29 -
 30
30 -
 31
31 -
 32
32 -
 33
33 -
 34
34 -
 35
35 -
 36
36 -
 37
37 -
 38
38 -
39
-
40
-
41
-
42
-
43
-
44
-
45
-
46
-
47
-
48
-
49
-
50
-
51
-
52
-
53
-
54
-
55
-
56
-
57
-
58
-
59
-
60
-
61
-
62
-
63
-
64
-
65
-
66
-
67
-
68
-
69
-
70
-
71
-
72
-
73
-
74
-
75
-
76
-
77
-
78
-
79
-
80
 |
 |
