Lenovo NetVista Hardware Maintenance Manual (HMM) for Aptiva, IBM PC300, and N - Page 93
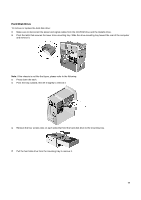
Diskette Drive, Press down the latch.
 |
View all Lenovo NetVista manuals
Add to My Manuals
Save this manual to your list of manuals |
Page 93 highlights
Diskette Drive To remove the diskette drive: Disconnect the power and signal cables from the back of the diskette drive. Remove the diskette mounting tray from the chassis as following illustration : Pivot the latch that secures the lower drive-mounting tray. Slide the drive-mounting tray toward the rear of the computer and remove it. Note: If the chassis is not like the figure, please refer to the following. Press down the latch. Pivot the tray outward, then lift it slightly to remove it. Remove the four screws (two on each side) that hold the diskette drive to the mounting tray Pull the diskette drive from the mounting tray to remove it. 93
-
 1
1 -
2
-
3
-
4
-
5
-
6
-
7
-
8
-
9
-
10
-
11
-
12
-
13
-
14
-
15
-
16
-
17
-
18
-
19
-
20
-
21
-
22
-
23
-
24
-
25
-
26
-
27
-
28
-
29
-
30
-
31
-
32
-
33
-
34
-
35
-
36
-
37
-
38
-
39
-
40
-
41
-
42
-
43
-
44
-
45
-
46
-
47
-
48
-
49
-
50
-
51
-
52
-
53
-
54
-
55
-
56
-
57
-
58
-
59
-
60
-
61
-
62
-
63
-
64
-
65
-
66
-
67
-
68
-
69
-
70
-
71
-
72
-
73
-
74
-
75
-
76
-
77
-
78
-
79
-
80
-
81
-
82
-
83
-
84
-
85
-
86
-
87
-
 88
88 -
 89
89 -
 90
90 -
 91
91 -
 92
92 -
 93
93 -
 94
94 -
 95
95 -
 96
96 -
 97
97 -
 98
98 -
99
-
100
-
101
-
102
-
103
-
104
-
105
-
106
-
107
-
108
-
109
-
110
-
111
-
112
-
113
-
114
-
115
-
116
-
117
-
118
-
119
-
120
-
121
-
122
-
123
-
124
-
125
-
126
-
127
-
128
-
129
-
130
-
131
-
132
-
133
-
134
-
135
-
136
-
137
-
138
-
139
-
140
-
141
-
142
-
143
-
144
-
145
-
146
-
147
-
148
-
149
-
150
-
151
-
152
-
153
-
154
-
155
-
156
-
157
-
158
-
159
-
160
-
161
-
162
-
163
 |
 |
93
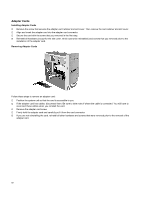
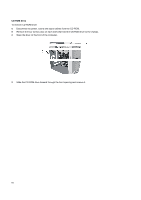
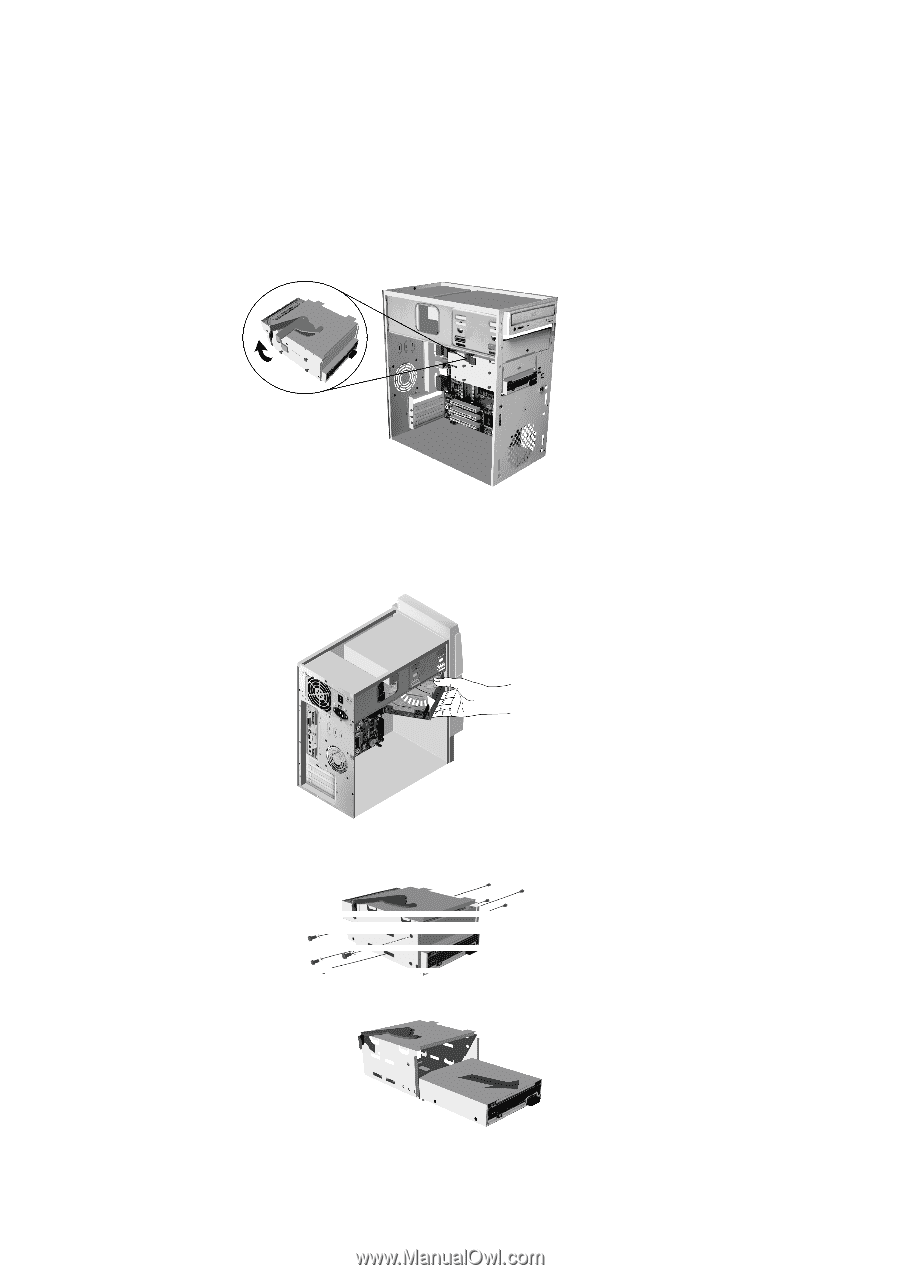
Diskette Drive
To remove the diskette drive:
±
Disconnect the power and signal cables from the back of the diskette drive.
±
Remove the diskette mounting tray from the chassis as following illustration :
±
Pivot the latch that secures the lower drive-mounting tray.
±
Slide the drive-mounting tray toward the rear of the computer and remove it.
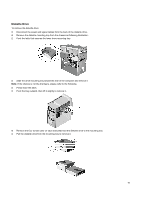
Note:
If the chassis is not like the figure, please refer to the following.
±
Press down the latch.
±
Pivot the tray outward, then lift it slightly to remove it.
±
Remove the four screws (two on each side) that hold the diskette drive to the mounting tray
±
Pull the diskette drive from the mounting tray to remove it.