Lenovo S200 (English) User guide - Page 38
Running, diagnostics, diskettes, Rescue, Recovery, workspace
 |
View all Lenovo S200 manuals
Add to My Manuals
Save this manual to your list of manuals |
Page 38 highlights
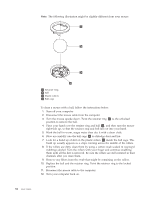
30 User Guide 4. When you hear beeps or see a logo screen, stop pressing the F11 key. The Rescue and Recovery workspace opens. Note: For some models, press the Esc key to enter Rescue and Recovery. 5. From the Rescue and Recovery workspace, select Create diagnostic disks. 6. Follow the instructions on the screen. 7. When prompted, insert a blank, formatted diskette into the diskette drive and continue to follow the instructions on the screen. 8. When the operation is complete, remove the diskette and click Quit. 9. Insert another blank, formatted diskette into the diskette drive and continue to follow the instructions on the screen. 10. When the operation is complete, remove the diskette and click Quit. Running diagnostics from the CD or diskettes To run diagnostics from the diagnostic CD image or diagnostic diskettes that you created, use the following procedure: 1. Make sure your computer is turned off. 2. If you are running diagnostics from diskettes using a USB diskette drive, plug in the USB device. 3. Insert the CD into the optical drive or the first diagnostic diskette into the diskette drive. 4. Restart the computer. Note: If the diagnostic program does not start, the optical drive or diskette drive has not been set as a bootable device. See "Selecting a startup device" on page 23 for instructions on how to select or change the startup device. 5. When the diagnostics program opens, follow the instructions on the screen. Note: If you are running diagnostics from a diskette, when prompted, remove the first diskette and insert the second diskette. 6. When the program finishes, remove the CD or diskette from the drive. 7. Select the diagnostic test you want to run. Press the F1 key for additional help. Running diagnostics from the Rescue and Recovery workspace To run diagnostics from the Rescue and Recovery workspace, use the following procedure: Note: If you did not create a diagnostic CD image or diagnostic diskettes, you can run the PC-Doctor for DOS diagnostic program from the Rescue and Recovery workspace. 1. Shut down the operating system and turn off the computer. 2. Repeatedly press and release the F11 key as you turn on the computer. 3. When you hear beeps or see a logo screen, stop pressing the F11 key. The Rescue and Recovery workspace opens. Note: For some models, press the Esc key to enter Rescue and Recovery. 4. From the Rescue and Recovery workspace, select Diagnose hardware. 5. Follow the prompts on the screen. The computer will reboot. 6. When the computer restarts, the diagnostic program opens automatically. Select the diagnostic test you want to run. Press the F1 key for additional help.
-
 1
1 -
2
-
3
-
4
-
5
-
6
-
7
-
8
-
9
-
10
-
11
-
12
-
13
-
14
-
15
-
16
-
17
-
18
-
19
-
20
-
21
-
22
-
23
-
24
-
25
-
26
-
27
-
28
-
29
-
30
-
31
-
32
-
 33
33 -
 34
34 -
 35
35 -
 36
36 -
 37
37 -
 38
38 -
 39
39 -
 40
40 -
 41
41 -
 42
42 -
 43
43 -
44
-
45
-
46
-
47
-
48
-
49
-
50
-
51
-
52
-
53
-
54
-
55
-
56
-
57
-
58
-
59
-
60
-
61
-
62
-
63
-
64
-
65
-
66
-
67
-
68
 |
 |
