Lenovo ThinkCentre M91p Hardware Maintenance Manual - Page 83
Replacing the hard disk drive, Disconnect the power cable from the optical drive first.
 |
View all Lenovo ThinkCentre M91p manuals
Add to My Manuals
Save this manual to your list of manuals |
Page 83 highlights
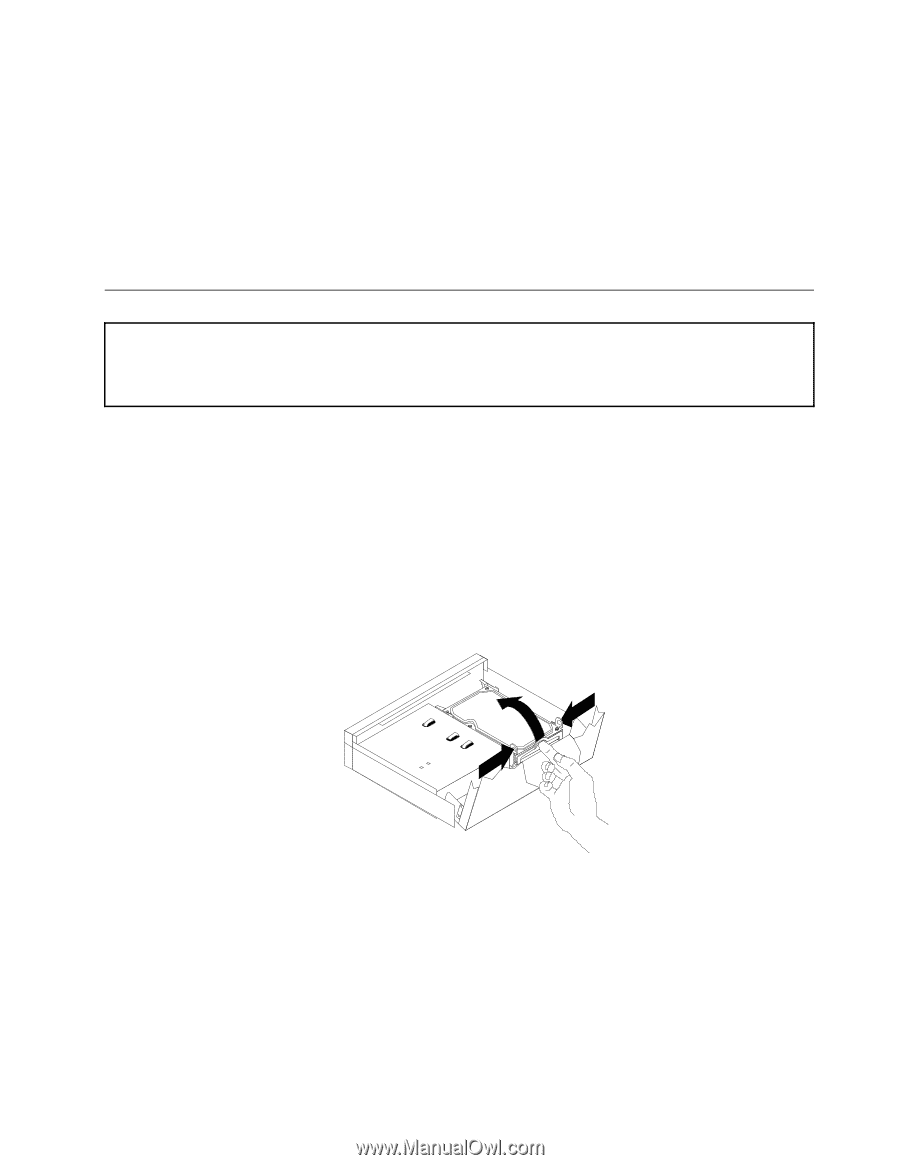
9. Remove the new PCI card from its static-protective package. 10. Install the new PCI card into the PCI card slot. Make sure that the PCI card is firmly fixed in the slot and does not move easily. 11. Close the PCI card retainer. 12. Slide the system board to the rear of the chassis and then pivot the system board until it snaps into position. 13. Reconnect all cables that were disconnected from the system board. 14. Go to "Completing the parts replacement" on page 98. Replacing the hard disk drive Attention: Do not open your computer or attempt any repair before reading and understanding the "Important safety information" in the ThinkCentre User Guide. To obtain a copy of the ThinkCentre User Guide, go to: http://www.lenovo.com/ThinkCentreUserGuides This section provides instructions on how to replace the hard disk drive. To replace the hard disk drive, do the following: 1. Remove all media from the drives and turn off all attached devices and the computer. Then, disconnect all power cords from electrical outlets and disconnect all cables that are connected to the computer. 2. Open the computer cover. See "Opening the computer cover" on page 72. 3. Disconnect the power cable from the optical drive first. 4. Press inward on the side tabs of the hard disk drive bracket. Place your finger on the tab located on the front of the hard disk drive bracket and then pivot the hard disk drive upward to remove it from the hard disk drive bay. Figure 11. Removing the hard disk drive 5. Disconnect the signal cable and the power cable from the rear of the hard disk drive. 6. Flex the sides of the hard disk drive bracket properly to remove the hard disk drive out of the bracket. Chapter 8. Replacing FRUs 77
-
 1
1 -
2
-
3
-
4
-
5
-
6
-
7
-
8
-
9
-
10
-
11
-
12
-
13
-
14
-
15
-
16
-
17
-
18
-
19
-
20
-
21
-
22
-
23
-
24
-
25
-
26
-
27
-
28
-
29
-
30
-
31
-
32
-
33
-
34
-
35
-
36
-
37
-
38
-
39
-
40
-
41
-
42
-
43
-
44
-
45
-
46
-
47
-
48
-
49
-
50
-
51
-
52
-
53
-
54
-
55
-
56
-
57
-
58
-
59
-
60
-
61
-
62
-
63
-
64
-
65
-
66
-
67
-
68
-
69
-
70
-
71
-
72
-
73
-
74
-
75
-
76
-
77
-
 78
78 -
 79
79 -
 80
80 -
 81
81 -
 82
82 -
 83
83 -
 84
84 -
 85
85 -
 86
86 -
 87
87 -
 88
88 -
89
-
90
-
91
-
92
-
93
-
94
-
95
-
96
-
97
-
98
-
99
-
100
-
101
-
102
-
103
-
104
-
105
-
106
-
107
-
108
-
109
-
110
-
111
-
112
-
113
-
114
-
115
-
116
-
117
-
118
-
119
-
120
-
121
-
122
-
123
-
124
-
125
-
126
-
127
-
128
-
129
-
130
-
131
-
132
-
133
-
134
-
135
-
136
-
137
-
138
-
139
-
140
-
141
-
142
-
143
-
144
-
145
-
146
-
147
-
148
-
149
-
150
-
151
-
152
-
153
-
154
-
155
-
156
-
157
-
158
-
159
-
160
-
161
-
162
-
163
-
164
-
165
-
166
-
167
-
168
-
169
-
170
-
171
-
172
-
173
-
174
-
175
-
176
-
177
-
178
-
179
-
180
-
181
-
182
-
183
-
184
-
185
-
186
-
187
-
188
-
189
-
190
-
191
-
192
-
193
-
194
-
195
-
196
-
197
-
198
-
199
-
200
 |
 |