Lenovo ThinkPad Edge E125 Hardware Maintenance Manual - Page 63
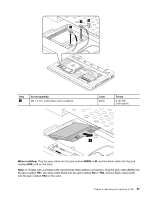
the jack marked, the white cable third into the jack marked
 |
View all Lenovo ThinkPad Edge E125 manuals
Add to My Manuals
Save this manual to your list of manuals |
Page 63 highlights
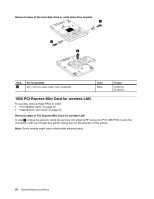
1 2 1 Step 2 Screw (quantity) M2 × 3 mm, wafer-head, nylon-coated (1) Color Black Torque 0.181 Nm (1.85 kgfcm) 3 When installing: Plug the gray cable into the jack marked MAIN or M, and the black cable into the jack marked AUX or A on the card. Note: In models with a wireless LAN card that has three antenna connectors, plug the gray cable (MAIN) into the jack marked TR1, the white cable (third) into the jack marked RO or TR3, and the black cable (AUX) into the jack marked TR2 on the card. Chapter 8. Removing and replacing a FRU 57
-
 1
1 -
2
-
3
-
4
-
5
-
6
-
7
-
8
-
9
-
10
-
11
-
12
-
13
-
14
-
15
-
16
-
17
-
18
-
19
-
20
-
21
-
22
-
23
-
24
-
25
-
26
-
27
-
28
-
29
-
30
-
31
-
32
-
33
-
34
-
35
-
36
-
37
-
38
-
39
-
40
-
41
-
42
-
43
-
44
-
45
-
46
-
47
-
48
-
49
-
50
-
51
-
52
-
53
-
54
-
55
-
56
-
57
-
 58
58 -
 59
59 -
 60
60 -
 61
61 -
 62
62 -
 63
63 -
 64
64 -
 65
65 -
 66
66 -
 67
67 -
 68
68 -
69
-
70
-
71
-
72
-
73
-
74
-
75
-
76
-
77
-
78
-
79
-
80
-
81
-
82
-
83
-
84
-
85
-
86
-
87
-
88
-
89
-
90
-
91
-
92
-
93
-
94
-
95
-
96
-
97
-
98
-
99
-
100
-
101
-
102
-
103
-
104
-
105
-
106
 |
 |

2
1
1
Step
Screw (quantity)
Color
Torque
2
M2 × 3 mm, wafer-head, nylon-coated (1)
Black
0.181 Nm
(1.85 kgfcm)
3
When installing:
Plug the gray cable into the jack marked
MAIN
or
M
, and the black cable into the jack
marked
AUX
or
A
on the card.
Note:
In models with a wireless LAN card that has three antenna connectors, plug the gray cable (MAIN) into
the jack marked
TR1
, the white cable (third) into the jack marked
RO
or
TR3
, and the black cable (AUX)
into the jack marked
TR2
on the card.
Chapter 8
.
Removing and replacing a FRU
57