Lexmark 342n User's Guide - Page 18
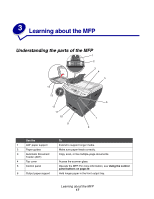
Understanding the parts of the MFP, Use - cartridge
 |
UPC - 734646062015
View all Lexmark 342n manuals
Add to My Manuals
Save this manual to your list of manuals |
Page 18 highlights
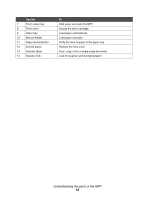
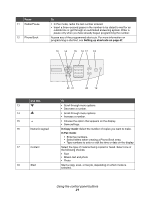
Use the 7 Front output tray 8 Front cover 9 Paper tray 10 Manual feeder 11 Paper level indicator 12 Access button 13 Scanner glass 14 Scanner lock To Hold paper as it exits the MFP. Access the toner cartridge. Load paper automatically. Load paper manually. Verify the level of paper in the paper tray. Release the front cover. Scan, copy, or fax a single-page document. Lock the scanner unit during transport. Understanding the parts of the MFP 18
-
 1
1 -
2
-
3
-
4
-
5
-
6
-
7
-
8
-
9
-
10
-
11
-
12
-
 13
13 -
 14
14 -
 15
15 -
 16
16 -
 17
17 -
 18
18 -
 19
19 -
 20
20 -
 21
21 -
 22
22 -
 23
23 -
24
-
25
-
26
-
27
-
28
-
29
-
30
-
31
-
32
-
33
-
34
-
35
-
36
-
37
-
38
-
39
-
40
-
41
-
42
-
43
-
44
-
45
-
46
-
47
-
48
-
49
-
50
-
51
-
52
-
53
-
54
-
55
-
56
-
57
-
58
-
59
-
60
-
61
-
62
-
63
-
64
-
65
-
66
-
67
-
68
-
69
-
70
-
71
-
72
-
73
-
74
-
75
-
76
-
77
-
78
-
79
-
80
-
81
-
82
-
83
-
84
-
85
-
86
-
87
-
88
-
89
-
90
-
91
-
92
-
93
-
94
-
95
-
96
-
97
-
98
-
99
-
100
-
101
-
102
-
103
-
104
-
105
 |
 |

Understanding the parts of the MFP
18
7
Front output tray
Hold paper as it exits the MFP.
8
Front cover
Access the toner cartridge.
9
Paper tray
Load paper automatically.
10
Manual feeder
Load paper manually.
11
Paper level indicator
Verify the level of paper in the paper tray.
12
Access button
Release the front cover.
13
Scanner glass
Scan, copy, or fax a single
–
page document.
14
Scanner lock
Lock the scanner unit during transport.
Use the
To