Lexmark 342n User's Guide - Page 90
FAX DEFAULTS, Prefix, Ready, Faxing on Setting up shortcuts on,
 |
UPC - 734646062015
View all Lexmark 342n manuals
Add to My Manuals
Save this manual to your list of manuals |
Page 90 highlights
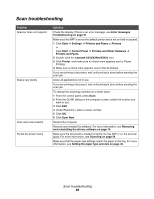
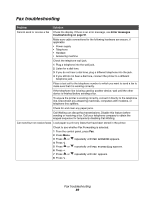
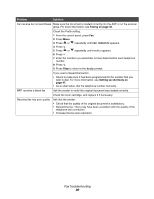
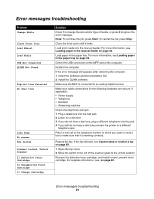
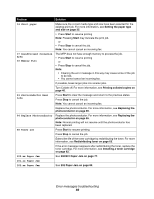
Problem Solution Can receive but not send faxes Make sure the document is loaded correctly into the ADF or on the scanner glass. For more information, see Faxing on page 42. Check the Prefix setting. 1 From the control panel, press Fax. 2 Press Menu. 3 Press or repeatedly until FAX DEFAULTS appears. 4 Press . 5 Press or repeatedly until Prefix appears. 6 Press . 7 Enter the numbers you would like to have dialed before each telephone number. 8 Press . 9 Press Stop to return to the Ready prompt. If you used a Speed Dial button: • Check to make sure it has been programmed for the number that you wish to dial. For more information, see Setting up shortcuts on page 47. • As an alternative, dial the telephone number manually. MFP receives a blank fax Ask the sender to verify the original document was loaded correctly. Check the toner cartridge, and replace it if necessary. Received fax has poor quality Ask that the sender: • Check that the quality of the original document is satisfactory. • Resend the fax. There may have been a problem with the quality of the telephone line connection. • Increase the fax scan resolution. Fax troubleshooting 90
-
 1
1 -
2
-
3
-
4
-
5
-
6
-
7
-
8
-
9
-
10
-
11
-
12
-
13
-
14
-
15
-
16
-
17
-
18
-
19
-
20
-
21
-
22
-
23
-
24
-
25
-
26
-
27
-
28
-
29
-
30
-
31
-
32
-
33
-
34
-
35
-
36
-
37
-
38
-
39
-
40
-
41
-
42
-
43
-
44
-
45
-
46
-
47
-
48
-
49
-
50
-
51
-
52
-
53
-
54
-
55
-
56
-
57
-
58
-
59
-
60
-
61
-
62
-
63
-
64
-
65
-
66
-
67
-
68
-
69
-
70
-
71
-
72
-
73
-
74
-
75
-
76
-
77
-
78
-
79
-
80
-
81
-
82
-
83
-
84
-
 85
85 -
 86
86 -
 87
87 -
 88
88 -
 89
89 -
 90
90 -
 91
91 -
 92
92 -
 93
93 -
 94
94 -
 95
95 -
96
-
97
-
98
-
99
-
100
-
101
-
102
-
103
-
104
-
105
 |
 |
