Lexmark 342n User's Guide - Page 89
Fax troubleshooting, FAX ADVANCED, Fax Forwarding
 |
UPC - 734646062015
View all Lexmark 342n manuals
Add to My Manuals
Save this manual to your list of manuals |
Page 89 highlights
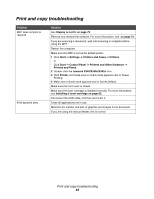
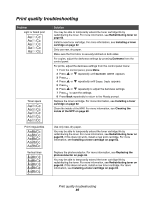
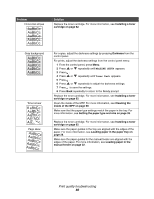
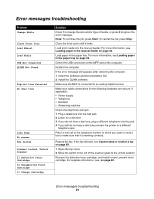
Fax troubleshooting Problem Solution Cannot send or receive a fax Check the display. If there is an error message, see Error messages troubleshooting on page 91. Make sure cable connections for the following hardware are secure, if applicable: • Power supply • Telephone • Handset • Answering machine Check the telephone wall jack. 1 Plug a telephone into the wall jack. 2 Listen for a dial tone. 3 If you do not hear a dial tone, plug a different telephone into the jack. 4 If you still do not hear a dial tone, connect the printer to a different telephone jack. Place a test call to the telephone number to which you want to send a fax to make sure that it is working correctly. If the telephone line is being used by another device, wait until the other device is finished before sending a fax. To ensure the printer is working correctly, connect it directly to the telephone line. Disconnect any answering machines, computers with modems, or telephone line splitters. Check for and clear any paper jams. Call Waiting can disrupt fax transmissions. Disable this feature before sending or receiving a fax. Call your telephone company to obtain the keypad sequence for temporarily disabling Call Waiting. Can send but not receive faxes Load paper to print any faxes that have been stored in the printer. Check to see whether Fax Forwarding is selected. 1 From the control panel, press Fax. 2 Press Menu. 3 Press or repeatedly until FAX ADVANCED appears. 4 Press . 5 Press or repeatedly until Fax Forwarding appears. 6 Press . 7 Press or repeatedly until Off appears. 8 Press . Fax troubleshooting 89
-
 1
1 -
2
-
3
-
4
-
5
-
6
-
7
-
8
-
9
-
10
-
11
-
12
-
13
-
14
-
15
-
16
-
17
-
18
-
19
-
20
-
21
-
22
-
23
-
24
-
25
-
26
-
27
-
28
-
29
-
30
-
31
-
32
-
33
-
34
-
35
-
36
-
37
-
38
-
39
-
40
-
41
-
42
-
43
-
44
-
45
-
46
-
47
-
48
-
49
-
50
-
51
-
52
-
53
-
54
-
55
-
56
-
57
-
58
-
59
-
60
-
61
-
62
-
63
-
64
-
65
-
66
-
67
-
68
-
69
-
70
-
71
-
72
-
73
-
74
-
75
-
76
-
77
-
78
-
79
-
80
-
81
-
82
-
83
-
 84
84 -
 85
85 -
 86
86 -
 87
87 -
 88
88 -
 89
89 -
 90
90 -
 91
91 -
 92
92 -
 93
93 -
 94
94 -
95
-
96
-
97
-
98
-
99
-
100
-
101
-
102
-
103
-
104
-
105
 |
 |
