Lexmark Interpret S409 Quick Reference Guide - Page 9
Using the printer control panel
 |
View all Lexmark Interpret S409 manuals
Add to My Manuals
Save this manual to your list of manuals |
Page 9 highlights
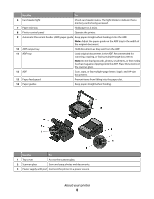
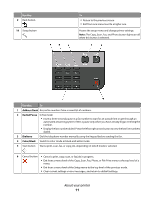
Use the 4 EXT Port 5 LINE Port To Connect additional devices (telephone or answering machine) to the printer and the telephone line. Use this port if you do not have a dedicated fax line for the printer, and if this connection method is supported in your country or region. Note: Remove the plug to access the port. Connect the printer to an active telephone line (through a standard wall jack, DSL filter, or VoIP adapter) to send and receive faxes. 6 USB port 7 Printhead access 8 Ink cartridge access 9 Scanner unit Connect the printer to a computer using a USB cable. Warning-Potential Damage: Do not touch the USB port except when plugging in or removing a USB cable or installation cable. Install the printhead. Note: The carrier moves to the printhead access area when no printhead is installed on the printer. For more information, see "Installing the printhead without the CD" on page 14. Install, replace, or remove ink cartridges. • Access the ink cartridges and printhead. • Remove paper jams. Using the printer control panel The following diagrams explain the sections of the printer control panel: About your printer 9
-
 1
1 -
2
-
3
-
 4
4 -
 5
5 -
 6
6 -
 7
7 -
 8
8 -
 9
9 -
 10
10 -
 11
11 -
 12
12 -
 13
13 -
 14
14 -
15
-
16
-
17
-
18
-
19
-
20
-
21
-
22
-
23
-
24
-
25
-
26
-
27
-
28
-
29
-
30
-
31
-
32
-
33
-
34
-
35
-
36
-
37
-
38
-
39
-
40
 |
 |
