Lexmark MX6500 User Guide - Page 20
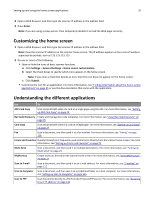
Customizing the home screen, Understanding the different applications, Enter, Settings
 |
View all Lexmark MX6500 manuals
Add to My Manuals
Save this manual to your list of manuals |
Page 20 highlights
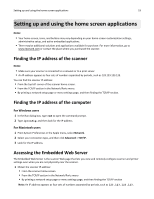
Setting up and using the home screen applications 20 2 Open a Web browser, and then type the scanner IP address in the address field. 3 Press Enter. Note: If you are using a proxy server, then temporarily disable it to load the Web page correctly. Customizing the home screen 1 Open a Web browser, and then type the scanner IP address in the address field. Note: View the scanner IP address on the scanner home screen. The IP address appears as four sets of numbers separated by periods, such as 123.123.123.123. 2 Do one or more of the following: • Show or hide the icons of basic scanner functions. a Click Settings > General Settings > Home screen customization. b Select the check boxes to specify which icons appear on the home screen. Note: If you clear a check box beside an icon, then the icon does not appear on the home screen. c Click Submit. • Customize the icon for an application. For more information, see "Finding information about the home screen applications" on page 21 or see the documentation that came with the application. Understanding the different applications Use To ADF Card Copy Scan and print both sides of a card on a single page using the ADF. For more information, see "Setting up ADF Card Copy" on page 24. Bar Code Discovery Create and manage bar code templates. For more information, see "Using Bar Code Discovery" on page 26. Card Copy Scan and print both sides of a card on a single page. For more information, see "Setting up Card Copy" on page 22. Fax Scan a document, and then send it to a fax number. For more information, see "Faxing" on page 119. Forms and Favorites Quickly find and print frequently used online forms directly from the scanner home screen. For more information, see "Setting up Forms and Favorites" on page 21. Multi Send Scan a document, and then send it to multiple destinations. For more information, see "Setting up Multi Send" on page 23. MyShortcut Create shortcuts directly on the scanner home screen. For more information, see "Using MyShortcut" on page 23. Scan to E‑mail Scan a document, and then send it to an e‑mail address. For more information, see "E-mailing" on page 112. Scan to Computer Scan a document, and then save it to a predefined folder on a host computer. For more information, see "Setting up Scan to Computer" on page 145. Scan to FTP Scan documents directly to a File Transfer Protocol (FTP) server. For more information, see "Scanning to an FTP address" on page 142.
-
 1
1 -
2
-
3
-
4
-
5
-
6
-
7
-
8
-
9
-
10
-
11
-
12
-
13
-
14
-
 15
15 -
 16
16 -
 17
17 -
 18
18 -
 19
19 -
 20
20 -
 21
21 -
 22
22 -
 23
23 -
 24
24 -
 25
25 -
26
-
27
-
28
-
29
-
30
-
31
-
32
-
33
-
34
-
35
-
36
-
37
-
38
-
39
-
40
-
41
-
42
-
43
-
44
-
45
-
46
-
47
-
48
-
49
-
50
-
51
-
52
-
53
-
54
-
55
-
56
-
57
-
58
-
59
-
60
-
61
-
62
-
63
-
64
-
65
-
66
-
67
-
68
-
69
-
70
-
71
-
72
-
73
-
74
-
75
-
76
-
77
-
78
-
79
-
80
-
81
-
82
-
83
-
84
-
85
-
86
-
87
-
88
-
89
-
90
-
91
-
92
-
93
-
94
-
95
-
96
-
97
-
98
-
99
-
100
-
101
-
102
-
103
-
104
-
105
-
106
-
107
-
108
-
109
-
110
-
111
-
112
-
113
-
114
-
115
-
116
-
117
-
118
-
119
-
120
-
121
-
122
-
123
-
124
-
125
-
126
-
127
-
128
-
129
-
130
-
131
-
132
-
133
-
134
-
135
-
136
-
137
-
138
-
139
-
140
-
141
-
142
-
143
-
144
-
145
-
146
-
147
-
148
-
149
-
150
-
151
-
152
-
153
-
154
-
155
-
156
-
157
-
158
-
159
-
160
-
161
-
162
-
163
-
164
-
165
-
166
-
167
-
168
-
169
-
170
-
171
-
172
-
173
-
174
-
175
-
176
-
177
-
178
-
179
-
180
-
181
-
182
-
183
-
184
-
185
-
186
-
187
-
188
-
189
-
190
-
191
-
192
-
193
-
194
-
195
-
196
-
197
-
198
-
199
-
200
-
201
-
202
-
203
-
204
-
205
-
206
-
207
-
208
-
209
-
210
-
211
-
212
-
213
-
214
-
215
-
216
-
217
-
218
-
219
-
220
-
221
-
222
-
223
-
224
-
225
-
226
-
227
-
228
-
229
-
230
-
231
-
232
-
233
-
234
-
235
-
236
-
237
-
238
-
239
-
240
-
241
-
242
-
243
-
244
-
245
-
246
-
247
-
248
-
249
-
250
-
251
-
252
-
253
-
254
-
255
-
256
-
257
-
258
-
259
-
260
-
261
-
262
-
263
-
264
-
265
-
266
-
267
-
268
-
269
-
270
-
271
-
272
-
273
-
274
-
275
-
276
-
277
-
278
-
279
-
280
-
281
-
282
-
283
-
284
-
285
-
286
-
287
-
288
-
289
-
290
-
291
-
292
-
293
-
294
-
295
-
296
-
297
-
298
-
299
-
300
-
301
-
302
-
303
-
304
-
305
-
306
-
307
-
308
-
309
-
310
-
311
-
312
-
313
-
314
-
315
-
316
-
317
-
318
-
319
-
320
-
321
-
322
-
323
-
324
-
325
-
326
-
327
-
328
-
329
-
330
-
331
-
332
-
333
-
334
-
335
-
336
-
337
-
338
-
339
-
340
-
341
-
342
-
343
-
344
-
345
-
346
-
347
-
348
-
349
-
350
-
351
-
352
-
353
-
354
-
355
-
356
-
357
-
358
-
359
-
360
-
361
-
362
-
363
-
364
-
365
-
366
-
367
-
368
-
369
-
370
-
371
-
372
-
373
-
374
-
375
-
376
-
377
-
378
-
379
-
380
-
381
-
382
-
383
-
384
-
385
-
386
-
387
-
388
-
389
-
390
-
391
-
392
-
393
-
394
 |
 |
