Lexmark MX6500 User Guide - Page 59
Connecting the scanner to a wireless network using Wi-Fi Protected Setup
 |
View all Lexmark MX6500 manuals
Add to My Manuals
Save this manual to your list of manuals |
Page 59 highlights
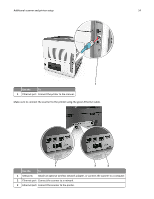
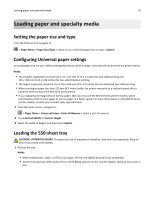
Additional scanner and printer setup 59 Connecting the scanner to a wireless network using Wi‑Fi Protected Setup Before you begin, make sure that: • The access point (wireless router) is Wi‑Fi Protected Setup (WPS) certified or WPS‑compatible. For more information, see the documentation that came with your access point. • A wireless network adapter installed in your scanner is attached and working properly. For more information, see the instruction sheet that came with the wireless network adapter. Using the Push Button Configuration method 1 From the scanner control panel, navigate to: > Network/Ports > Network [x] > Network [x] Setup > Wireless > Wireless Connection Setup > Wi‑Fi Protected Setup > Start Push Button Method 2 Follow the instructions on the scanner display. Using the Personal Identification Number (PIN) method 1 From the scanner control panel, navigate to: > Network/Ports > Network [x] > Network [x] Setup > Wireless > Wireless Connection Setup > Wi‑Fi Protected Setup > Start PIN Method 2 Copy the eight‑digit WPS PIN. 3 Open a Web browser, and then type the IP address of your access point in the address field. Notes: • The IP address appears as four sets of numbers separated by periods, such as 123.123.123.123. • If you are using a proxy server, then temporarily disable it to load the Web page correctly. 4 Access the WPS settings. For more information, see the documentation that came with your access point. 5 Enter the eight‑digit PIN, and then save the setting. Connecting the scanner to a wireless network using the Embedded Web Server Before you begin, make sure that: • Your scanner is connected temporarily to an Ethernet network. • A wireless network adapter is installed in your scanner and is working properly. For more information, see the instruction sheet that came with the wireless network adapter. 1 Open a Web browser, and then type the scanner IP address in the address field. Notes: • View the scanner IP address on the scanner control panel. The IP address appears as four sets of numbers separated by periods, such as 123.123.123.123. • If you are using a proxy server, then temporarily disable it to load the Web page correctly. 2 Click Settings > Network/Ports > Wireless.
-
 1
1 -
2
-
3
-
4
-
5
-
6
-
7
-
8
-
9
-
10
-
11
-
12
-
13
-
14
-
15
-
16
-
17
-
18
-
19
-
20
-
21
-
22
-
23
-
24
-
25
-
26
-
27
-
28
-
29
-
30
-
31
-
32
-
33
-
34
-
35
-
36
-
37
-
38
-
39
-
40
-
41
-
42
-
43
-
44
-
45
-
46
-
47
-
48
-
49
-
50
-
51
-
52
-
53
-
 54
54 -
 55
55 -
 56
56 -
 57
57 -
 58
58 -
 59
59 -
 60
60 -
 61
61 -
 62
62 -
 63
63 -
 64
64 -
65
-
66
-
67
-
68
-
69
-
70
-
71
-
72
-
73
-
74
-
75
-
76
-
77
-
78
-
79
-
80
-
81
-
82
-
83
-
84
-
85
-
86
-
87
-
88
-
89
-
90
-
91
-
92
-
93
-
94
-
95
-
96
-
97
-
98
-
99
-
100
-
101
-
102
-
103
-
104
-
105
-
106
-
107
-
108
-
109
-
110
-
111
-
112
-
113
-
114
-
115
-
116
-
117
-
118
-
119
-
120
-
121
-
122
-
123
-
124
-
125
-
126
-
127
-
128
-
129
-
130
-
131
-
132
-
133
-
134
-
135
-
136
-
137
-
138
-
139
-
140
-
141
-
142
-
143
-
144
-
145
-
146
-
147
-
148
-
149
-
150
-
151
-
152
-
153
-
154
-
155
-
156
-
157
-
158
-
159
-
160
-
161
-
162
-
163
-
164
-
165
-
166
-
167
-
168
-
169
-
170
-
171
-
172
-
173
-
174
-
175
-
176
-
177
-
178
-
179
-
180
-
181
-
182
-
183
-
184
-
185
-
186
-
187
-
188
-
189
-
190
-
191
-
192
-
193
-
194
-
195
-
196
-
197
-
198
-
199
-
200
-
201
-
202
-
203
-
204
-
205
-
206
-
207
-
208
-
209
-
210
-
211
-
212
-
213
-
214
-
215
-
216
-
217
-
218
-
219
-
220
-
221
-
222
-
223
-
224
-
225
-
226
-
227
-
228
-
229
-
230
-
231
-
232
-
233
-
234
-
235
-
236
-
237
-
238
-
239
-
240
-
241
-
242
-
243
-
244
-
245
-
246
-
247
-
248
-
249
-
250
-
251
-
252
-
253
-
254
-
255
-
256
-
257
-
258
-
259
-
260
-
261
-
262
-
263
-
264
-
265
-
266
-
267
-
268
-
269
-
270
-
271
-
272
-
273
-
274
-
275
-
276
-
277
-
278
-
279
-
280
-
281
-
282
-
283
-
284
-
285
-
286
-
287
-
288
-
289
-
290
-
291
-
292
-
293
-
294
-
295
-
296
-
297
-
298
-
299
-
300
-
301
-
302
-
303
-
304
-
305
-
306
-
307
-
308
-
309
-
310
-
311
-
312
-
313
-
314
-
315
-
316
-
317
-
318
-
319
-
320
-
321
-
322
-
323
-
324
-
325
-
326
-
327
-
328
-
329
-
330
-
331
-
332
-
333
-
334
-
335
-
336
-
337
-
338
-
339
-
340
-
341
-
342
-
343
-
344
-
345
-
346
-
347
-
348
-
349
-
350
-
351
-
352
-
353
-
354
-
355
-
356
-
357
-
358
-
359
-
360
-
361
-
362
-
363
-
364
-
365
-
366
-
367
-
368
-
369
-
370
-
371
-
372
-
373
-
374
-
375
-
376
-
377
-
378
-
379
-
380
-
381
-
382
-
383
-
384
-
385
-
386
-
387
-
388
-
389
-
390
-
391
-
392
-
393
-
394
 |
 |
