Lexmark X443 Setup and User's Guide - Page 75
Novell NetWare, NDPS Novell Distributed Print Services, Non-NDPS queue-based
 |
View all Lexmark X443 manuals
Add to My Manuals
Save this manual to your list of manuals |
Page 75 highlights
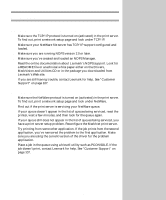
Novell NetWare On the Drivers, MarkVision and Utilities CD, look for a subdirectory named NDPS. This subdirectory contains the NDPS gateway files and all supporting documentation (README file and an instructional white paper). The default login name contains the characters !LEX plus the UAA of the MarkNet print server (for example, !LEX00200022012F). For information about choosing PSERVER or RPRINTER mode, look on the CD. Click View Documentation and look for the MarkNet link. NDPS (Novell Distributed Print Services) If you have MarkNet print servers in an NDPS environment, we recommend that you install the Lexmark NDPS IP Gateway. Your printers are integrated with NDPS so you can easily monitor, control and print to them. You can get the gateway plus all support files and installation procedures from the Lexmark Web site (www.lexmark.com) or from some versions of the Drivers, MarkVision and Utilities CD. Non-NDPS (queue-based) The easiest way to configure the print server for NetWare jobs in a non-NDPS environment is to use MarkVision. MarkVision can automatically create all the necessary NetWare objects (print queue objects, print server objects, and printer objects). Do the following from a Windows NT workstation running Novell NetWare Client32 software, or from a Windows 95 or Windows 98 workstation running either Novell Client32 or Microsoft Client for NetWare networks. 1 Install the NetWare software component on the workstation. Look on the Drivers, MarkVision and Utilities CD for the software. (Hint: Do a custom install to add network support, and select NetWare.) 2 Launch MarkVision. In the MarkVision main window, find the new network printer. Look for the line item containing your print server's physical address (the MSB form of the print server UAA). 3 Double-click the network printer. Configure the MarkNet print server by doing the following: a Set a unique NetWare login name. This is the name the print server uses to log in to the NetWare server. b Enable the MarkNet print server port. c Select PSERVER mode. • To manage NDS queues, specify the NDS tree and context where the MarkNet print server is defined. Afterwards, create or select queues to be serviced. • To manage bindery queues, specify the file servers. Afterwards, create or select queues to be serviced. 4 If prompted to reset the print server, select Yes to immediately begin servicing the queues. 67
-
 1
1 -
2
-
3
-
4
-
5
-
6
-
7
-
8
-
9
-
10
-
11
-
12
-
13
-
14
-
15
-
16
-
17
-
18
-
19
-
20
-
21
-
22
-
23
-
24
-
25
-
26
-
27
-
28
-
29
-
30
-
31
-
32
-
33
-
34
-
35
-
36
-
37
-
38
-
39
-
40
-
41
-
42
-
43
-
44
-
45
-
46
-
47
-
48
-
49
-
50
-
51
-
52
-
53
-
54
-
55
-
56
-
57
-
58
-
59
-
60
-
61
-
62
-
63
-
64
-
65
-
66
-
67
-
68
-
69
-
 70
70 -
 71
71 -
 72
72 -
 73
73 -
 74
74 -
 75
75 -
 76
76 -
 77
77 -
 78
78 -
 79
79 -
 80
80 -
81
-
82
-
83
-
84
-
85
-
86
-
87
-
88
-
89
-
90
-
91
-
92
-
93
-
94
-
95
-
96
-
97
-
98
-
99
-
100
-
101
-
102
-
103
-
104
-
105
-
106
-
107
-
108
-
109
-
110
-
111
-
112
-
113
-
114
-
115
-
116
-
117
-
118
-
119
-
120
-
121
-
122
-
123
 |
 |
