Lexmark X750e MFP X4500 Option Setup Guide
Lexmark X750e Manual
 |
View all Lexmark X750e manuals
Add to My Manuals
Save this manual to your list of manuals |
Lexmark X750e manual content summary:
- Lexmark X750e | MFP X4500 Option Setup Guide - Page 1
MFP X4500 Option Setup Guide April 2002 - Lexmark X750e | MFP X4500 Option Setup Guide - Page 2
English - Lexmark X750e | MFP X4500 Option Setup Guide - Page 3
of operation in conjunction with other products, programs, or services, except those expressly designated by the manufacturer, are the user's responsibility. Lexmark and Lexmark with diamond design are trademarks of Lexmark International, Inc., registered in the United States and/or other - Lexmark X750e | MFP X4500 Option Setup Guide - Page 4
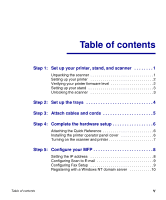
and scanner 1 Unpacking the scanner 1 Setting up your printer 2 Verifying your printer firmware level 2 Setting up your stand 3 Unlocking the scanner Reference 6 Installing the printer operator panel cover 6 Turning on the scanner and printer 7 Step 5: Configure your MFP 8 Setting the IP - Lexmark X750e | MFP X4500 Option Setup Guide - Page 5
print job to the MFP 12 Maintaining your MFP 13 Cleaning the touch screen 13 Cleaning the scanner bed 13 Paper feeding problems 14 Cleaning the feeding rollers and pick pad 15 Replacing the pick pad assembly 16 Moving the scanner 17 Document Distributor 18 Troubleshooting 19 Notices 20 - Lexmark X750e | MFP X4500 Option Setup Guide - Page 6
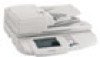
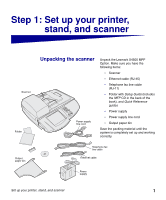
printer, stand, and scanner Scanner Folder Output paper bin Unpacking the scanner Power supply line cord Unpack the Lexmark X4500 MFP Option. Make sure you have the following items: • Scanner • Ethernet cable (RJ-45) • Telephone fax line cable (RJ-11) • Folder with Setup Guide (includes the MFP - Lexmark X750e | MFP X4500 Option Setup Guide - Page 7
to http://support.lexmark.com. 2 Select your country and language. 3 Under Multifunction Printers, select X4500 MFP option. 4 Click Go. 5 Select X4500 Minimum Requirements. Verify that the firmware level listed matches your printer firmware. If they do not match, follow the instructions on the Web - Lexmark X750e | MFP X4500 Option Setup Guide - Page 8
did not purchase a stand and you plan to position the scanner on top of the Lexmark™ C750 Finisher for MFP, refer to the instructions that came with the finisher. Unlocking the scanner 1 Make sure the printer is turned off and unplugged. 2 Unlock your scanner: a Locate the lock switch on the right - Lexmark X750e | MFP X4500 Option Setup Guide - Page 9
to the scanner before it is shipped. 1 Attach the output paper bin to the automatic document feeder. 2 Lift the document feed tray and snap the support bar into the top of the scanner lid. Output paper bin Document feed tray 4 Set up the trays - Lexmark X750e | MFP X4500 Option Setup Guide - Page 10
is turned on. 1 Make sure the printer and scanner are turned off and unplugged. 2 Connect the end of the Ethernet cable with the toroid to provided by Lexmark. 5 Connect the power supply to the scanner. 6 Connect the power supply line cord to the power supply, but do not plug the other end into an - Lexmark X750e | MFP X4500 Option Setup Guide - Page 11
backing off of the adhesive strip on the back of the Quick Reference. 2 Press the Quick Reference into place above the touch screen. Installing the printer Please refer to the instructions that came operator panel cover with operator panel cover. 6 Complete the hardware setup - Lexmark X750e | MFP X4500 Option Setup Guide - Page 12
Turning on the scanner and printer 1 Plug the printer and the power supply line cord into properly grounded electrical outlets. 2 Turn the printer on. 3 Turn on the scanner. The MFP requires time to warm up after you turn it on. After the MFP completes its tests, the Home screen is displayed on - Lexmark X750e | MFP X4500 Option Setup Guide - Page 13
assign one manually if you do not have DHCP: 1 From the Home screen, touch the Key icon, and then touch System Configuration. 2 Under Printer/Print Server, address, you can use your Web browser to remotely view and manage the MFP. Type the IP address in the URL field of the browser (for example, - Lexmark X750e | MFP X4500 Option Setup Guide - Page 14
1 Type the MFP IP address in your browser URL field (for example, http://192.168.236.24), and then press Enter. 2 Click Configuration. 3 Click Scan to E-mail General Setup. 4 Type the SMTP gateway of your network or Internet service provider in the appropriate field. Specify a default e-mail address - Lexmark X750e | MFP X4500 Option Setup Guide - Page 15
NT Authentication as a way of restricting or tracking access to your MFP, you must first register the device with a Windows NT domain. Contact Note: In order to register the MFP with a Windows NT domain, you must have an administrator account name and password for the intended domain. Touch the - Lexmark X750e | MFP X4500 Option Setup Guide - Page 16
automatic document feeder: 1 Place your document face down in the automatic document feeder. 2 Press the green Start button to the right of the touch screen, (Copy is the default setting for the MFP). 3 Touch Done. Sending a test fax Send a one-page test fax to a known fax machine: 1 From the Home - Lexmark X750e | MFP X4500 Option Setup Guide - Page 17
Touch Send It or press Start to scan and send the document. 5 Touch Done. Sending a network print job to the MFP Use a computer application to send a network print job to your MFP. Consult your printer documentation for assistance with setting up a computer for network printing. 12 Verify setup - Lexmark X750e | MFP X4500 Option Setup Guide - Page 18
Cleaning the touch screen Warning! Do not spray the touch screen with water or glass cleaner. Liquid can damage the MFP. 1 Dampen a clean, lint-free cotton cloth with water. 2 Wipe the touch screen. Cleaning the scanner bed 1 Dampen a clean, lint-free cotton cloth with water. 2 Open - Lexmark X750e | MFP X4500 Option Setup Guide - Page 19
If you are experiencing paper feed problems, such as: • The scanner problems, you may have to replace the pick pad, see "Replacing the pick pad assembly" on page 16. If you are still having problems after replacing the pick pad assembly, go to the Lexmark support Web site at http://support.lexmark - Lexmark X750e | MFP X4500 Option Setup Guide - Page 20
wipe the pick pad face with the damp cloth 6 Close the automatic document feeder. 7 Plug in the scanner and turn it back on. Maintaining your MFP 15 - Lexmark X750e | MFP X4500 Option Setup Guide - Page 21
problems with multiple sheets of paper feeding through the automatic document feeder, you may need to replace the pick pad assembly. To order a replacement pick pad assembly, go to the Lexmark support Web site at http://support.lexmark the scanner in and turn it back on. 16 Maintaining your MFP - Lexmark X750e | MFP X4500 Option Setup Guide - Page 22
the scanner off. 3 Move the locking switch on the right side of the scanner to the locked position and close the scanner lid. Maintaining your MFP 17 - Lexmark X750e | MFP X4500 Option Setup Guide - Page 23
shortcuts with your personal scan settings so you can quickly scan documents back to your computer. Document Distributor is a software package available from Lexmark for use with your MFP. The Document Distributor software lets you automate the scanning process and streamline your document workflow - Lexmark X750e | MFP X4500 Option Setup Guide - Page 24
Troubleshooting Problem The touch screen is blank and does not respond to touches. . • If you are still having problems, contact Lexmark customer support at http://support.lexmark.com. • Touch the Copy icon. Follow the instructions on the screen. • Make sure the printer is plugged in and turned on. - Lexmark X750e | MFP X4500 Option Setup Guide - Page 25
or repairs, other than those described in the operating instructions, to a professional service person. • This product is designed, tested, and approved to meet strict global safety standards with the use of specific Lexmark components. The safety features of some parts may not always be obvious - Lexmark X750e | MFP X4500 Option Setup Guide - Page 26
energy and, if not installed and used in accordance with the instruction manual, may cause harmful interference to radio communications. Operation of this to this equipment. Unauthorized changes or modifications could void the user's authority to operate this equipment. Industry Canada This Class - Lexmark X750e | MFP X4500 Option Setup Guide - Page 27
telephone cord is provided with this equipment. Refer to the setup documentation for instructions about connecting the fax telephone cable. If you experience problems with this equipment that you cannot resolve, contact Lexmark International, Inc., for repair and warranty information. If the - Lexmark X750e | MFP X4500 Option Setup Guide - Page 28
the equipment will operate to the user's satisfaction. Before installing this equipment, users should ensure that it is permissible to aware that compliance with the above conditions may not prevent degradation of service in some situations. Repairs to certified equipment should be coordinated by a - Lexmark X750e | MFP X4500 Option Setup Guide - Page 29
authority, or electrician, as appropriate. Users should ensure for their own protection Telephone Network (PSTN). This applies to all X4500 MFP Options which bear the following mark: This equipment is event of problems, you should contact your equipment supplier. Lexmark does not currently - Lexmark X750e | MFP X4500 Option Setup Guide - Page 30
does it imply that any product is compatible with all of Telecom's network services. Warning! No "111" or other calls can be made from this device receipt of ringing. If a charge for local calls is unacceptable, the Dial button should not be used for local calls. Only the seven digits of the local - Lexmark X750e | MFP X4500 Option Setup Guide - Page 31
26 Notices - Lexmark X750e | MFP X4500 Option Setup Guide - Page 32
Português - Lexmark X750e | MFP X4500 Option Setup Guide - Page 33
, Kentucky 40550, USA. No Reino Unido e na Irlanda, envie os comentários para Lexmark International Ltd., Marketing and Services Department, Westhorpe House, Westhorpe, Marlow Bucks SL7 3RQ. A Lexmark poderá utilizar ou distribuir informações por você fornecidas na forma que considerar apropriada - Lexmark X750e | MFP X4500 Option Setup Guide - Page 34
digitalizador 1 Instalando a impressora 2 Verificando o nível de firmware da impressora 2 Instalando o suporte 2 Destravando o digitalizador .6 Ligando o digitalizador e a impressora 7 Etapa 5: Configurar o MFP 8 Configurando o endereço IP 8 Configurando Digitalização para email 9 - Lexmark X750e | MFP X4500 Option Setup Guide - Page 35
de teste 11 Enviando um fax de teste 11 Enviando um e-mail de teste 12 Enviando um trabalho de impressão de rede para o MFP . . .12 Fazendo a manutenção do MFP 13 Limpando a tela de toque 13 Limpando a mesa do digitalizador 13 Problemas com a alimentação de papel 14 Limpando os roletes de - Lexmark X750e | MFP X4500 Option Setup Guide - Page 36
, o suporte e o digitalizador Digitalizador Pasta Bandeja de saída de papel Desembalando o digitalizador Cabo da fonte de alimentação Desembale a opção MFP da Lexmark X4500. Verifique se você tem os seguintes itens: • Digitalizador • Cabo Ethernet (RJ-45) • Cabo da linha telefônica do fax - Lexmark X750e | MFP X4500 Option Setup Guide - Page 37
os equipamentos a tomadas adequadamente aterradas e ligá-los. Verificando o nível de firmware da impressora Para verificar o nível mínimo de firmware necessário para que o MFP funcione: 1 Vá para http://support.lexmark.com. 2 Selecione seu país e idioma. 3 Em Impressoras multifuncionais, selecione - Lexmark X750e | MFP X4500 Option Setup Guide - Page 38
ções que acompanham o suporte. Se você não comprou um suporte e planeja posicionar o digitalizador na parte superior do Encadernador Lexmark™ C750 para MFP, consulte as instruções fornecidas com o encadernador. Destravando o digitalizador 1 Verifique se a impressora está desligada e desconectada - Lexmark X750e | MFP X4500 Option Setup Guide - Page 39
Etapa 2: Instalar as bandejas Observação: O alimentador automático de documentos e a bandeja de alimentação de documentos são fixados ao digitalizador antes de ser transportado. 1 Fixe a bandeja de saída de papel ao alimentador automático de documentos. 2 Levante a bandeja de alimentação de - Lexmark X750e | MFP X4500 Option Setup Guide - Page 40
o cabo padrão compatível com a sua rede à porta 2 Ethernet do digitalizador e, a seguir, à conexão da rede. Este cabo não é fornecido pela Lexmark. 5 Conecte a fonte de alimentação ao digitalizador. 6 Conecte o cabo da fonte de alimentação à fonte de alimentação, mas não conecte a outra ponta em - Lexmark X750e | MFP X4500 Option Setup Guide - Page 41
Etapa 4: Concluir a instalação de hardware Colando a Referência rápida 1 Retire a proteção da faixa adesiva atrás da Referência rápida. 2 Pressione a Referência rápida no local acima da tela de toque. Instalando a tampa do painel do operador da impressora Consulte as instruções que acompanham a - Lexmark X750e | MFP X4500 Option Setup Guide - Page 42
de força da impressora a uma tomada elétrica adequadamente aterrada. 2 Ligue a impressora. 3 Ligue o digitalizador. O MFP demora algum tempo para aquecer-se após ter sido ligado. Depois que o MFP termina seus testes, a tela inicial é exibida na tela de toque. Concluir a instalação de hardware 7 - Lexmark X750e | MFP X4500 Option Setup Guide - Page 43
exigir assistência do administrador de rede. Configurando o endereço IP Você precisa ter um endereço IP para que os dispositivos de rede encontrem o MFP na rede. Se sua rede tiver DHCP ativo, os valores apropriados de endereço serão atribuídos automaticamente. Para confirmar o seu endereço IP ou - Lexmark X750e | MFP X4500 Option Setup Guide - Page 44
ou na primeira página da transmissão. Utilize o navegador da Web para configurar as informações necessárias para o fax: 1 Digite o endereço IP do MFP no campo de URL do navegador (por exemplo, http://192.168.236.24) e pressione Enter. 2 Clique em Configuração e, a seguir, clique em Configuração do - Lexmark X750e | MFP X4500 Option Setup Guide - Page 45
do Windows NT como maneira de restringir ou controlar o acesso ao seu MFP, em primeiro lugar você deve registrar o aparelho com um domínio ência com o registro no domínio do Windows NT. Observação: Para registrar o MFP com um domínio Windows NT, você precisa ter um nome de conta de administrador - Lexmark X750e | MFP X4500 Option Setup Guide - Page 46
o documento virado para baixo no alimentador automático de documentos. 2 Pressione o botão verde Iniciar à direita da tela de toque (Cópia é a configuração padrão para o MFP). 3 Toque Concluído. Enviando um fax de teste Envie um fax de teste de uma página para um número de fax conhecido: 1 Na tela - Lexmark X750e | MFP X4500 Option Setup Guide - Page 47
para enviar o documento. 5 Toque Concluído. Enviando um trabalho de impressão de rede para o MFP Utilize uma aplicação de computador para enviar um trabalho de impressão de rede para o seu MFP. Consulte a documentação da impressora para obter assistência ao configurar um computador para impress - Lexmark X750e | MFP X4500 Option Setup Guide - Page 48
Limpando a tela de toque Aviso! Não borrife água ou limpa-vidros na tela de toque. O líquido pode danificar o MFP. 1 Umedeça com água um pano de algodão limpo e sem fiapos. 2 Limpe a tela de toque. Limpando a mesa do digitalizador 1 Umedeça com água um pano de algodão - Lexmark X750e | MFP X4500 Option Setup Guide - Page 49
"Recolocando o conjunto do protetor de tracionamento" na página 16. Se ainda estiver tendo problemas depois de substituir o conjunto do protetor de tracionamento, vá para o suporte da Lexmark no site da Web em http://support.lexmark.com para obter mais informações. 14 Fazendo a manutenção do - Lexmark X750e | MFP X4500 Option Setup Guide - Page 50
o pano até que fique limpo. 5 Limpe cuidadosamente o protetor de tracionamento com o pano úmido 6 Feche o alimentador automático de documentos. 7 Conecte o digitalizador e ligue-o. Fazendo a manutenção do MFP 15 - Lexmark X750e | MFP X4500 Option Setup Guide - Page 51
do conjunto de protetor de tracionamento, vá para o site de suporte da Lexmark na Web em http://support.lexmark.com. O código da peça para o conjunto de protetor de tracionamento é 5 Feche o alimentador automático de documentos. 6 Conecte o digitalizador e ligue-o. 16 Fazendo a manutenção do MFP - Lexmark X750e | MFP X4500 Option Setup Guide - Page 52
ção atingir o lado extremo direito do vidro do digitalizador, desligue-o. 3 Mova a trava do lado direito do digitalizador para a posição travada e feche a tampa. Trava Fazendo a manutenção do MFP 17 - Lexmark X750e | MFP X4500 Option Setup Guide - Page 53
possa digitalizar rapidamente documentos de volta para o computador. O Document Distributor é um pacote de software disponível a partir da Lexmark para uso com o seu MFP. O software Document Distributor permite que você automatize o processo de digitalização e simplifique o seu fluxo de trabalho com - Lexmark X750e | MFP X4500 Option Setup Guide - Page 54
. Para obter mais informações, consulte "Fazendo a manutenção do MFP" na página 13. • Abra a porta do alimentador automático • Se ainda tiver problemas, entre em contato com o suporte ao cliente Lexmark em http://support.lexmark.com. Meu trabalho de impressão na rede não está sendo impresso. - Lexmark X750e | MFP X4500 Option Setup Guide - Page 55
ça relacionados ao uso de componentes específicos da Lexmark. Nem sempre os recursos de segurança de algumas peças são claramente indicados. A Lexmark não se responsabiliza pela utilização de peças de aviso identifica algo que pode danificar o hardware ou o software do sistema MFP. 20 Avisos - Lexmark X750e | MFP X4500 Option Setup Guide - Page 56
PSTN, Public Switched Telephone Network). Isso se aplica a todos os MFPs da X4500 que possuem a seguinte marca: Este equipamento foi projetado para , entre em contato com o fornecedor do equipamento. A Lexmark atualmente não tem conhecimento de dificuldades interoperacionais para os seguintes - Lexmark X750e | MFP X4500 Option Setup Guide - Page 57
22 Avisos - Lexmark X750e | MFP X4500 Option Setup Guide - Page 58
Français - Lexmark X750e | MFP X4500 Option Setup Guide - Page 59
40550, Etats-Unis. Au Royaume-Uni et en République d'Irlande, adressez vos commentaires à Lexmark International Ltd., Marketing and Services Department, Westhorpe House, Westhorpe, Marlow Bucks SL7 3RQ. Lexmark est libre d'utiliser ou de diffuser les informations qui lui sont communiquées de la mani - Lexmark X750e | MFP X4500 Option Setup Guide - Page 60
version du microcode de l'imprimante . . . . . .2 Installation du support 3 Déverrouillage du scanner 3 Etape 2 : Installation des tiroirs 4 Etape de l'imprimante et du scanner 7 Etape 5 : Configuration de l'imprimante MFP 8 Définition de l'adresse IP 8 Configuration de la numérisation vers - Lexmark X750e | MFP X4500 Option Setup Guide - Page 61
de test 11 Envoi d'un fax de test 11 Envoi d'un e-mail de test 12 Envoi d'un travail d'impression réseau à l'imprimante MFP . .12 Maintenance de l'imprimante MFP 13 Nettoyage de l'écran tactile 13 Nettoyage de la surface de numérisation du scanner . . . . . .13 Problèmes d'alimentation de - Lexmark X750e | MFP X4500 Option Setup Guide - Page 62
, du support et du scanner Scanner Pochette Réceptacle de sortie du papier Déballage du scanner Déballez l'option X4500 de l'imprimante MFP. Vérifiez que vous disposez des éléments suivants : • Scanner • Câble Ethernet (RJ-45) • Câble téléphonique du fax (RJ-11) • Pochette avec le Guide - Lexmark X750e | MFP X4500 Option Setup Guide - Page 63
suit pour vérifier la version de microcode minimum à utiliser afin que votre imprimante MFP fonctionne correctement : 1 Consultez le site Web de Lexmark à l'adresse suivante : http://support.lexmark.com. 2 Sélectionnez le pays et la langue souhaités. 3 Sous Imprimantes multifonction, sélectionnez - Lexmark X750e | MFP X4500 Option Setup Guide - Page 64
assembler et fixer le support à l'imprimante, reportez-vous aux instructions fournies avec ce support. Si vous ne vous êtes pas procuré de support et que vous pensez placer le scanner sur l'unité de finition Lexmark™ C750 pour imprimante MFP, reportez-vous aux instructions fournies avec cette unit - Lexmark X750e | MFP X4500 Option Setup Guide - Page 65
Etape 2 : Installation des tiroirs Remarque : Le scanner est livré avec le dispositif d'alimentation automatique de document et le plateau d'alimentation installés. 1 Fixez le réceptacle de sortie du papier sur le dispositif d'alimentation automatique de document. 2 Soulevez le plateau d' - Lexmark X750e | MFP X4500 Option Setup Guide - Page 66
réseau pour le port Ethernet 2 du scanner, puis branchez l'autre extrémité du câble sur un connecteur réseau. Ce câble n'est pas fourni par Lexmark. 5 Branchez le bloc d'alimentation sur le scanner. 6 Branchez le cordon sur le bloc d'alimentation, mais ne branchez pas l'autre extrémité sur une prise - Lexmark X750e | MFP X4500 Option Setup Guide - Page 67
Carte de référence rapide pour la positionner correctement au-dessus de l'écran tactile. Installation du cache du panneau de commandes de l'imprimante Reportez-vous aux instructions fournies avec le cache du panneau de commandes. 6 Installation du matériel - Lexmark X750e | MFP X4500 Option Setup Guide - Page 68
le cordon d'alimentation sur une prise électrique correctement reliée à la terre. 2 Mettez l'imprimante sous tension. 3 Mettez le scanner sous tension. L'imprimante MFP nécessite un temps de préchauffage après sa mise sous tension. Lorsque l'imprimante a terminé ses tests, l'écran Accueil s'affiche - Lexmark X750e | MFP X4500 Option Setup Guide - Page 69
votre administrateur réseau. Définition de l'adresse IP Vous devez disposer d'une adresse IP pour les périphériques réseau afin de localiser l'imprimante MFP sur le réseau. Si vous disposez du protocole DHCP, les valeurs spécifiques à l'adresse sont automatiquement attribuées. Pour vérifier votre - Lexmark X750e | MFP X4500 Option Setup Guide - Page 70
la première page transmise. Utilisez votre navigateur Web pour définir les informations requises relatives au fax. 1 Tapez l'adresse IP de votre imprimante MFP dans la zone d'adresse du navigateur (par exemple, http://192.168.236.24), puis appuyez sur Entrée. 2 Cliquez sur Configuration, puis sur - Lexmark X750e | MFP X4500 Option Setup Guide - Page 71
de mode. Enregistrement auprès d'un serveur de domaine Windows NT Si vous souhaitez utiliser l'authentification Windows NT pour limiter l'accès à votre imprimante MFP ou consigner ces événements, vous devez au préalable enregistrer ce périphérique auprès d'un domaine Windows NT. Contactez votre - Lexmark X750e | MFP X4500 Option Setup Guide - Page 72
alimentation automatique. 2 Appuyez sur la touche verte Démarrer située à droite de l'écran tactile (le mode Copie est le paramètre par défaut pour l'imprimante MFP). 3 Appuyez sur Terminé. Envoi d'un fax de test Envoyez un fax d'une page en guise de test à un numéro de fax souvent utilisé. 1 Sur - Lexmark X750e | MFP X4500 Option Setup Guide - Page 73
envoyer le document. 5 Appuyez sur Terminé. Envoi d'un travail d'impression réseau à l'imprimante MFP Utilisez une application logicielle pour envoyer un travail d'impression réseau à votre imprimante MFP. Consultez la documentation de votre imprimante pour obtenir de plus amples informations sur - Lexmark X750e | MFP X4500 Option Setup Guide - Page 74
Nettoyage de l'écran tactile Avertissement ! Ne vaporisez ni eau ni nettoyant pour vitres sur l'écran tactile au risque d'endommager votre imprimante MFP. 1 Utilisez un chiffon propre, non pelucheux et légèrement humidifié avec de l'eau. 2 Nettoyez l'écran tactile. Nettoyage de la surface de num - Lexmark X750e | MFP X4500 Option Setup Guide - Page 75
en vous reportant à la section « Remplacement du tampon » page 16. Si les problèmes persistent après avoir remplacé le tampon, consultez le site Web du support Lexmark à l'adresse suivante : http://support.lexmark.com. 14 Maintenance de l'imprimante - Lexmark X750e | MFP X4500 Option Setup Guide - Page 76
écaution le tampon à l'aide d'un chiffon humide. 6 Fermez le dispositif d'alimentation automatique de document. 7 Rebranchez le scanner, puis remettez-le sous tension. Maintenance de l'imprimante MFP 15 - Lexmark X750e | MFP X4500 Option Setup Guide - Page 77
tampon de rechange, consultez le site Web du support Lexmark à l'adresse suivante : http://support.lexmark.com. La référence du tampon de rechange est nouveau tampon par les pinces, puis placez-le avec précaution dans le support prévu à cet effet. 5 Fermez le dispositif d'alimentation automatique de - Lexmark X750e | MFP X4500 Option Setup Guide - Page 78
ce dernier hors tension. 3 Déplacez le bouton de verrouillage vers la droite du scanner pour verrouiller ce dernier, puis refermez le capot. Maintenance de l'imprimante MFP 17 - Lexmark X750e | MFP X4500 Option Setup Guide - Page 79
afin que vous puissiez rapidement numériser des documents vers votre ordinateur. Document Distributor est un logiciel destiné à votre MFP disponible auprès de Lexmark. Le logiciel Document Distributor vous permet d'automatiser le processus de numérisation et de simplifier le traitement des documents - Lexmark X750e | MFP X4500 Option Setup Guide - Page 80
le support client de Lexmark à l'adresse suivante : http://support.lexmark.com. • Appuyez sur l'icône représentant une copie. Suivez les instructions à informations, reportez-vous à la section « Maintenance de l'imprimante MFP » page 13. • Ouvrez la porte du dispositif d'alimentation automatique - Lexmark X750e | MFP X4500 Option Setup Guide - Page 81
accès. • Pour tout dépannage ou réparation autres que ceux décrits dans le guide d'utilisation, adressez-vous à un technicien spécialisé. • Ce produit est con des composants Lexmark spécifiques. Les fonctions de sécurité de certaines pièces ne sont pas toujours évidentes. Lexmark n'est MFP. 20 Avis - Lexmark X750e | MFP X4500 Option Setup Guide - Page 82
nécessaires pour y remédier. Une déclaration de conformité à la Directive a été signée par le Directeur de la fabrication et du support technique, Lexmark International, S.A., Boigny, France. Ce produit satisfait aux limites de Classe A EN 55022 et aux exigences de sécurité EN 60950. Homologation - Lexmark X750e | MFP X4500 Option Setup Guide - Page 83
le respect des conditions ci-dessus n'empêche pas la dégradation du service dans certains cas. Toute réparation d'un équipement homologué doit être téléphonique public commuté (RTPC). Il s'applique à toutes les imprimantes MFP avec option X4500 qui portent la marque suivante : Cet appareil est con - Lexmark X750e | MFP X4500 Option Setup Guide - Page 84
ème d'interopérabilité n'a été rapporté à Lexmark jusqu'à présent pour les pays suivants : Autriche France Grèce Portugal Espagne Belgique Allemagne Islande Suède Norvège Danemark Luxembourg Irlande Royaume-Uni Finlande Pays-Bas Italie Suisse Utilisation de l'imprimante MFP avec option X4500 en - Lexmark X750e | MFP X4500 Option Setup Guide - Page 85
24 Avis - Lexmark X750e | MFP X4500 Option Setup Guide - Page 86
Deutsch - Lexmark X750e | MFP X4500 Option Setup Guide - Page 87
und Irland richten Sie Ihre Kommentare an Lexmark International Ltd., Marketing and Services Department, Westhorpe House, Westhorpe, Marlow Bucks SL7 3RQ. Lexmark darf alle von Ihnen bereitgestellten Informationen in jeder von Lexmark als angemessen erachteten Weise verwenden oder verbreiten - Lexmark X750e | MFP X4500 Option Setup Guide - Page 88
Auspacken des Scanners 1 Einrichten des Druckers 2 Überprüfen der Version der Drucker-Firmware 2 Aufstellen des Gestells 3 Entsperren des Scanners 3 Schritt 2: Anbringen der Fächer Scanner und Drucker 7 Schritt 5: Konfigurieren des MFP 8 Festlegen der IP-Adresse 8 Konfigurieren der Funktion - Lexmark X750e | MFP X4500 Option Setup Guide - Page 89
eines Testfaxes 11 Senden einer Test-E-Mail 12 Senden eines Netzwerkdruckauftrags an den MFP 12 Wartung des MFP 13 Reinigen des Touchscreens 13 Reinigen des Scanner-Flachbetts 13 Probleme beim Papiereinzug 14 Reinigen der Transportrollen und des Einzugspolsters . . . . .15 Austauschen des - Lexmark X750e | MFP X4500 Option Setup Guide - Page 90
Scanner Scanner Umschlag Papierablage Auspacken des Scanners Netzkabel Packen Sie die Lexmark X4500 MFPOption aus. Überprüfen Sie, ob folgende Teile 11) • Umschlag mit Installationshandbuch (hinten im Buch ist die MFP-CD eingelegt) und Kurzanleitungen • Netzteil • Netzkabel • Papierablage - Lexmark X750e | MFP X4500 Option Setup Guide - Page 91
geerdete Steckdosen stecken und die Geräte einschalten. Überprüfen der Version der Drucker-Firmware So ermitteln Sie die für die Funktion des MFP erforderliche MindestFirmwareversion: 1 Wechseln Sie zur URL http://support.lexmark.com. 2 Wählen Sie Ihr Land und Ihre Sprache aus. 3 Wählen Sie unter - Lexmark X750e | MFP X4500 Option Setup Guide - Page 92
die Anweisungen auf der Website zum Aktualisieren der Firmware. Aufstellen des Gestells Im Lieferumfang Ihres Druckers sind Wenn Sie kein Gestell erworben haben und den Scanner oben auf dem Lexmark™ C750 Finisher für MFP anbringen möchten, lesen Sie die im Lieferumfang des Finishers enthaltenen - Lexmark X750e | MFP X4500 Option Setup Guide - Page 93
Schritt 2: Anbringen der Fächer Hinweis: Die automatische Dokumentzuführung und das Papierfach werden bereits vor Auslieferung am Scanner angebracht. 1 Bringen Sie die Papierablage an der automatischen Dokumentzuführung an. 2 Heben Sie das Papierfach an, und lassen Sie die Stütze oben an der - Lexmark X750e | MFP X4500 Option Setup Guide - Page 94
Schließen Sie das Ende des Ethernet-Kables mit dem Ferritkern an den EthernetAnschluß 1 des Scanners an. Schließen Sie das andere Ende an den Drucker an. und dann an einen Netzwerkanschluß an. Dieses Kabel wird nicht von Lexmark bereitgestellt. 5 Schließen Sie das Netzteil an den Scanner an. - Lexmark X750e | MFP X4500 Option Setup Guide - Page 95
Schritt 4: Abschließen der Hardwarekonfiguration Anbringen der Kurzanleitung 1 Lösen Sie die Schutzfolie von dem selbstklebenden Streifen auf der Rückseite der Kurzanleitung. 2 Plazieren Sie die Kurzanleitung über dem Touchscreen, und drücken Sie sie fest an. Anbringen der Bedienerkonsolen- - Lexmark X750e | MFP X4500 Option Setup Guide - Page 96
Steckdosen an. 2 Schalten Sie den Drucker ein. 3 Schalten Sie den Scanner ein. Der MFP benötigt nach dem Einschalten eine gewisse Zeit zum Aufwärmen. Nachdem der MFP seine Selbsttests abgeschlossen hat, wird am Touchscreen der Anfangsbildschirm angezeigt. Abschließen der Hardwarekonfiguration 7 - Lexmark X750e | MFP X4500 Option Setup Guide - Page 97
Sie, bis die Konfigurationsseite aktualisiert wird, und überprüfen Sie anschließend, ob die gewünschten Parameter angegeben sind. Nachdem Sie die IP- Adresse konfiguriert haben, können Sie über Ihren Web-Browser auf den MFP zugreifen und diesen verwalten. Geben Sie die IP-Adresse in das URL-Feld - Lexmark X750e | MFP X4500 Option Setup Guide - Page 98
mit Ihrem Web-Browser die folgenden erforderlichen Faxinformationen an: 1 Geben Sie die IP-Adresse des MFP in das URL-Feld des Browsers ein (z. B. http://192.168.236.24), und dr Sie zusätzliche Faxeinstellungen festlegen oder ändern. Klicken Sie anschließend auf Übernehmen. Konfigurieren des MFP 9 - Lexmark X750e | MFP X4500 Option Setup Guide - Page 99
Windows NT-Authentifizierung einsetzen möchten, um den Zugriff auf den MFP einzuschränken oder zu protokollieren, müssen Sie das Gerät zuerst Windows NT-Domäne um Unterstützung. Hinweis: Für die Registrierung des MFP bei einer Windows NTDomäne benötigen Sie einen Administrator-Kontonamen für diese - Lexmark X750e | MFP X4500 Option Setup Guide - Page 100
nach unten in die automatische Dokumentzuführung. 2 Drücken Sie die grüne Taste Start rechts neben dem Touchscreen (Kopieren ist die Standardfunktion des MFP). 3 Berühren Sie Fertig. Senden eines Testfaxes Senden Sie ein Testfax von einer Seite Länge an ein bekanntes Faxgerät: 1 Berühren Sie auf - Lexmark X750e | MFP X4500 Option Setup Guide - Page 101
scannen und zu senden. 5 Berühren Sie Fertig. Senden eines Netzwerkdruckauf- trags an den MFP Senden Sie mit einer Computeranwendung einen Netzwerkdruckauftrag an den MFP. Unterstützende Informationen zum Einrichten eines Computers für den Netzwerkdruck finden Sie in der Druckerdokumentation. 12 - Lexmark X750e | MFP X4500 Option Setup Guide - Page 102
des Touchscreens Warnung! Besprühen Sie den Touchscreen nicht mit Wasser oder Glasreiniger. Flüssigkeit kann den MFP beschädigen. 1 Befeuchten Sie ein sauberes, staubfreies Baumwolltuch mit Wasser. 2 Wischen Sie den Touchscreen ab. Reinigen des ScannerFlachbetts 1 Befeuchten Sie ein sauberes - Lexmark X750e | MFP X4500 Option Setup Guide - Page 103
kein Papier eingezogen) In diesen Fällen versuchen Sie zunächst, das Problem durch Reinigen der automatischen Dokumentzuführung zu beheben. Siehe „Reinigen der Einzugspolsters weiterhin Probleme auftreten, finden Sie auf der Lexmark Support-Website unter der Adresse http://support.lexmark.com weitere - Lexmark X750e | MFP X4500 Option Setup Guide - Page 104
Tuch ab. 6 Schließen Sie die automatische Dokumentzuführung. 7 Stecken Sie den Netzstecker des Scanners ein, und schalten Sie das Gerät wieder ein. Wartung des MFP 15 - Lexmark X750e | MFP X4500 Option Setup Guide - Page 105
Problem auftritt, daß mehrere Blatt Papier gleichzeitig in die automatische Dokumentzuführung eingezogen werden, müssen Sie möglicherweise das Einzugspolster austauschen. Ein Ersatz-Einzugspolster können Sie auf der Lexmark Support-Website unter http://support.lexmark wieder ein. 16 Wartung des MFP - Lexmark X750e | MFP X4500 Option Setup Guide - Page 106
des Scan-Mechanismus zu vermeiden. 1 Öffnen Sie die Scanner-Klappe, und schalten Sie den Scanner ein. 2 Wenn der Scan-Mechanismus am äußersten rechten Ende des Scanner-Glases angekommen ist, schalten Sie den Scanner aus. 3 Schieben Sie den Sperrschalter auf der rechten Seite des Scanners in die - Lexmark X750e | MFP X4500 Option Setup Guide - Page 107
, die es Ihnen ermöglichen, Dokumente schnell auf Ihren Computer zurückzuscannen. Document Distributor ist ein von Lexmark angebotenes Softwarepaket zur Verwendung mit Ihrem MFP. Mit der Document Distributor-Software können Sie den Scan-Vorgang automatisieren und Ihren Dokument-Workflow straffen - Lexmark X750e | MFP X4500 Option Setup Guide - Page 108
aus und anschließend wieder ein. • Wenn weiterhin Probleme auftreten, wenden Sie sich unter der Adresse http://support.lexmark.com an den Lexmark Kundendienst. • versuchen Sie es erneut. Weitere Informationen finden Sie unter „Warten des MFP" auf Seite 13. • Öffnen Sie die Klappe der automatischen - Lexmark X750e | MFP X4500 Option Setup Guide - Page 109
Problem Lösung Es können keine analogen Faxe gesendet oder empfangen werden. • Vergewissern Sie sich, daß das Fax-/Telefonkabel ordnungsgemäß Unterstützung benötigen, starten Sie die im Lieferumfang des Druckers enthaltene Treiber-CD, und klicken Sie auf Lexmark Adressen. 20 Problemlösung - Lexmark X750e | MFP X4500 Option Setup Guide - Page 110
Funktionen der Bauteile und Optionen sind nicht immer offensichtlich. Sofern Teile eingesetzt werden, die nicht von Lexmark stammen, wird von Lexmark keinerlei Verantwortung oder Haftung übernommen. Sicherheitshinweise für Fax/Telefon • Führen Sie die in diesem Handbuch erläuterten - Lexmark X750e | MFP X4500 Option Setup Guide - Page 111
der Abteilungen Fertigung und Technischer Kundendienst bei Lexmark International, S.A., Boigny, Frankreich, ausgestellt den Grenzwerten. Dies gilt für alle X4500 MFP-Optionen mit folgender Kennzeichnung: Dieses Gerät ist ät im PSTN-Netz. Falls Probleme auftreten, setzen Sie sich mit dem Lieferanten - Lexmark X750e | MFP X4500 Option Setup Guide - Page 112
Lexmark sind zum momentanen Zeitpunkt keine Interoperabilitätsprobleme für folgende Länder bekannt: Teilnehmer dies bei der Installation explizit anfordert. Verwenden der X4500 MFP-Option in der Schweiz Für den Einsatz der X4500 MFP-Option muß ein schweizer Filter für das Gebührenzählersignal - Lexmark X750e | MFP X4500 Option Setup Guide - Page 113
24 Hinweise - Lexmark X750e | MFP X4500 Option Setup Guide - Page 114
Italiano - Lexmark X750e | MFP X4500 Option Setup Guide - Page 115
New Circle Road, Lexington, Kentucky 40550, U.S.A. Per il Regno Unito e l'Eire, l'indirizzo è Lexmark International Ltd., Marketing and Services Department, Westhorpe House, Westhorpe, Marlow Bucks SL7 3RQ. Lexmark si riserva il diritto di utilizzare o divulgare le informazioni ricevute nei modi - Lexmark X750e | MFP X4500 Option Setup Guide - Page 116
della stampante, della base e dello scanner 1 Disimballaggio dello scanner 1 Installazione della stampante 2 Verifica del livello del firmware della stampante 2 Installazione della base 3 Sbloccaggio dello scanner 3 Punto 2: Installazione dei vassoi 4 Punto 3: Collegamento dei cavi - Lexmark X750e | MFP X4500 Option Setup Guide - Page 117
Punto 6: Verifica dell'impostazione 11 Copia di prova 11 Invio di un fax di prova 11 Invio di un'e-mail di prova 12 Invio di un processo di stampa in rete alla stampante multifunzione 12 Manutenzione della stampante multifunzione 13 Pulizia dello schermo a sfioramento 13 Pulizia del piano - Lexmark X750e | MFP X4500 Option Setup Guide - Page 118
base e dello scanner Scanner Cartella Raccoglito re di uscita Disimballaggio dello scanner Cavo di alimentazione Disimballare la stampante multifunzione Lexmark X4500. Verificare di avere i seguenti componenti: • Scanner • Cavo Ethernet (RJ-45) • Cavo della linea telefonica/fax (RJ-11) • Cartella - Lexmark X750e | MFP X4500 Option Setup Guide - Page 119
verificare il livello minimo del firmware necessario per funzionamento della stampante multifunzione: 1 Andare a http:// support.lexmark.com. 2 Selezionare il paese e la lingua. 3 Nella sezione relativa alle stampanti multifunzione, selezionare l'opzione X4500 MFP. 4 Fare clic su OK. 5 Selezionare - Lexmark X750e | MFP X4500 Option Setup Guide - Page 120
le istruzioni fornite con la base stessa. Se non è stata acquistata alcuna base e si intende collocare lo scanner sul fascicolatore della Lexmark™ C750 per la stampante multifunzione, consultare le istruzioni fornite con il fascicolatore. Sbloccaggio dello scanner 1 Verificare che la stampante sia - Lexmark X750e | MFP X4500 Option Setup Guide - Page 121
Punto 2: Installazione dei vassoi Nota: L'alimentatore automatico documenti e il vassoio di alimentazione sono già collegati allo scanner. 1 Collegare il raccoglitore di uscita all'alimentatore automatico documenti. 2 Sollevare il vassoio di alimentazione e far scattare la barra di supporto nella - Lexmark X750e | MFP X4500 Option Setup Guide - Page 122
il cavo standard compatibile con la rete nella porta Ethernet 2 sullo scanner, quindi nel collegamento di rete. Questo cavo non è fornito da Lexmark. 5 Collegare l'alimentatore allo scanner. 6 Collegare il cavo di alimentazione all'alimentatore ma non inserire ancora l'altra estremità in una presa - Lexmark X750e | MFP X4500 Option Setup Guide - Page 123
Punto 4: Completamento dell'installazione hardware Applicazione della Guida rapida 1 Rimuovere la pellicola dalla striscia adesiva sul retro della Guida rapida. 2 Applicare la Guida rapida sopra lo schermo a sfioramento. Installazione del coperchio del pannello operatore della stampante - Lexmark X750e | MFP X4500 Option Setup Guide - Page 124
Accensione dello scanner e della stampante 1 Inserire il cavo di alimentazione della stampante in una presa elettrica dotata di messa a terra. 2 Accendere la stampante. 3 Accendere lo scanner. Dopo l'accensione è necessario attendere il riscaldamento della stampante multifunzione. Completate le - Lexmark X750e | MFP X4500 Option Setup Guide - Page 125
Punto 5: Configurazione della stampante multifunzione Di seguito sono riportate le impostazioni minime richieste per eseguire funzioni di base, come stampare, copiare, inviare fax o e-mail. Per alcune di queste impostazioni, potrebbe essere necessario il supporto dell'amministratore di rete. - Lexmark X750e | MFP X4500 Option Setup Guide - Page 126
Configurazione della scansione verso e-mail 1 Immettere l'indirizzo IP della stampante multifunzione nel campo relativo all'URL del browser (ad esempio http:// 192.168.236.24), quindi premere Invio. 2 Fare clic su Configurazione. 3 Fare clic su Impostazione generale scansione verso e-mail. 4 - Lexmark X750e | MFP X4500 Option Setup Guide - Page 127
di rete. Nota: Per registrare la stampante multifunzione con un dominio Windows NT, è necessario disporre di un nome account e di una password per quel dominio. Toccare l'icona Chiave nella finestra principale, quindi scegliere la registrazione del dominio Windows NT. Sullo schermo vengono - Lexmark X750e | MFP X4500 Option Setup Guide - Page 128
Punto 6: Verifica dell'impostazione Copia di prova Eseguire una copia di una pagina e provare l'alimentatore automatico documenti. 1 Inserire il documento nell'alimentatore automatico documenti con il lato stampato rivolto verso il basso. 2 Per eseguire una copia, premere il pulsante verde Avvia - Lexmark X750e | MFP X4500 Option Setup Guide - Page 129
Invio di un'e-mail di prova Inviare un'e-mail di prova di una sola pagina ad un indirizzo e-mail conosciuto. 1 Nella finestra principale, toccare l'icona E-mail. 2 Nella schermata riservata alla destinazione dell'e-mail, immettere un indirizzo e-mail mediante il tastierino virtuale. 3 Inserire il - Lexmark X750e | MFP X4500 Option Setup Guide - Page 130
Manutenzione della stampante multifunzione Pulizia dello schermo a sfioramento Avvertenza! Non spruzzare acqua o detergente sullo schermo a sfioramento. Le sostanze liquide possono danneggiare la stampante multifunzione. 1 Inumidire con acqua un panno di cotone pulito e senza lanugine. 2 Pulire lo - Lexmark X750e | MFP X4500 Option Setup Guide - Page 131
dell'unità cuscinetto di prelievo" a pagina 16. Se i problemi persistono anche dopo la sostituzione dell'unità cuscinetto, visitare il sito Web di assistenza Lexmark all'indirizzo http://support.lexmark.com per ulteriori informazioni al riguardo. 14 Manutenzione della stampante multifunzione - Lexmark X750e | MFP X4500 Option Setup Guide - Page 132
Cuscinetto di prelievo Pulizia dei rulli di alimentazione e del cuscinetto di prelievo Rulli di alimentazione 1 Spegnere lo scanner e scollegare il cavo di alimentazione. 2 Inumidire con acqua un panno di cotone pulito e senza lanugine. 3 Aprire l'alimentatore automatico documenti e detergere - Lexmark X750e | MFP X4500 Option Setup Guide - Page 133
di prelievo. Per ordinare un'unità cuscinetto di prelievo di ricambio, visitare il sito Web di assistenza Lexmark all'indirizzo http:// support.lexmark.com. Il codice per tale unità è 12G3758. 1 Spegnere lo scanner e scollegarlo dall'alimentazione. 2 Aprire l'alimentatore automatico documenti - Lexmark X750e | MFP X4500 Option Setup Guide - Page 134
Spostamento dello scanner Interruttore del dispositivo di blocco Se è necessario trasferire lo scanner in un'altra ubicazione, bloccarlo per evitare danni al meccanismo di scansione. 1 Aprire il coperchio dello scanner e accenderlo. 2 Quando il meccanismo di scansione raggiunge l'estrema destra del - Lexmark X750e | MFP X4500 Option Setup Guide - Page 135
collegamenti alle impostazioni di scansione personali ed eseguire rapidamente la scansione dei documenti sul computer. Document Distributor è un pacchetto software Lexmark per l'uso con stampanti MFP che consente di automatizzare il processo di scansione e snellire il flusso dei documenti. 18 - Lexmark X750e | MFP X4500 Option Setup Guide - Page 136
inserita quanto basta per essere prelevata. • Se si verificano ancora dei problemi, contattare il centro di assistenza clienti Lexmark all'indirizzo http://support.lexmark.com. 1 Stampare una pagina di impostazioni di rete: a Dalla schermata principale, toccare l'icona Chiave, quindi Stampa rapporti - Lexmark X750e | MFP X4500 Option Setup Guide - Page 137
collaudato e approvato in base a specifici standard di sicurezza internazionali per essere utilizzato con componenti Lexmark. Le caratteristiche di sicurezza potrebbero non essere evidenti. Lexmark non si assume alcuna responsabilità per l'uso di componenti di ricambio diversi da quelli consigliati - Lexmark X750e | MFP X4500 Option Setup Guide - Page 138
chiesto di prendere adeguati provvedimenti. La dichiarazione di conformità stata firmata dal Direttore della produzione e dell'assistenza tecnica di Lexmark International, S.A., Boigny, Francia. Questo prodotto è conforme ai limiti EN 55022 per la Classe A e ai requisiti di sicurezza EN 60950 - Lexmark X750e | MFP X4500 Option Setup Guide - Page 139
Lexmark non è a conoscenza di problemi di interoperatività nei seguenti paesi: Austria Francia Grecia Portogallo Spagna Belgio Germania Islanda Svezia Norvegia Danimarca Lussemburgo Irlanda Regno Unito Finlandia - Lexmark X750e | MFP X4500 Option Setup Guide - Page 140
Español - Lexmark X750e | MFP X4500 Option Setup Guide - Page 141
Road, Lexington, Kentucky 40550, EE.UU. En el Reino Unido y Eire, diríjase a Lexmark International Ltd., Marketing and Services Department, Westhorpe House, Westhorpe, Marlow Bucks SL7 3RQ. Lexmark puede utilizar o distribuir cualquier información que proporcione de la forma que considere adecuada - Lexmark X750e | MFP X4500 Option Setup Guide - Page 142
del escáner 1 Instalación de la impresora 2 Verificación del nivel de firmware de la impresora 2 Instalación del soporte 3 Desbloqueo del escáner 3 Paso Encendido del escáner y la impresora 7 Paso 5: Configuración de la MFP 8 Definición de la dirección IP 8 Configuración de Digitalizar a E- - Lexmark X750e | MFP X4500 Option Setup Guide - Page 143
un fax de prueba 11 Envío de un mensaje de e-mail de prueba 12 Envío de un trabajo de impresión de red a la MFP 12 Mantenimiento de la MFP 13 Limpieza de la pantalla táctil 13 Limpieza de la base del escáner 13 Problemas de alimentación del papel 14 Limpieza de - Lexmark X750e | MFP X4500 Option Setup Guide - Page 144
y el escáner Escáner Carpeta Bandeja de salida de papel Desembalaje del escáner Cable de corriente de la fuente de Desembale la Opción MFP Lexmark X4500. Asegúrese de que dispone de los siguientes elementos: • Escáner • Cable Ethernet (RJ-45) • Cable de teléfono y fax (RJ-11) • Carpeta con - Lexmark X750e | MFP X4500 Option Setup Guide - Page 145
a tomas de tierra y se puede encender. Verificación del nivel de firmware de la impresora Para comprobar el nivel de firmware mínimo necesario para que la MFP funcione: 1 Vaya a la dirección http:// support.lexmark.com. 2 Seleccione su país e idioma. 3 En Impresoras multifunción, seleccione la - Lexmark X750e | MFP X4500 Option Setup Guide - Page 146
las instrucciones que se incluyen en el soporte. Si no ha adquirido un soporte y pretende colocar el escáner sobre el clasificador Lexmark™ C750 para la MFP, consulte las instrucciones que se incluyen con el clasificador. Desbloqueo del escáner 1 Asegúrese de que la impresora no está encendida - Lexmark X750e | MFP X4500 Option Setup Guide - Page 147
Paso 2: Instalación de las bandejas Nota: el alimentador automático de documentos y la bandeja de alimentación de documentos se proporcionan instalados en el escáner. 1 Coloque la bandeja de salida de papel en el alimentador automático de documentos. 2 Levante la bandeja de alimentación de - Lexmark X750e | MFP X4500 Option Setup Guide - Page 148
ónica, si es necesario. 4 Conecte cables estándar compatibles con la red al puerto Ethernet 2 del escáner y, a continuación, a una conexión de red. Lexmark no proporciona este cable. 5 Conecte la fuente de alimentación al escáner. 6 Conecte el cable de corriente de la fuente de alimentación a la - Lexmark X750e | MFP X4500 Option Setup Guide - Page 149
Paso 4: Finalización de la instalación del hardware Instalación de la Referencia rápida 1 Retire el soporte para etiquetas de la tira adhesiva de la parte posterior de la Referencia rápida. 2 Introduzca la Referencia rápida en su ubicación encima de la pantalla táctil. Instalación de la cubierta - Lexmark X750e | MFP X4500 Option Setup Guide - Page 150
de corriente de la fuente de alimentación a tomas de tierra. 2 Encienda la impresora. 3 Encienda el escáner. Después de encenderla, la MFP tarda en calentarse. Cuando la MFP haya terminado las pruebas, en la pantalla táctil aparece la pantalla Inicio. Finalización de la instalación del hardware 7 - Lexmark X750e | MFP X4500 Option Setup Guide - Page 151
administrador de red. Definición de la dirección IP Debe disponer de una dirección IP para los dispositivos de red con el fin de buscar la MFP en la red. Si dispone de DHCP, se asignan automáticamente los valores de dirección correctos. Para comprobar la dirección IP o para asignarla manualmente - Lexmark X750e | MFP X4500 Option Setup Guide - Page 152
Digitalizar a E-mail 1 Introduzca la dirección IP de la MFP en el campo de dirección URL del navegador (por ejemplo el navegador Web para definir la información de fax necesaria: 1 Introduzca la dirección IP de la MFP en el campo de dirección URL del navegador (por ejemplo, http://192.168.236.24) y - Lexmark X750e | MFP X4500 Option Setup Guide - Page 153
Windows NT como método de restricción o seguimiento del acceso a la MFP, en primer lugar debe registrar el dispositivo con un dominio de Windows NT ayuda en el registro de un dominio de Windows NT. Nota: para registrar la MFP con un dominio de Windows NT, debe disponer de un nombre de cuenta y una - Lexmark X750e | MFP X4500 Option Setup Guide - Page 154
de documentos. 2 Pulse el botón Empezar de color verde situado en la parte derecha de la pantalla táctil, (Copia es el valor predeterminado para la MFP). 3 Pulse Terminado. Envío de un fax de prueba Envíe un fax de prueba de una página a un equipo de fax conocido: 1 En la pantalla Inicio - Lexmark X750e | MFP X4500 Option Setup Guide - Page 155
digitalizar y enviar el documento. 5 Pulse Terminado. Envío de un trabajo de impresión de red a la MFP Utilice una aplicación del ordenador para enviar un trabajo de impresión de red a la MFP. Consulte la documentación de la impresora para obtener ayuda en la configuración de un ordenador para la - Lexmark X750e | MFP X4500 Option Setup Guide - Page 156
Limpieza de la pantalla táctil Advertencia No limpie la pantalla táctil con agua ni con limpiacristales. El agua puede dañar la MFP. 1 Humedezca un paño de algodón limpio sin pelusas con agua. 2 Limpie la pantalla táctil. Limpieza de la base del escáner 1 Humedezca un paño de - Lexmark X750e | MFP X4500 Option Setup Guide - Page 157
de carga" en la página 16. Si aún sigue teniendo problemas después de sustituir la almohadilla de carga, vaya al sitio Web de servicio técnico de Lexmark en la dirección http://support.lexmark.com para obtener más información. 14 Mantenimiento de la - Lexmark X750e | MFP X4500 Option Setup Guide - Page 158
de la almohadilla de carga con el paño húmedo. 6 Cierre el alimentador automático de documentos. 7 Enchufe el escáner y vuelva a encenderlo. Mantenimiento de la MFP 15 - Lexmark X750e | MFP X4500 Option Setup Guide - Page 159
solicitar una almohadilla de carga de repuesto, vaya al sitio Web de servicio técnico de Lexmark en la dirección http://support.lexmark.com. El número de referencia de la almohadilla es 12G3758. 1 Apague el escáner documentos. 6 Enchufe el escáner y vuelva a encenderlo. 16 Mantenimiento de la MFP - Lexmark X750e | MFP X4500 Option Setup Guide - Page 160
. 3 Mueva el interruptor de bloqueo de la parte derecha del escáner a la posición de bloqueo y cierre la tapa del escáner. Mantenimiento de la MFP 17 - Lexmark X750e | MFP X4500 Option Setup Guide - Page 161
Distribuidor de documentos de Lexmark Con la impresora multifunción se incluye un CD que contiene la pidamente en el ordenador. Document Distributor es un paquete de software proporcionado por Lexmark para utilizarlo con la impresora multifunción. El software de Document Distributor permite - Lexmark X750e | MFP X4500 Option Setup Guide - Page 162
problemas, póngase en contacto con el servicio técnico de Lexmark en la dirección http:// support.lexmark.com. • Pulse el icono Copia. Siga las instrucciones vuelva a intentarlo. Para obtener más información, consulte "Mantenimiento de la MFP" en la página 13. • Abra la puerta del alimentador autom - Lexmark X750e | MFP X4500 Option Setup Guide - Page 163
analógica. Si necesita más ayuda, inicie el CD de controladores que se incluye con la impresora y, a continuación, haga clic en Cómo ponerse en contacto con Lexmark. 20 Solución de problemas - Lexmark X750e | MFP X4500 Option Setup Guide - Page 164
de seguridad global con el uso de componentes específicos de Lexmark. Las características de seguridad de alguna pieza pueden no ser siempre obvias. Lexmark no se responsabiliza del uso de otras piezas de recambio. algo que puede dañar el hardware o software del sistema de la MFP. Avisos 21 - Lexmark X750e | MFP X4500 Option Setup Guide - Page 165
de radio, en cuyo caso, se solicitará al usuario que adopte las medidas oportunas. El director de fabricación y del servicio técnico de Lexmark International, S.A., Boigny, Francia, ha firmado una declaración de conformidad con los requisitos de las directivas. Este producto cumple con los límites - Lexmark X750e | MFP X4500 Option Setup Guide - Page 166
red telefónica conmutada pública (PSTN). Esto se aplica a todas las opciones MFP X4500 que lleven la siguiente marca: Este equipo está diseñado para trabajar problema, póngase en contacto con el proveedor del equipo. Lexmark no tiene conocimiento de dificultades de interoperación en los siguientes - Lexmark X750e | MFP X4500 Option Setup Guide - Page 167
24 Avisos - Lexmark X750e | MFP X4500 Option Setup Guide - Page 168
X4500 Lexmark and Lexmark with diamond design are trademarks of Lexmark International, Inc., registered in the United States and/or other countries. © 2002 Lexmark International, Inc. 740 West New Circle Road Lexington, Kentucky 40550 www.lexmark.com
-
 1
1 -
 2
2 -
 3
3 -
 4
4 -
 5
5 -
 6
6 -
 7
7 -
8
-
9
-
10
-
11
-
12
-
13
-
14
-
15
-
16
-
17
-
18
-
19
-
20
-
21
-
22
-
23
-
24
-
25
-
26
-
27
-
28
-
29
-
30
-
31
-
32
-
33
-
34
-
35
-
36
-
37
-
38
-
39
-
40
-
41
-
42
-
43
-
44
-
45
-
46
-
47
-
48
-
49
-
50
-
51
-
52
-
53
-
54
-
55
-
56
-
57
-
58
-
59
-
60
-
61
-
62
-
63
-
64
-
65
-
66
-
67
-
68
-
69
-
70
-
71
-
72
-
73
-
74
-
75
-
76
-
77
-
78
-
79
-
80
-
81
-
82
-
83
-
84
-
85
-
86
-
87
-
88
-
89
-
90
-
91
-
92
-
93
-
94
-
95
-
96
-
97
-
98
-
99
-
100
-
101
-
102
-
103
-
104
-
105
-
106
-
107
-
108
-
109
-
110
-
111
-
112
-
113
-
114
-
115
-
116
-
117
-
118
-
119
-
120
-
121
-
122
-
123
-
124
-
125
-
126
-
127
-
128
-
129
-
130
-
131
-
132
-
133
-
134
-
135
-
136
-
137
-
138
-
139
-
140
-
141
-
142
-
143
-
144
-
145
-
146
-
147
-
148
-
149
-
150
-
151
-
152
-
153
-
154
-
155
-
156
-
157
-
158
-
159
-
160
-
161
-
162
-
163
-
164
-
165
-
166
-
167
-
168
 |
 |

Setup Guide
April 2002
MFP X4500 Option