Lexmark X945 User Guide - Page 17
Understanding the home screen
 |
View all Lexmark X945 manuals
Add to My Manuals
Save this manual to your list of manuals |
Page 17 highlights
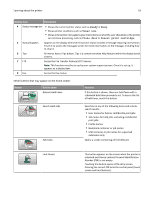
Learning about the printer 17 Control panel item 6 Start 7 Stop Description • Press to initiate the current job indicated on the display. • From the home screen, press to start a copy job with the default settings. • If pressed while a job is scanning, the button has no effect. Stops all printer activity A list of options is offered once Stopped appears on the display. 8 Back In the Copy menu, press to delete the right-most digit of the value in the Copy Count. The default value of 1 appears if the entire number is deleted by pressing numerous times. In the Fax Destination List, press to delete the right-most digit of a number entered manually. You can also press to delete an entire shortcut entry. Once an entire line is deleted, another press of causes the cursor to move up one line. In the E-mail Destination List, press to delete the character to the left of the cursor. If the character is in a shortcut, the shortcut is deleted. Understanding the home screen After the printer is turned on and a short warm-up period occurs, the display shows the following basic screen which is referred to as the home screen. Use the home screen buttons to initiate an action such as copying, faxing, or scanning; to open the menu screen; or to respond to messages. Display item 1 Copy 2 E-mail 3 Menus Description Access the Copy menus. Note: If the home screen is shown, you can also access the Copy menus by pressing a number on the keypad. Access the E-mail menus. Access the menus. These menus are available only when the printer is in the Ready state.
-
 1
1 -
2
-
3
-
4
-
5
-
6
-
7
-
8
-
9
-
10
-
11
-
 12
12 -
 13
13 -
 14
14 -
 15
15 -
 16
16 -
 17
17 -
 18
18 -
 19
19 -
 20
20 -
 21
21 -
 22
22 -
23
-
24
-
25
-
26
-
27
-
28
-
29
-
30
-
31
-
32
-
33
-
34
-
35
-
36
-
37
-
38
-
39
-
40
-
41
-
42
-
43
-
44
-
45
-
46
-
47
-
48
-
49
-
50
-
51
-
52
-
53
-
54
-
55
-
56
-
57
-
58
-
59
-
60
-
61
-
62
-
63
-
64
-
65
-
66
-
67
-
68
-
69
-
70
-
71
-
72
-
73
-
74
-
75
-
76
-
77
-
78
-
79
-
80
-
81
-
82
-
83
-
84
-
85
-
86
-
87
-
88
-
89
-
90
-
91
-
92
-
93
-
94
-
95
-
96
-
97
-
98
-
99
-
100
-
101
-
102
-
103
-
104
-
105
-
106
-
107
-
108
-
109
-
110
-
111
-
112
-
113
-
114
-
115
-
116
-
117
-
118
-
119
-
120
-
121
-
122
-
123
-
124
-
125
-
126
-
127
-
128
-
129
-
130
-
131
-
132
-
133
-
134
-
135
-
136
-
137
-
138
-
139
-
140
-
141
-
142
-
143
-
144
-
145
-
146
-
147
-
148
-
149
-
150
-
151
-
152
-
153
-
154
-
155
-
156
-
157
-
158
-
159
-
160
-
161
-
162
-
163
-
164
-
165
-
166
-
167
-
168
-
169
-
170
-
171
-
172
-
173
-
174
-
175
-
176
-
177
-
178
-
179
-
180
-
181
-
182
-
183
-
184
-
185
-
186
-
187
-
188
-
189
-
190
-
191
-
192
-
193
-
194
-
195
-
196
-
197
-
198
-
199
-
200
-
201
-
202
-
203
-
204
-
205
-
206
-
207
-
208
-
209
-
210
-
211
-
212
-
213
-
214
-
215
-
216
-
217
-
218
-
219
-
220
-
221
-
222
-
223
-
224
-
225
-
226
-
227
-
228
-
229
-
230
-
231
-
232
-
233
-
234
-
235
-
236
-
237
-
238
-
239
-
240
-
241
-
242
-
243
-
244
-
245
-
246
-
247
-
248
-
249
-
250
-
251
-
252
-
253
-
254
-
255
-
256
-
257
-
258
-
259
-
260
-
261
-
262
-
263
-
264
-
265
-
266
-
267
-
268
-
269
-
270
-
271
-
272
-
273
-
274
-
275
-
276
-
277
-
278
-
279
-
280
-
281
-
282
-
283
-
284
-
285
 |
 |
