Lexmark X9575 User's Guide - Page 160
Understanding the Phone Book menu, Understanding the History and Reports menu
 |
UPC - 734646041348
View all Lexmark X9575 manuals
Add to My Manuals
Save this manual to your list of manuals |
Page 160 highlights
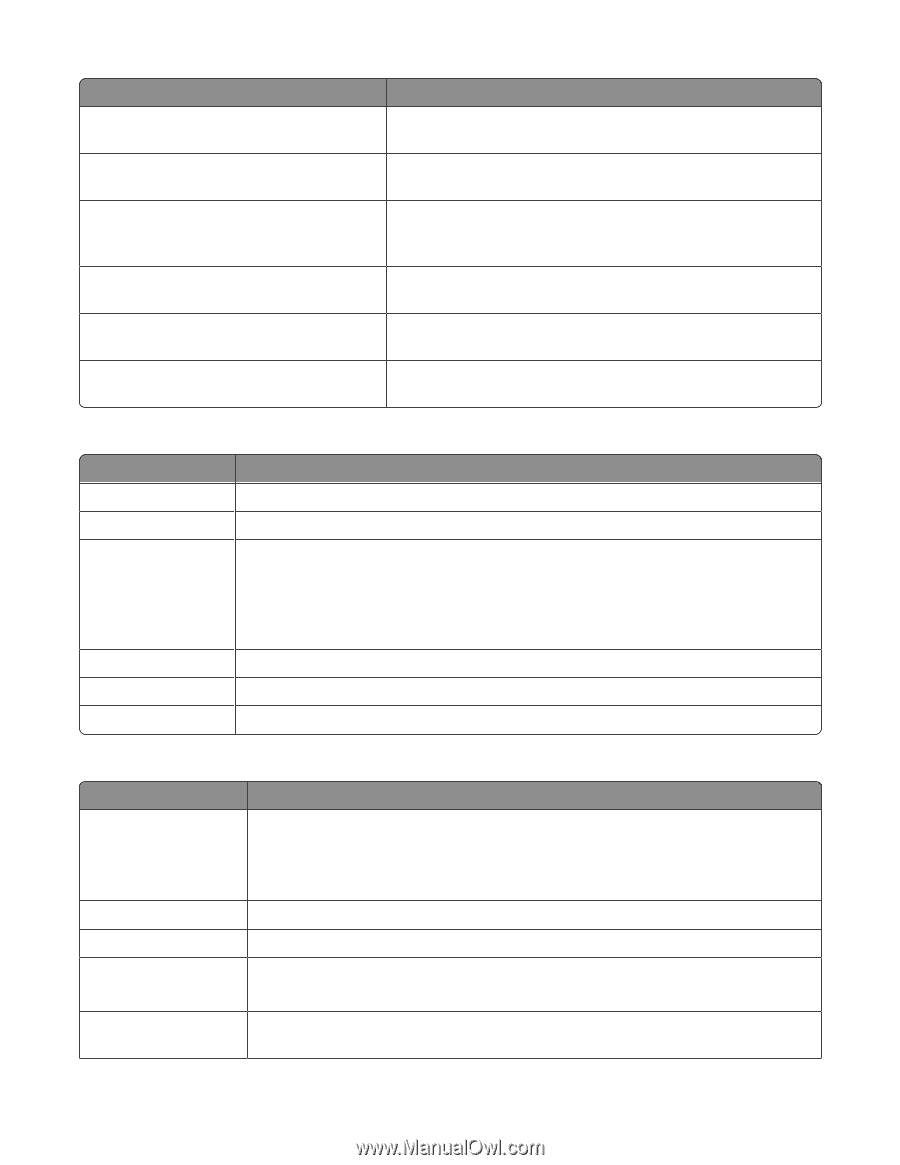
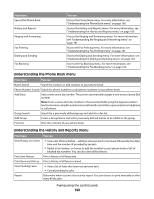
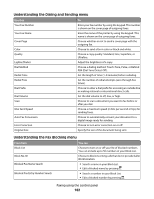
From here Speed Dial Phone Book History and Reports Ringing and Answering Fax Printing Dialing and Sending Fax Blocking You can Access the Phone Book menu. For more information, see "Understanding the Phone Book menu" on page 160. Access the History and Reports menu. For more information, see "Understanding the History and Reports menu" on page 160. Access the Ringing and Answering menu. For more information, see "Understanding the Ringing and Answering menu" on page 161. Access the Fax Printing menu. For more information, see "Understanding the Fax Printing menu" on page 161. Access the Dialing and Sending menu. For more information, see "Understanding the Dialing and Sending menu" on page 162. Access the Fax Blocking menu. For more information, see "Understanding the Fax Blocking menu" on page 162. Understanding the Phone Book menu From here Name Search You can Search for contacts or add contacts to your phone book. Phone Number Search Search for phone numbers or add phone numbers to your phone book. Add Entry Group Search Add a name and a fax number. The printer automatically assigns a new entry a Speed Dial number. Note: Enter a name and a fax number in the provided fields using the keypad numbers. Spell out a name using the numbers associated with each letter as you would on a telephone or cell phone. Search for a previously defined group and add it to a fax list. Add Group Create a Group Name and select previously defined names to be added to the group. Print List Print the contents of your phone book. Understanding the History and Reports menu From here You can View History on Screen • View a list of fax activities-whether a fax was sent or received, followed by the date, time and fax number (if provided by sender). • Redial a fax number, or choose to add the number to your phone book or list of blocked fax numbers. You can also clear all fax history. Print Sent History Print a history of all faxes sent Print Received History Print a history of all faxes received. View Pending Faxes • View a list of faxes that have not yet been sent. • Cancel pending fax jobs. Report Determine when to print a fax activity report. You can choose to print manually or after every 40 fax jobs. Faxing using the control panel 160
-
 1
1 -
2
-
3
-
4
-
5
-
6
-
7
-
8
-
9
-
10
-
11
-
12
-
13
-
14
-
15
-
16
-
17
-
18
-
19
-
20
-
21
-
22
-
23
-
24
-
25
-
26
-
27
-
28
-
29
-
30
-
31
-
32
-
33
-
34
-
35
-
36
-
37
-
38
-
39
-
40
-
41
-
42
-
43
-
44
-
45
-
46
-
47
-
48
-
49
-
50
-
51
-
52
-
53
-
54
-
55
-
56
-
57
-
58
-
59
-
60
-
61
-
62
-
63
-
64
-
65
-
66
-
67
-
68
-
69
-
70
-
71
-
72
-
73
-
74
-
75
-
76
-
77
-
78
-
79
-
80
-
81
-
82
-
83
-
84
-
85
-
86
-
87
-
88
-
89
-
90
-
91
-
92
-
93
-
94
-
95
-
96
-
97
-
98
-
99
-
100
-
101
-
102
-
103
-
104
-
105
-
106
-
107
-
108
-
109
-
110
-
111
-
112
-
113
-
114
-
115
-
116
-
117
-
118
-
119
-
120
-
121
-
122
-
123
-
124
-
125
-
126
-
127
-
128
-
129
-
130
-
131
-
132
-
133
-
134
-
135
-
136
-
137
-
138
-
139
-
140
-
141
-
142
-
143
-
144
-
145
-
146
-
147
-
148
-
149
-
150
-
151
-
152
-
153
-
154
-
 155
155 -
 156
156 -
 157
157 -
 158
158 -
 159
159 -
 160
160 -
 161
161 -
 162
162 -
 163
163 -
 164
164 -
 165
165 -
166
-
167
-
168
-
169
-
170
-
171
-
172
-
173
-
174
-
175
-
176
-
177
-
178
-
179
-
180
-
181
-
182
-
183
-
184
-
185
-
186
-
187
-
188
-
189
-
190
-
191
-
192
-
193
-
194
-
195
-
196
-
197
-
198
-
199
-
200
-
201
-
202
-
203
-
204
-
205
-
206
-
207
-
208
-
209
-
210
-
211
-
212
-
213
-
214
-
215
-
216
-
217
-
218
-
219
-
220
-
221
-
222
-
223
-
224
-
225
-
226
-
227
-
228
-
229
-
230
-
231
-
232
-
233
-
234
-
235
-
236
-
237
-
238
-
239
-
240
-
241
-
242
-
243
-
244
-
245
-
246
-
247
-
248
-
249
-
250
-
251
-
252
-
253
-
254
-
255
-
256
-
257
-
258
-
259
-
260
-
261
-
262
-
263
-
264
-
265
-
266
-
267
-
268
-
269
-
270
-
271
-
272
-
273
-
274
-
275
-
276
-
277
-
278
-
279
-
280
-
281
-
282
-
283
-
284
-
285
-
286
-
287
-
288
-
289
-
290
 |
 |