Lexmark X9575 User's Guide - Page 199
Control Panel, Printer, Start, Printers & Faxes, Lexmark 9500 Series, Properties, Advanced - driver for window 7
 |
UPC - 734646041348
View all Lexmark X9575 manuals
Add to My Manuals
Save this manual to your list of manuals |
Page 199 highlights
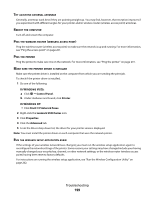
TRY ADJUSTING EXTERNAL ANTENNAS Generally, antennas work best if they are pointing straight up. You may find, however, that reception improves if you experiment with different angles for your printer and/or wireless router (wireless access point) antennas. REBOOT THE COMPUTER Turn off and restart the computer. PING THE WIRELESS ROUTER (WIRELESS ACCESS POINT) Ping the wireless router (wireless access point) to make sure the network is up and running. For more information, see "Ping the access point" on page 201. PING THE PRINTER Ping the printer to make sure it is on the network. For more information, see "Ping the printer" on page 201. MAKE SURE THE PRINTER DRIVER IS INSTALLED Make sure the printer driver is installed on the computer from which you are sending the print job. To check if the printer driver is installed, 1 Do one of the following: In Windows Vista: a Click Œ Control Panel. b Under Hardware and Sound, click Printer. In Windows XP: • Click Start Œ Printers & Faxes. 2 Right-click the Lexmark 9500 Series icon. 3 Click Properties. 4 Click the Advanced tab. 5 From the Driver drop-down list, the driver for your printer series is displayed. Note: You must install the printer driver on each computer that uses the network printer. RUN THE WIRELESS SETUP APPLICATION AGAIN If the settings of your wireless network have changed, you must run the wireless setup application again to reconfigure the network settings of the printer. Some reasons your settings may have changed include your having manually changed your security key, channel, or other network settings, or the wireless router (wireless access point) having been reset to factory defaults. For instructions on running the wireless setup application, see "Run the Wireless Configuration Utility" on page 202. Troubleshooting 199
-
 1
1 -
2
-
3
-
4
-
5
-
6
-
7
-
8
-
9
-
10
-
11
-
12
-
13
-
14
-
15
-
16
-
17
-
18
-
19
-
20
-
21
-
22
-
23
-
24
-
25
-
26
-
27
-
28
-
29
-
30
-
31
-
32
-
33
-
34
-
35
-
36
-
37
-
38
-
39
-
40
-
41
-
42
-
43
-
44
-
45
-
46
-
47
-
48
-
49
-
50
-
51
-
52
-
53
-
54
-
55
-
56
-
57
-
58
-
59
-
60
-
61
-
62
-
63
-
64
-
65
-
66
-
67
-
68
-
69
-
70
-
71
-
72
-
73
-
74
-
75
-
76
-
77
-
78
-
79
-
80
-
81
-
82
-
83
-
84
-
85
-
86
-
87
-
88
-
89
-
90
-
91
-
92
-
93
-
94
-
95
-
96
-
97
-
98
-
99
-
100
-
101
-
102
-
103
-
104
-
105
-
106
-
107
-
108
-
109
-
110
-
111
-
112
-
113
-
114
-
115
-
116
-
117
-
118
-
119
-
120
-
121
-
122
-
123
-
124
-
125
-
126
-
127
-
128
-
129
-
130
-
131
-
132
-
133
-
134
-
135
-
136
-
137
-
138
-
139
-
140
-
141
-
142
-
143
-
144
-
145
-
146
-
147
-
148
-
149
-
150
-
151
-
152
-
153
-
154
-
155
-
156
-
157
-
158
-
159
-
160
-
161
-
162
-
163
-
164
-
165
-
166
-
167
-
168
-
169
-
170
-
171
-
172
-
173
-
174
-
175
-
176
-
177
-
178
-
179
-
180
-
181
-
182
-
183
-
184
-
185
-
186
-
187
-
188
-
189
-
190
-
191
-
192
-
193
-
 194
194 -
 195
195 -
 196
196 -
 197
197 -
 198
198 -
 199
199 -
 200
200 -
 201
201 -
 202
202 -
 203
203 -
 204
204 -
205
-
206
-
207
-
208
-
209
-
210
-
211
-
212
-
213
-
214
-
215
-
216
-
217
-
218
-
219
-
220
-
221
-
222
-
223
-
224
-
225
-
226
-
227
-
228
-
229
-
230
-
231
-
232
-
233
-
234
-
235
-
236
-
237
-
238
-
239
-
240
-
241
-
242
-
243
-
244
-
245
-
246
-
247
-
248
-
249
-
250
-
251
-
252
-
253
-
254
-
255
-
256
-
257
-
258
-
259
-
260
-
261
-
262
-
263
-
264
-
265
-
266
-
267
-
268
-
269
-
270
-
271
-
272
-
273
-
274
-
275
-
276
-
277
-
278
-
279
-
280
-
281
-
282
-
283
-
284
-
285
-
286
-
287
-
288
-
289
-
290
 |
 |