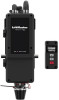
LiftMaster JDC Installation Manual - English French Spanish - Page 2

Table of Contents

Page 2 highlights

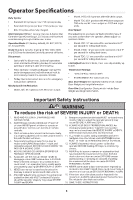
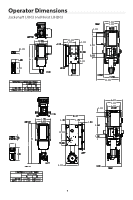
Table of Contents Safety Information 3 Safety Symbol and Signal Word Review 3 Planning 4 Introduction 5 Voltage Selection 5 Model Electrical Ratings 5 Operator Specifications 6 Operator Dimensions 7 Jackshaft (JDC) and Hoist (JHDC 7 TDC Trolley 8 Battery Backup 9 TDC Trolley Operators 10 Carton Inventory 10 Description 10 Hardware 10 TDC Trolley Assembly 11 Assemble the Operator 11 Install the Chain 12 TDC Trolley Installation 13 Install the Header Bracket 13 Attach the Track to the Header Bracket and Hang the Operator 14 Attach the Door Arm and Bracket 15 Jackshaft (JDC) and Hoist (JHDC) Operators 16 Carton Inventory 16 Description 16 Door Sprockets 16 JDC/JHDC Assembly 17 Configure the Operator 17 Applying AC Power 17 Battery Backup Wiring 18 JDC/JHDC Installation 19 Determine Mounting Location 19 Mount the Operator 20 Secure the Chain Hoist 20 Manual Release 21 Emergency Disconnect System Model TDC 21 Emergency Disconnect System Model JHDC 21 Wiring 22 Power and Ground 22 Voltage Selection 22 Wall Controller Installation 23 Entrapment Protection 24 Monitored Entrapment Protection 24 Install the Monitored Light Curtain (Optional 25 Cable Tension Monitors 26 Install the Cable Tension Monitor(s) (Optional 26 Testing 27 Test all Entrapment Protection Devices 27 Test Wall Controller Menu Access 27 Test Limit Adjustment 27 Wiring Diagram 28 Programming 29 Quick Start Commissioning 29 Manual Commissioning Program Flow 29 Operating Modes 32 Determine Operating Mode 33 Determine and Set Operating Mode 34 Programmable Inputs 42 Radio 42 Programming Remote Controls and myQ® Devices . . . . . 42 Erasing Programmed Devices 42 Reset Defaults 42 myQ® Smart Facility Access 43 Setup a myQ® Smart Facility Access Account 43 Provisioning Wi-Fi 43 Auxiliary Relays Accessory Kit (AUXREL) 44 Configure the Relay Adapter 44 Troubleshooting 45 Additional Troubleshooting 45 Maintenance 62 Maintenance Schedule 62 Accessories 63 Field Installable Accessory Kits 66 Service Parts 67 Model TDC 67 Model JHDC 68 Model TDC, JDC, and JHDC Common Parts 68 Warranty 69 MYQ® CONNECTIVITY • myQ® Smart Facility Access Technology enables secure monitoring and control of door operators and other myQ® Smart Facility Access devices with a smartphone, tablet or computer. • Alerts can be received as email notifications, ensuring the status of a commercial door. SAFETY AND SECURITY Security+ 2.0® - with every press of the button, a new code is sent to the commercial door operator, ensuring a door will only open for the remote control programmed. UL 325 requires all commercial door operators to be either constant pressure to close or be equipped with a primary external monitored entrapment protection device. LiftMaster® is the leading brand of professionally installed commercial door operators and access control products for businesses worldwide. We are committed to quality products, innovative designs and comprehensive services which exceed our Customers' expectations. 2

  • 1
  • 2
  • 3
  • 4
  • 5
  • 6
  • 7
  • 8
  • 9
  • 10
  • 11
  • 12
  • 13
  • 14
  • 15
  • 16
  • 17
  • 18
  • 19
  • 20
  • 21
  • 22
  • 23
  • 24
  • 25
  • 26
  • 27
  • 28
  • 29
  • 30
  • 31
  • 32
  • 33
  • 34
  • 35
  • 36
  • 37
  • 38
  • 39
  • 40
  • 41
  • 42
  • 43
  • 44
  • 45
  • 46
  • 47
  • 48
  • 49
  • 50
  • 51
  • 52
  • 53
  • 54
  • 55
  • 56
  • 57
  • 58
  • 59
  • 60
  • 61
  • 62
  • 63
  • 64
  • 65
  • 66
  • 67
  • 68
  • 69
  • 70
  • 71
  • 72
  • 73
  • 74
  • 75
  • 76
  • 77
  • 78
  • 79
  • 80
  • 81
  • 82
  • 83
  • 84
  • 85
  • 86
  • 87
  • 88
  • 89
  • 90
  • 91
  • 92
  • 93
  • 94
  • 95
  • 96
  • 97
  • 98
  • 99
  • 100
  • 101
  • 102
  • 103
  • 104
  • 105
  • 106
  • 107
  • 108
  • 109
  • 110
  • 111
  • 112
  • 113
  • 114
  • 115
  • 116
  • 117
  • 118
  • 119
  • 120
  • 121
  • 122
  • 123
  • 124
  • 125
  • 126
  • 127
  • 128
  • 129
  • 130
  • 131
  • 132
  • 133
  • 134
  • 135
  • 136
  • 137
  • 138
  • 139
  • 140
  • 141
  • 142
  • 143
  • 144
  • 145
  • 146
  • 147
  • 148
  • 149
  • 150
  • 151
  • 152
  • 153
  • 154
  • 155
  • 156
  • 157
  • 158
  • 159
  • 160
  • 161
  • 162
  • 163
  • 164
  • 165
  • 166
  • 167
  • 168
  • 169
  • 170
  • 171
  • 172
  • 173
  • 174
  • 175
  • 176
  • 177
  • 178
  • 179
  • 180
  • 181
  • 182
  • 183
  • 184
  • 185
  • 186
  • 187
  • 188
  • 189
  • 190
  • 191
  • 192
  • 193
  • 194
  • 195
  • 196
  • 197
  • 198
  • 199
  • 200
  • 201
  • 202
  • 203
  • 204
  • 205
  • 206
  • 207
  • 208
  • 209
  • 210
  • 211
  • 212
  • 213
  • 214
  • 215
  • 216

2
Table of Contents
Safety Information
3
Safety Symbol and Signal Word Review
..................
3
Planning
4
Introduction
5
Voltage Selection
.......................................
5
Model Electrical Ratings
.................................
5
Operator Specifications
6
Operator Dimensions
7
Jackshaft (JDC) and Hoist (JHDC)
.......................
7
TDC Trolley
.............................................
8
Battery Backup
.........................................
9
TDC Trolley Operators
10
Carton Inventory
......................................
10
Description
...........................................
10
Hardware
.............................................
10
TDC Trolley Assembly
11
Assemble the Operator
...............................
11
Install the Chain
.......................................
12
TDC Trolley Installation
13
Install the Header Bracket
.............................
13
Attach the Track to the Header Bracket and Hang the
Operator
..............................................
14
Attach the Door Arm and Bracket
.....................
15
Jackshaft (JDC) and Hoist (JHDC) Operators
16
Carton Inventory
......................................
16
Description
...........................................
16
Door Sprockets
.......................................
16
JDC/JHDC Assembly
17
Configure the Operator
...............................
17
Applying AC Power
....................................
17
Battery Backup Wiring
18
JDC/JHDC Installation
19
Determine Mounting Location
.........................
19
Mount the Operator
...................................
20
Secure the Chain Hoist
................................
20
Manual Release
21
Emergency Disconnect System Model TDC
...........
21
Emergency Disconnect System Model JHDC
..........
21
Wiring
22
Power and Ground
....................................
22
Voltage Selection
.....................................
22
Wall Controller Installation
23
Entrapment Protection
24
Monitored Entrapment Protection
.....................
24
Install the Monitored Light Curtain (Optional)
..........
25
Cable Tension Monitors
26
Install the Cable Tension Monitor(s) (Optional)
.........
26
Testing
27
Test all Entrapment Protection Devices
................
27
Test Wall Controller Menu Access
.....................
27
Test Limit Adjustment
.................................
27
Wiring Diagram
28
Programming
29
Quick Start Commissioning
...........................
29
Manual Commissioning Program Flow
.................
29
Operating Modes
.....................................
32
Determine Operating Mode
...........................
33
Determine and Set Operating Mode . . . . . . . . . . . . . . . . . . . 34
Programmable Inputs
.................................
42
Radio
.................................................
42
Programming Remote Controls and myQ® Devices
....
42
Erasing Programmed Devices . . . . . . . . . . . . . . . . . . . . . . . . . 42
Reset Defaults
........................................
42
myQ® Smart Facility Access
...........................
43
Setup a myQ® Smart Facility Access Account
.........
43
Provisioning Wi-Fi
.....................................
43
Auxiliary Relays Accessory Kit (AUXREL)
44
Configure the Relay Adapter
..........................
44
Troubleshooting
45
Additional Troubleshooting
............................
45
Maintenance
62
Maintenance Schedule
................................
62
Accessories
63
Field Installable Accessory Kits
66
Service Parts
67
Model TDC
............................................
67
Model JHDC
..........................................
68
Model TDC, JDC, and JHDC Common Parts
...........
68
Warranty
69
MYQ® CONNECTIVITY
myQ® Smart Facility Access Technology enables secure monitoring and control of door operators and other
myQ® Smart Facility Access devices with a smartphone, tablet or computer.
Alerts can be received as email notifications, ensuring the status of a commercial door.
SAFETY AND SECURITY
Security+ 2.0® – with every press of the button, a new code is sent to the commercial door operator, ensuring a door will
only open for the remote control programmed.
UL 325 requires all commercial door operators to be either constant pressure to close or be equipped with a primary
external monitored entrapment protection device.
LiftMaster® is the leading brand of professionally installed commercial door operators and access control products for
businesses worldwide. We are committed to quality products, innovative designs and comprehensive services which
exceed our Customers’ expectations.