LiftMaster SW420 SW420 S3 BOARD Manual - Page 22
CLOSE, Turn off power, off power, Turn off power, turn off power, Turn on power, Turn off power
 |
View all LiftMaster SW420 manuals
Add to My Manuals
Save this manual to your list of manuals |
Page 22 highlights
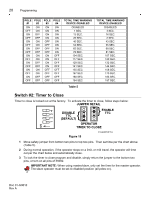
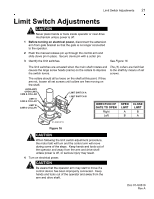
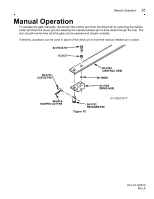
22 Limit Switch Adjustments 5 Press the CLOSE button or connect terminals #3 & #1 or #3 & The control arm should start #2, depending on which installation you have (left or right hand to move in the direction that opening). The OPEN/CLOSE button is a constant pressure would close the gate if it function. were connected. If the control arm does not start to move, the close limit cam may be already actuating the close limit switch or an improper electrical connection may have been made. Turn off power, inspect and correct the situation, and repeat this step. 6 When the control arm is pointed in the approximate direction of The control arm should the gate bracket (on the fully closed gate), press the STOP stop. button or release terminals 3 & 1 or 3 & 2. If the control arm does not stop, the STOP button was improperly connected. Turn off power, inspect and correct the situation, and repeat steps #3 and #4. If the control arm does not move far enough to point in the proper direction, the close limit switch has been prematurely actuated. If the close limit switch has been prematurely actuated, turn off power. Loosen the set screw on the close limit cam and rotate the nut away from the close limit switch. Repeat steps #3 and #4 until the control arm is pointed in the correct direction. 7 Turn off power! Be sure the close limit cam is freely turning. The close limit switch is Rotate the cam in the same direction as the shaft turns to close now "coarse set." the gate. Stop at the point at which the cam just clicks the close limit switch. Tighten the set screw securely. 8 Connect the gate bracket back up to the extension arm. If the arm has moved too far in the close direction to allow connection of the gate bracket, turn off power, press the OPEN button to rotate the arm back a short distance in the opposite direction, and press the STOP button when the arm is in the desired position. 9 Turn on power! Press the OPEN button (with constant pressure) or connect terminal #1 and #3 (or 2 & 3, depending on right or left hand operation) on the control terminal strip. The gate should start to open. If it does not, the open limit cam may be already actuating the open limit switch or an improper electrical connection may have been made. Turn off power, inspect and correct the situation, and repeat this step. 10 When the gate reaches the desired fully open position, press the STOP button or release terminals 1 & 3. The gate should stop. 11 Turn off power! Be sure the open limit cam is freely turning. Rotate the cam in the same direction as the shaft turns to open The open limit switch is now the gate. Stop at the point at which the cam just clicks the "coarse set." open limit switch. Tighten the set screw securely. Doc 01-G0610 Rev A
-
 1
1 -
2
-
3
-
4
-
5
-
6
-
7
-
8
-
9
-
10
-
11
-
12
-
13
-
14
-
15
-
16
-
 17
17 -
 18
18 -
 19
19 -
 20
20 -
 21
21 -
 22
22 -
 23
23 -
 24
24 -
 25
25 -
 26
26 -
 27
27 -
28
-
29
-
30
-
31
-
32
-
33
-
34
 |
 |
