Linksys WIP330 User Guide - Page 49
You have a choice of Auto Switch, Share Key, Open System, and WPA
 |
UPC - 745883568208
View all Linksys WIP330 manuals
Add to My Manuals
Save this manual to your list of manuals |
Page 49 highlights
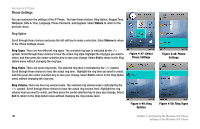
Authentication Mode. You have a choice of Auto Switch, Share Key, Open System, and WPAPSK. To change the Authentication Mode, select Edit. A new window will open. Scroll through the modes, and select the appropriate mode. Select Save to save the new Authentication Mode, or select Exit to return to the Edit Profile menu without changing the Authentication Mode. Proceed to the section for the Authentication Mode you have selected. Auto Switch, Share Key, or Open System Encryption. You have a choice of Disabled and WEP encryption. To change the Encryption method, select Edit. If you select Disabled, there are no other settings to change. If you select WEP, there are two more settings available, Key Index and WEP Key. Key Index. For the index of transmit keys, you have a choice of 1-4. To specify which WEP key the IP Phone will use, select Edit. A new window will open. Scroll through the numbers, and select the appropriate transmit key number. Select Save to save the new transmit key number, or select Exit to return to the Edit Profile menu without changing the number. Figure 4-35: Change Authentication Mode WEP Key. To enter the WEP Key, select Edit. Enter the new WEP Key in the new window. Press the center selection key to save the new WEP Key, or select Exit to return to the Edit Profile menu without changing the key. 802.1x. You have a choice of Enable and Disable. The Enable option configures the IP Phone for a network using 802.1x authentication. To change the 802.1x setting, select Edit. If 802.1x is enabled, configure the EAP Type setting. Select Edit. You have a choice of TLS, MD5, and PEAP. Select Save to save the new EAP Type, or select Exit to return to the Edit Profile menu without changing the EAP Type. Figure 4-37: Enter WEP Key Wireless-G IP Phone Figure 4-36: Edit WEP Key Figure 4-38: Change EAP Type (802.1x) Chapter 4: Configuring the Wireless-G IP Phone 41 Settings of the Wireless-G IP Phone
-
 1
1 -
2
-
3
-
4
-
5
-
6
-
7
-
8
-
9
-
10
-
11
-
12
-
13
-
14
-
15
-
16
-
17
-
18
-
19
-
20
-
21
-
22
-
23
-
24
-
25
-
26
-
27
-
28
-
29
-
30
-
31
-
32
-
33
-
34
-
35
-
36
-
37
-
38
-
39
-
40
-
41
-
42
-
43
-
 44
44 -
 45
45 -
 46
46 -
 47
47 -
 48
48 -
 49
49 -
 50
50 -
 51
51 -
 52
52 -
 53
53 -
 54
54 -
55
-
56
-
57
-
58
-
59
-
60
-
61
-
62
-
63
-
64
-
65
-
66
-
67
-
68
-
69
-
70
-
71
-
72
-
73
-
74
-
75
-
76
-
77
-
78
-
79
-
80
-
81
-
82
-
83
-
84
-
85
-
86
-
87
-
88
-
89
-
90
-
91
-
92
-
93
-
94
-
95
-
96
-
97
-
98
-
99
 |
 |
