Linksys WRV54G Cisco WRV54G Wireless-G VPN Broadband Router User Guide - Page 50
The Access Restrictions Tab - VPN Client Access, VPN Client Status, VPN Client List Table - firmware upgrade
 |
UPC - 745883556687
View all Linksys WRV54G manuals
Add to My Manuals
Save this manual to your list of manuals |
Page 50 highlights
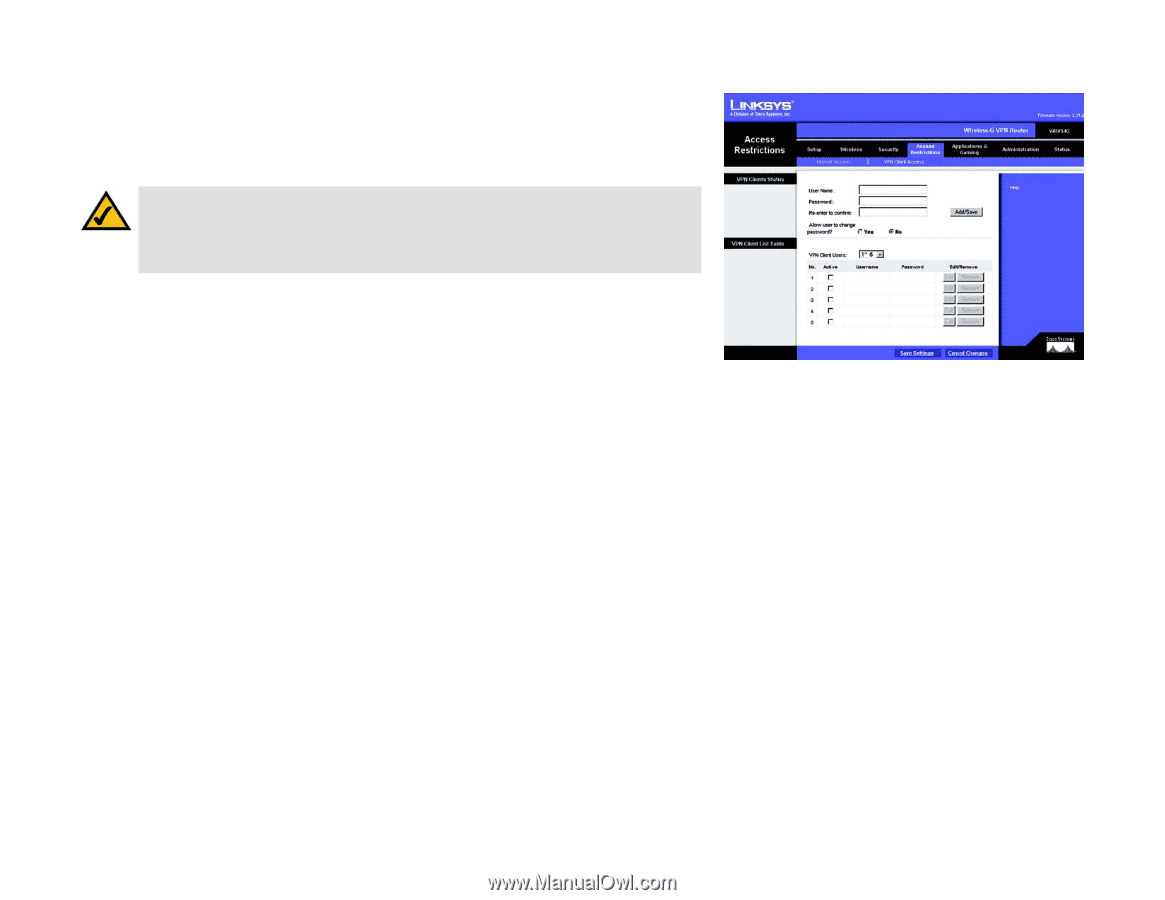
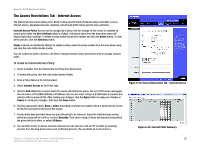
Wireless-G VPN Broadband Router The Access Restrictions Tab - VPN Client Access The Wireless-G VPN Broadband Router offers a free Linksys QuickVPN utility for Windows 2000 or XP. (For more information, refer to "Appendix D: Using the Linksys QuickVPN Software for Windows 2000 or XP.") If the Router has VPN clients using this utility, then you can designate the VPN clients and their passwords on this screen. NOTE: If you want VPN clients to use the Linksys QuickVPN utility, then the Router must have the VPN Client Access screen as part of its Web-based Utility. If you do not see this screen, then you must upgrade the Router's firmware. Refer to "Appendix H: Upgrading Firmware" for further instructions. (Before upgrading its firmware, write down the Router's settings. You will need to reset the Router to its factory defaults after you upgrade its firmware.) VPN Client Status User Name. Enter a name for the VPN client. Password. Enter a password for the VPN client. Re-enter to confirm. Enter the password again to confirm it. Allow user to change password? If you want to let the user change his or her password, click the Yes. When you have finished setting up a VPN client, click the Add/Save button to add the VPN client to your list and save the new settings. VPN Client List Table VPN Client Users. Select the appropriate group of users from the drop-down menu. No. This is the number assigned to this VPN client. Active. If you want to activate this VPN client, click the Active checkbox. Username. The Username assigned to this VPN client will be displayed here. Password. The Password assigned to this VPN client will be displayed here. Edit/Remove. If you want to change the settings for a VPN client, click the Edit button and then make your changes. If you want to delete a VPN client from your list, click the Remove button. When you have finished making changes to the screen, click the Save Settings button to save the changes, or click the Cancel Changes button to undo your changes. For help information, click More. Chapter 6: Configuring the Wireless-G VPN Broadband Router The Access Restrictions Tab - VPN Client Access Figure 6-36: Access Restrictions Tab VPN Client Access 40
-
 1
1 -
2
-
3
-
4
-
5
-
6
-
7
-
8
-
9
-
10
-
11
-
12
-
13
-
14
-
15
-
16
-
17
-
18
-
19
-
20
-
21
-
22
-
23
-
24
-
25
-
26
-
27
-
28
-
29
-
30
-
31
-
32
-
33
-
34
-
35
-
36
-
37
-
38
-
39
-
40
-
41
-
42
-
43
-
44
-
 45
45 -
 46
46 -
 47
47 -
 48
48 -
 49
49 -
 50
50 -
 51
51 -
 52
52 -
 53
53 -
 54
54 -
 55
55 -
56
-
57
-
58
-
59
-
60
-
61
-
62
-
63
-
64
-
65
-
66
-
67
-
68
-
69
-
70
-
71
-
72
-
73
-
74
-
75
-
76
-
77
-
78
-
79
-
80
-
81
-
82
-
83
-
84
-
85
-
86
-
87
-
88
-
89
-
90
-
91
-
92
-
93
-
94
-
95
-
96
-
97
-
98
-
99
-
100
-
101
-
102
-
103
-
104
-
105
-
106
-
107
-
108
-
109
-
110
-
111
-
112
-
113
-
114
-
115
-
116
-
117
-
118
-
119
-
120
-
121
-
122
-
123
-
124
-
125
-
126
-
127
-
128
-
129
-
130
-
131
-
132
-
133
-
134
-
135
-
136
-
137
-
138
-
139
-
140
-
141
-
142
-
143
-
144
-
145
 |
 |