Lowrance Elite-12 Ti Installation Manual EN - Page 20
screw size and type, refer to the mounting template. Once, screws are fully tightened
 |
View all Lowrance Elite-12 Ti manuals
Add to My Manuals
Save this manual to your list of manuals |
Page 20 highlights
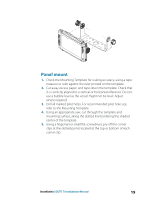
6. Check the fit of the unit, and use a file to remove any remaining obstructions. If water-tightness is required, apply a thin, continuous bead of sealant to the back of the unit prior to final installation. Sealant should be of a neutral cure type to prevent damage to the plastics. 7. Secure the unit with screws (not supplied). For recommended screw size and type, refer to the mounting template. Once screws are fully tightened, ensure there is complete contact with the mounting surface. 8. Press the four corner clips back into position. 20 Installation | ELITE Ti Installation Manual
-
 1
1 -
2
-
3
-
4
-
5
-
6
-
7
-
8
-
9
-
10
-
11
-
12
-
13
-
14
-
 15
15 -
 16
16 -
 17
17 -
 18
18 -
 19
19 -
 20
20 -
 21
21 -
 22
22 -
 23
23 -
 24
24 -
 25
25 -
26
-
27
-
28
-
29
-
30
-
31
-
32
-
33
-
34
-
35
-
36
-
37
-
38
-
39
-
40
-
41
-
42
-
43
-
44
-
45
-
46
-
47
-
48
-
49
-
50
-
51
-
52
-
53
-
54
-
55
-
56
-
57
-
58
-
59
-
60
-
61
-
62
-
63
-
64
-
65
-
66
-
67
-
68
-
69
-
70
-
71
-
72
 |
 |

6.
Check the fit of the unit, and use a file to remove any remaining
obstructions. If water-tightness is required, apply a thin,
continuous bead of sealant to the back of the unit prior to final
installation. Sealant should be of a
neutral cure
type to prevent
damage to the plastics.
7.
Secure the unit with screws (not supplied). For recommended
screw size and type, refer to the mounting template. Once
screws are fully tightened, ensure there is complete contact
with the mounting surface.
8.
Press the four corner clips back into position.
20
Installation
| ELITE Ti Installation Manual