Lowrance HDS-5 Gen2 Installation Manual - Page 17
Aligning Ratchets on Transducer bracket, Aligning ratchets on one-piece bracket - with transducer
 |
View all Lowrance HDS-5 Gen2 manuals
Add to My Manuals
Save this manual to your list of manuals |
Page 17 highlights
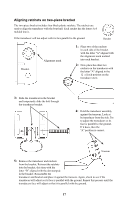
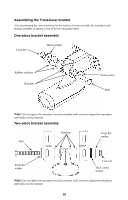
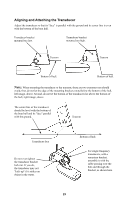
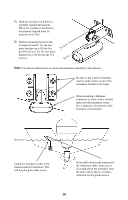
Aligning Ratchets on Transducer bracket Aligning ratchets on one-piece bracket: The one-piece bracket assembly includes two black plastic ratchets. The ratchets are used to align the transducer with the boat hull. Each ratchet has the letters A-E molded into it. Ratchet Bracket 1: Insert the ratchets in the bracket with the letter "A" aligned with the dot stamped on the outside of the transducer bracket, as shown in the following series of diagrams. Align dot and letter "A". 2: Slide the transducer in the bracket and temporarily slide the bolt through the transducer bracket, as shown in the image at right. Transom 3: Hold the transducer assembly against the transom. Look at the transducer from the side.Try to adjust the transducer so its face is parallel to the ground. If it does, then the "A" position is correct. If the transducer will not adjust with its face parallel to the ground, remove the transducer and ratchets from the bracket. Reinsert the ratchets into the bracket, this time with the letter "B" aligned with the dot stamped in the bracket. Reassemble the transducer and bracket and place it against the transom. Again, check to see if the transducer will adjust so its face is parallel with the ground. Repeat this process until the transducers face will adjust so that it is parallel with the ground. 16
-
 1
1 -
2
-
3
-
4
-
5
-
6
-
7
-
8
-
9
-
10
-
11
-
 12
12 -
 13
13 -
 14
14 -
 15
15 -
 16
16 -
 17
17 -
 18
18 -
 19
19 -
 20
20 -
 21
21 -
 22
22 -
23
-
24
-
25
-
26
-
27
-
28
-
29
-
30
-
31
-
32
-
33
-
34
-
35
-
36
-
37
-
38
-
39
-
40
-
41
-
42
-
43
-
44
-
45
-
46
-
47
-
48
-
49
-
50
-
51
-
52
 |
 |
