Lowrance HDS-5 Gen2 Installation Manual - Page 27
when it bottoms out on the hull.
 |
View all Lowrance HDS-5 Gen2 manuals
Add to My Manuals
Save this manual to your list of manuals |
Page 27 highlights
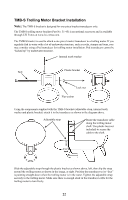
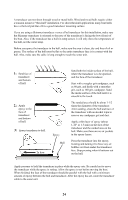
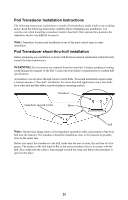
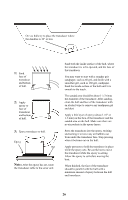
On vee hulls try to place the transducer where the deadrise is 10° or less. 1: Sand face of transducer and bottom of hull. 2: Apply epoxy to face of transducer and bottom of hull. 3: Epoxy transducer to hull. Epoxy Hull Note: After the epoxy has set, route the transducer cable to the sonar unit. Sand both the inside surface of the hull, where the transducer is to be epoxied, and the face of the transducer. You may want to start with a rougher grit sandpaper, such as 60 grit, and finish with a smoother grit, such as 160 grit, sandpaper. Sand the inside surface of the hull until it is smooth to the touch. The sanded area should be about 1-1/2 times the diameter of the transducer. After sanding, clean the hull and face of the transducer with an alcohol wipe to remove any sandpaper grit and dust. Apply a thin layer of epoxy (about 1-16" or 1.5 mm) on the face of the transducer and the sanded area on the hull. Make sure there are no air pockets in the epoxy layers. Press the transducer into the epoxy, twisting and turning it to force any air bubbles out from under the transducer face. Stop pressing when it bottoms out on the hull. Apply pressure to hold the transducer in place while the epoxy sets. Be careful not to move the transducer while the epoxy is setting. Allow the epoxy to set before moving the boat. When finished, the face of the transducer should be parallel with the hull with a minimum amount of epoxy between the hull and transducer. 26
-
 1
1 -
2
-
3
-
4
-
5
-
6
-
7
-
8
-
9
-
10
-
11
-
12
-
13
-
14
-
15
-
16
-
17
-
18
-
19
-
20
-
21
-
 22
22 -
 23
23 -
 24
24 -
 25
25 -
 26
26 -
 27
27 -
 28
28 -
 29
29 -
 30
30 -
 31
31 -
 32
32 -
33
-
34
-
35
-
36
-
37
-
38
-
39
-
40
-
41
-
42
-
43
-
44
-
45
-
46
-
47
-
48
-
49
-
50
-
51
-
52
 |
 |
