MSI MEG Z390 GODLIKE User Manual - Page 35
U2_1: U.2 Connector, Video Demonstration, Important
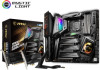 |
View all MSI MEG Z390 GODLIKE manuals
Add to My Manuals
Save this manual to your list of manuals |
Page 35 highlights
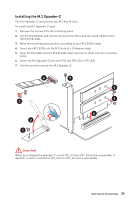
U2_1: U.2 Connector This connector is a U.2 interface port. Each connector can connect to one PCIe 3.0 x4 NVMe storage device. Video Demonstration Watch the video to learn how to Install U.2 SSD. http://youtu.be/KgFvKDxymvw Installing U.2 SSD 1. Connect the U.2 cable to the U.2 connector on the motherboard. 2. Connect the U.2 cable to the U.2 SSD. 3. Connect the U.2 cable to power adapter cable. U.2 SSD U.2 Connector 2 1 U.2 Cable 3 Connect to power adapter cable Important The M2_2, SATA5 and SATA6 will be unavailable when installing U.2 device into U.2 port. Overview of Components 35
-
 1
1 -
2
-
3
-
4
-
5
-
6
-
7
-
8
-
9
-
10
-
11
-
12
-
13
-
14
-
15
-
16
-
17
-
18
-
19
-
20
-
21
-
22
-
23
-
24
-
25
-
26
-
27
-
28
-
29
-
 30
30 -
 31
31 -
 32
32 -
 33
33 -
 34
34 -
 35
35 -
 36
36 -
 37
37 -
 38
38 -
 39
39 -
 40
40 -
41
-
42
-
43
-
44
-
45
-
46
-
47
-
48
-
49
-
50
-
51
-
52
-
53
-
54
-
55
-
56
-
57
-
58
-
59
-
60
-
61
-
62
-
63
-
64
-
65
-
66
-
67
-
68
-
69
-
70
-
71
-
72
-
73
-
74
-
75
-
76
-
77
-
78
-
79
-
80
-
81
-
82
-
83
-
84
-
85
-
86
-
87
-
88
-
89
-
90
-
91
-
92
-
93
-
94
-
95
-
96
-
97
-
98
-
99
-
100
-
101
-
102
-
103
-
104
-
105
-
106
-
107
-
108
-
109
-
110
-
111
 |
 |

35
Overview of Components
Video Demonstration
Watch the video to learn how to Install
U.2 SSD.
http://youtu.be/KgFvKDxymvw
U2_1: U.2 Connector
This connector is a U.2 interface port. Each connector can connect to one PCIe 3.0 x4
NVMe storage device.
Installing U.2 SSD
1.
Connect the U.2 cable to the U.2 connector on the
motherboard.
2.
Connect the U.2 cable to the U.2 SSD.
3.
Connect the U.2 cable to power adapter cable.
1
2
3
U.2 SSD
U.2 Connector
U.2 Cable
Connect to power
adapter cable
Important
The M2_2, SATA5 and SATA6 will be unavailable when installing U.2 device into U.2
port.