MSI MEG Z390 GODLIKE User Manual - Page 38
V-Check Points, Push the M.2 SHIELD FROZR heatsink down.
 |
View all MSI MEG Z390 GODLIKE manuals
Add to My Manuals
Save this manual to your list of manuals |
Page 38 highlights
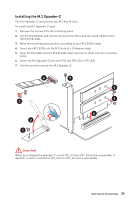
8. Insert the M.2 SHIELD FROZR heatsink shaft into the groove. 9. Push the M.2 SHIELD FROZR heatsink down. 10. Secure the M.2 SHIELD FROZR heatsink onto the mounting pole. 9 8 10 V-Check Points These voltage checkpoints are used to measure the current system voltages. A multimeter (not included) will be required to check voltages. To measure voltage, place test leads on the GND (screw mountin g hole) and a V-Check Point. Please refer to the manual of your multimeter for more information. GND CPU VCCIO VSA DRAM PCH 38 Overview of Components
-
 1
1 -
2
-
3
-
4
-
5
-
6
-
7
-
8
-
9
-
10
-
11
-
12
-
13
-
14
-
15
-
16
-
17
-
18
-
19
-
20
-
21
-
22
-
23
-
24
-
25
-
26
-
27
-
28
-
29
-
30
-
31
-
32
-
 33
33 -
 34
34 -
 35
35 -
 36
36 -
 37
37 -
 38
38 -
 39
39 -
 40
40 -
 41
41 -
 42
42 -
 43
43 -
44
-
45
-
46
-
47
-
48
-
49
-
50
-
51
-
52
-
53
-
54
-
55
-
56
-
57
-
58
-
59
-
60
-
61
-
62
-
63
-
64
-
65
-
66
-
67
-
68
-
69
-
70
-
71
-
72
-
73
-
74
-
75
-
76
-
77
-
78
-
79
-
80
-
81
-
82
-
83
-
84
-
85
-
86
-
87
-
88
-
89
-
90
-
91
-
92
-
93
-
94
-
95
-
96
-
97
-
98
-
99
-
100
-
101
-
102
-
103
-
104
-
105
-
106
-
107
-
108
-
109
-
110
-
111
 |
 |

38
Overview of Components
8
9
10
8.
Insert the M.2 SHIELD FROZR heatsink shaft into the groove.
9.
Push the M.2 SHIELD FROZR heatsink down.
10.
Secure the M.2 SHIELD FROZR heatsink onto the mounting pole.
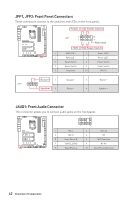
V-Check Points
These voltage checkpoints are used to measure the current system voltages. A
multimeter (not included) will be required to check voltages. To measure voltage,
place test leads on the GND (screw mountin g hole) and a V-Check Point. Please refer
to the manual of your multimeter for more information.
VCCIO
CPU
VSA
DRAM
PCH
GND