Mackie DL32R Owners Manual - Page 10
Removable Expansion Slot - recording
 |
View all Mackie DL32R manuals
Add to My Manuals
Save this manual to your list of manuals |
Page 10 highlights
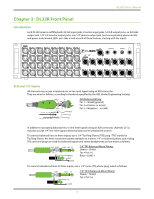
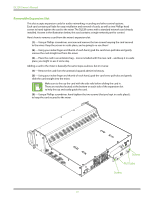
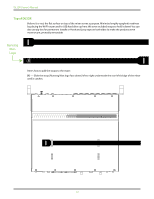
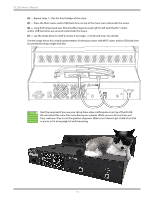
DL32R Owner's Manual Removable Expansion Slot This slot accepts expansion cards for audio networking, recording and other control options. Each card contains pull tabs for easy installation and removal of cards, as well as two Phillips head screws to hand-tighten the card to the mixer. The DL32R comes with a standard network card already installed. As seen in the illustration below, this card contains a single network port for control. Here's how to remove a card from the mixer's expansion slot: (1) - Using a Phillips screwdriver, unscrew and remove the two screws keeping the card secured to the mixer. Keep the screws in a safe place; you're going to re-use them! (2) - Using your index finger and thumb of each hand, grab the card's two pull tabs and gently remove the card straight out from the mixer. (3) - Place the card in an antistatic bag - one is included with the new card - and keep it in a safe place; you might re-use it some day. Adding a card to the mixer is basically the same steps as above, but in reverse: (1) - Remove the card from the antistatic bag and admire its beauty. (2) - Using your index finger and thumb of each hand, grab the card's two pull tabs and gently slide the card straight into the mixer. Make sure to line up the card with the side rails before sliding the card in. There are notches located at the bottom on each side of the expansion slot to help line up and easily guide the card. (3) - Using a Phillips screwdriver, hand-tighten the two screws (that you kept in a safe place!), to keep the card secured to the mixer. Screw Pull tabs Screw 10
-
 1
1 -
2
-
3
-
4
-
 5
5 -
 6
6 -
 7
7 -
 8
8 -
 9
9 -
 10
10 -
 11
11 -
 12
12 -
 13
13 -
 14
14 -
 15
15 -
16
-
17
-
18
-
19
-
20
-
21
-
22
-
23
-
24
-
25
-
26
-
27
-
28
-
29
-
30
-
31
-
32
-
33
-
34
-
35
-
36
 |
 |
