Mackie DL32R Owners Manual - Page 9
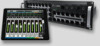
DL32R Rear Panel - hard drive
 |
View all Mackie DL32R manuals
Add to My Manuals
Save this manual to your list of manuals |
Page 9 highlights
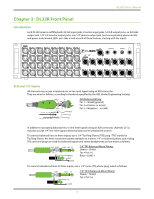
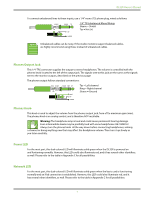
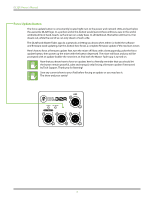
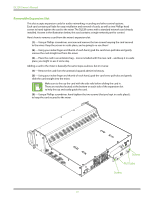
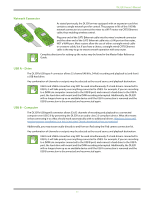
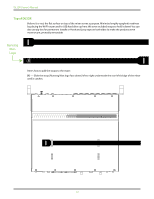
DL32R Owner's Manual Chapter 3 : DL32R Rear Panel Introduction The rear panel of each DL32R is outfitted with a power connector, a power switch, two fan vents, a removable expansion slot, an Ethernet connector and two USB slots to stream multichannel audio to and from (one for a hard drive, one for a computer). Power Connector This is a standard 3-prong IEC power connector. Connect the detachable power cord (included in the packaging) to the power receptacle, and plug the other end of the power cord into an AC outlet. Make sure that the AC power is matched to the AC power indicated on the rear panel (below the IEC receptacle). Warning: Disconnecting the plug's ground pin is dangerous. Don't do it! In fact, it's a bad idea to remove anything from - or add anything to, for that matter - the line cord. Again, don't do it! Power Switch Press the top of this rocker switch in to turn the DL32R on and press the bottom of this switch to turn the mixer off. As a general guide, the DL32R should be turned on first, before any external power amplifiers or powered speakers. As such, it should also be turned off last. This will reduce the possibility of any turn-on or turn-off thumps in the PA. Fan Vents The DL32R is cooled with two fans on the rear of the unit. Air is drawn in through the sides and sloping part of the top panel, and is expelled through the rear fan openings. The speed of these fans is adjusted automatically based on the temperature of the unit and its surroundings. Always maintain at least four inches clearance behind, and one inch clearance on each side of the unit. When installing into a rack, the rear should be open with at least four inches of clearance behind the rack and adjacent structures (maintaining the one inch clearance on each side of the unit within the rack). For racks with only front ventilation, leave at least one rack space open above and below the unit (maintaining the one inch side and four inch rear clearances around the unit within the rack). 9
-
 1
1 -
2
-
3
-
 4
4 -
 5
5 -
 6
6 -
 7
7 -
 8
8 -
 9
9 -
 10
10 -
 11
11 -
 12
12 -
 13
13 -
 14
14 -
15
-
16
-
17
-
18
-
19
-
20
-
21
-
22
-
23
-
24
-
25
-
26
-
27
-
28
-
29
-
30
-
31
-
32
-
33
-
34
-
35
-
36
 |
 |
