Magellan Mapsend Direct Route Manual - English, French, German and Spanish - Page 17
Finish, Using Street Routing and Guidance in MapSend, Click the Upload Regions - problems
 |
UPC - 763357108514
View all Magellan Mapsend Direct Route manuals
Add to My Manuals
Save this manual to your list of manuals |
Page 17 highlights
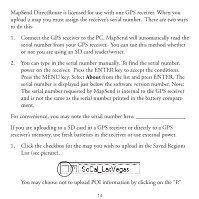
2. Click the Upload Regions button on the toolbar. 3. Choose where you want to send the map. Note: Sending the map to the hard drive is useful if you wish to frequently switch maps on the unit. This option processes the map image and stores it, so next time you upload it you can skip the processing wait. 4. The first time you upload a map, MapSend asks you to connect your GPS receiver to the computer's serial port, so it can auto-detect the port and determine the baud rate. If MapSend has problems detecting the port, use the GPS receiver MENU options to turn off NMEA and Set Baud Rate to 4800. Make sure any hot sync programs (e.g. PDA, cell phone, etc.) on your PC are turned off. 5. Next step is to either auto-detect or manually input the unit serial number. 6. MapSend will help you make sure the map will fit on the storage device. This may involve a couple of steps to reach an acceptable map size. Once you have an acceptable map, Click Finish to proceed. 7. The map data is then converted and loaded to the target receiver or storage device. Using Street Routing and Guidance in MapSend DirectRoute routing and guidance is primarily designed for use on the handheld, but it is possible to create street routes in DirectRoute on the PC. 15
-
 1
1 -
2
-
3
-
4
-
5
-
6
-
7
-
8
-
9
-
10
-
11
-
 12
12 -
 13
13 -
 14
14 -
 15
15 -
 16
16 -
 17
17 -
 18
18 -
 19
19 -
 20
20 -
 21
21 -
 22
22 -
23
-
24
-
25
-
26
-
27
-
28
-
29
-
30
-
31
-
32
-
33
-
34
-
35
-
36
-
37
-
38
-
39
-
40
-
41
-
42
-
43
-
44
-
45
-
46
-
47
-
48
-
49
-
50
-
51
-
52
-
53
-
54
-
55
-
56
-
57
-
58
-
59
-
60
-
61
-
62
-
63
-
64
-
65
-
66
-
67
-
68
-
69
-
70
-
71
-
72
-
73
-
74
-
75
-
76
-
77
-
78
-
79
-
80
-
81
-
82
-
83
-
84
-
85
-
86
-
87
-
88
-
89
-
90
-
91
-
92
-
93
-
94
-
95
-
96
-
97
-
98
-
99
-
100
-
101
-
102
-
103
-
104
-
105
-
106
-
107
-
108
 |
 |