Magellan SporTrak Color User Manual - Page 39
Highlighted Road Vertical Profile Description
 |
UPC - 763357105629
View all Magellan SporTrak Color manuals
Add to My Manuals
Save this manual to your list of manuals |
Page 39 highlights
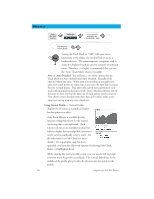
Reference Selecting Vertical Profile - Note, not all options for Vertical Profile are available at all times. For example, if you have a topographical map loaded but the cursor or present position is not on a road, the option "Highlighted road" will not be displayed. From Any Screen Highlight ENTER Vert. Profile Select option ENTER Track History Description - This option displays the vertical profile of the track that is stored in the SporTrak. If you have cleared your track, either with the Clear Track option or clearing memory, Track History cannot be accessed. Highlighted Road Vertical Profile Description - (Available only with map data uploaded from Magellan MapSend Topo for the United States.) If the cursor or your present position is on a road and you have topographic maps loaded, you can view the vertical profile for the road you have selected. Route Vertical Profile Description - (Available only with map data uploaded from Magellan MapSend Topo for the United States.) If you have at least one route stored in memory, you can view the vertical profile for the route. After selecting Vertical Profile, you will be asked to select the route you want to plot. Path Check Description - Path check performs two functions. First, it allows you to create a path on the Map screen graphically and then view this path's vertical profile (assuming that you have uploaded a topo map). You can also save this path as a route, allowing an additional method of creating a route. After selecting Path Check from the Vert. Profile menu, you will be returned to the Map screen where you can begin to lay out your path. Using the arrow keypad, move the cursor to the desired location of the path's beginning and press [GOTO]. Now use the arrow keypad to move to a new location and press [GOTO]. Notice a thick line has been drawn between the two points. Continue moving the cursor and pressing [GOTO] until your path is complete. When it is done, press [ENTER] and the vertical profile for the path is displayed. Magellan SporTrak GPS Receiver 29
-
 1
1 -
2
-
3
-
4
-
5
-
6
-
7
-
8
-
9
-
10
-
11
-
12
-
13
-
14
-
15
-
16
-
17
-
18
-
19
-
20
-
21
-
22
-
23
-
24
-
25
-
26
-
27
-
28
-
29
-
30
-
31
-
32
-
33
-
 34
34 -
 35
35 -
 36
36 -
 37
37 -
 38
38 -
 39
39 -
 40
40 -
 41
41 -
 42
42 -
 43
43 -
 44
44 -
45
-
46
-
47
-
48
-
49
-
50
-
51
-
52
-
53
-
54
-
55
-
56
-
57
-
58
-
59
-
60
-
61
-
62
-
63
-
64
-
65
-
66
-
67
-
68
-
69
-
70
-
71
-
72
-
73
-
74
-
75
-
76
-
77
-
78
-
79
-
80
-
81
-
82
-
83
-
84
-
85
-
86
 |
 |
