Makita EK7301 Owners Manual - Page 15
Tightening the V-belt, Checking V-belt tension, IMPORTANT, Installing the pressure water system
 |
View all Makita EK7301 manuals
Add to My Manuals
Save this manual to your list of manuals |
Page 15 highlights
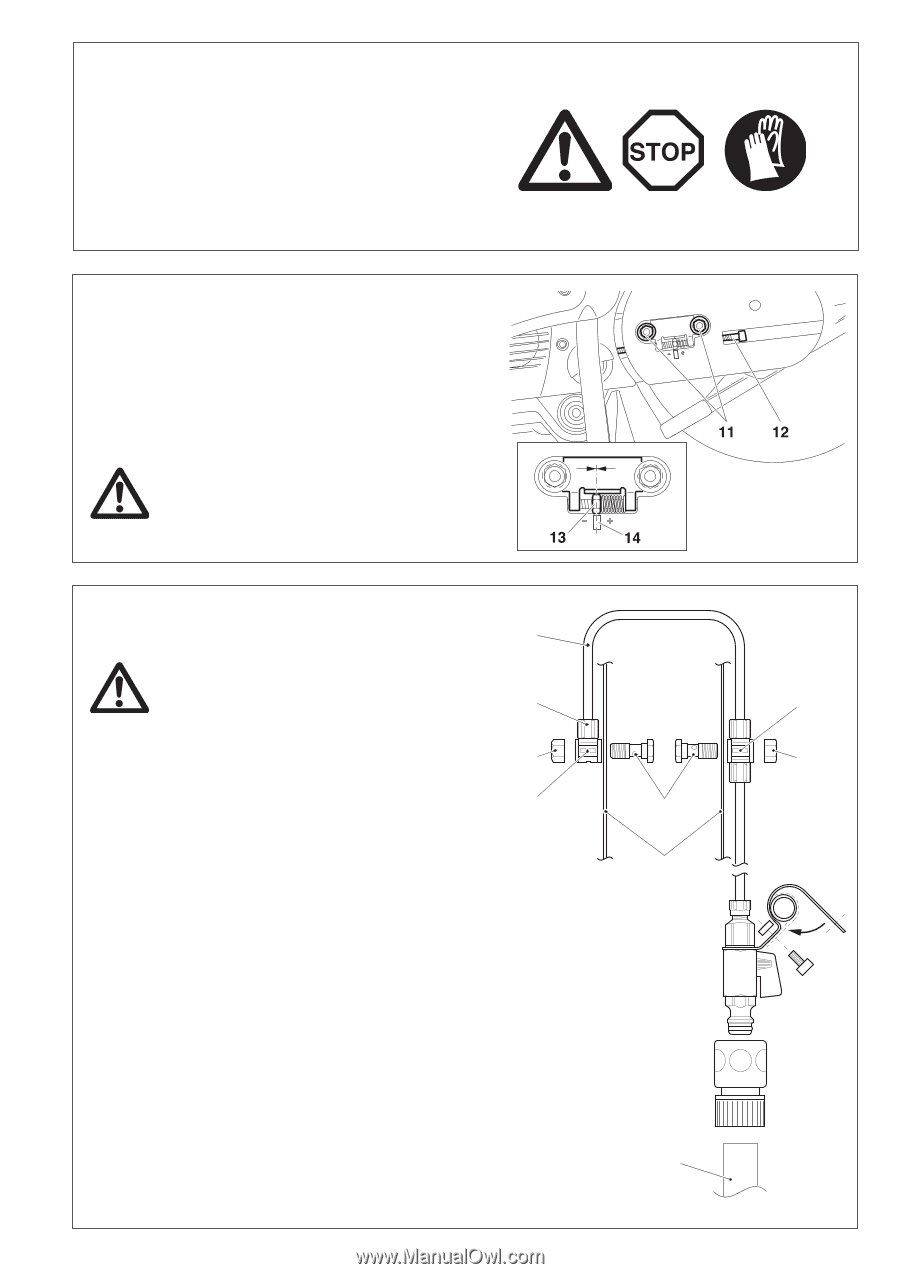
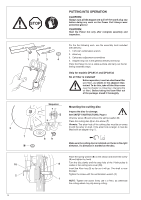
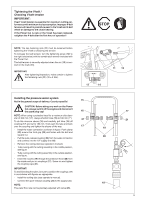
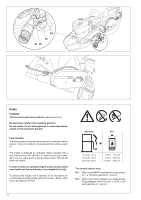
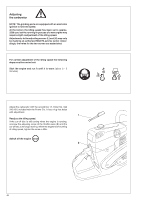
Tightening the V-belt / Checking V-belt tension IMPORTANT: Exact V‑belt tension is essential for maximum cutting performance with minimum fuel consumption. Improper V‑belt tension will result in premature wear to the V‑belt and V‑belt wheel or damage to the clutch bearing. If the Power Cut is new or the V-belt has been replaced, retighten the V-belt after the first hour of operation! NOTE: The two fastening nuts (11) must be loosened before tightening the V-belt or checking the tension. To increase the belt tension, turn the tightening screw (12) to the right (clockwise) with the combination wrench included with the Power Cut. The belt tension is correctly adjusted when the nut (13) is centred on the mark (14). IMPORTANT: After tightening/inspection, make certain to tighten the fastening nuts (11) (30 ± 2 Nm). Installing the pressure water system 15 Not in the general scope of delivery. Country-specific! CAUTION: Before doing any work on the Power Cut, always switch off the engine and disconnect the spark plug cap! 16 NOTE: When using a protective hood for a maximum disk diam- eter of 300 mm (12"), always shorten hose (15) to 180 mm (7"). 21 To do this unscrew sleeve (16) and carefully pull tube (15) off coupling (17) and cut to 180 mm. Then push the tube end back over the coupling and tighten the sleeve all the way. 17 - Install the water connection as shown in figure. Push clamp (22) around the front grip (23) and fasten with the bolt and square nut. - Pull the quick-release coupling (24) from the water connection and connect it to the 1/2" supply line (18). - Remove the cutting disk (see operator's manual). - Tube routing with the cutting assembly in the middle position, see figure. - Tube routing with the cutting assembly in the outside position, see figure. - Insert the nozzles (19) through the protective hood (20) from the inside and put on couplings (17). Screw on and tighten the coupling caps (21). IMPORTANT: To avoid bending the tubes, be sure to position the couplings (17) in accordance with figures as appropriate. - Install the cutting disc (see operator's manual). - Connect the quick-release coupling (24) to the supply tube. NOTE: The water flow rate can be precisely adjusted with valve (25). 19 20 18 * 17 21 15
-
 1
1 -
2
-
3
-
4
-
5
-
6
-
7
-
8
-
9
-
 10
10 -
 11
11 -
 12
12 -
 13
13 -
 14
14 -
 15
15 -
 16
16 -
 17
17 -
 18
18 -
 19
19 -
 20
20 -
21
-
22
-
23
-
24
-
25
-
26
-
27
-
28
-
29
-
30
-
31
-
32
-
33
-
34
-
35
-
36
-
37
-
38
-
39
-
40
-
41
-
42
-
43
-
44
-
45
-
46
-
47
-
48
-
49
-
50
-
51
-
52
-
53
-
54
-
55
-
56
-
57
-
58
-
59
-
60
-
61
-
62
-
63
-
64
-
65
-
66
-
67
-
68
 |
 |