Makita RT0700C Owners Manual - Page 8
Trimmer guide, optional accessory, Tilt base optional accessory
 |
View all Makita RT0700C manuals
Add to My Manuals
Save this manual to your list of manuals |
Page 8 highlights
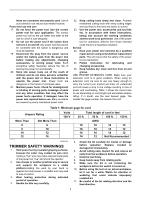
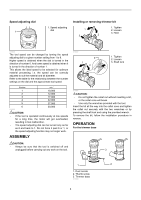
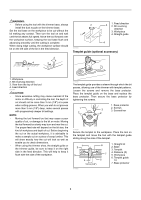
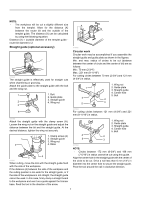
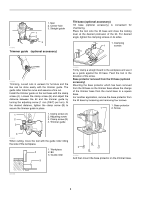
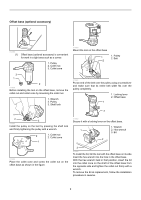
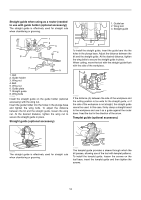
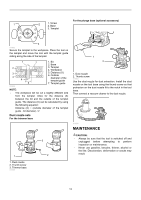
1. Nail 2. Center hole 3. Straight guide 1 2 3 011843 Trimmer guide (optional accessory) Tilt base (optional accessory) Tilt base (optional accessory) is convenient for chamfering. Place the tool onto the tilt base and close the locking lever at the desired protrusion of the bit. For desired angle, tighten the clamping screws on its sides. 1. Clamping 1 screws 011844 Trimming, curved cuts in veneers for furniture and the like can be done easily with the trimmer guide. The guide roller rides the curve and assures a fine cut. Install the trimmer guide on the tool base with the clamp screw (A). Loosen the clamp screw (B) and adjust the distance between the bit and the trimmer guide by turning the adjusting screw (1 mm (3/64") per turn). At the desired distance, tighten the clamp screw (B) to secure the trimmer guide in place. 1 1. Clamp screw (A) 2. Adjusting screw 2 3. Clamp screw (B) 4. Trimmer guide 3 011993 Firmly clamp a straight board to the workpiece and use it as a guide against the tilt base. Feed the tool in the direction of the arrow. Base protector removed from the tilt base (optional accessory) Mounting the base protector which has been removed from the tilt base on the trimmer base allows the change of the trimmer base from the round base to a square base. For another application, remove the base protector from the tilt base by loosening and removing four screws. 1. Base protector 1 2. Screw 4 011845 When cutting, move the tool with the guide roller riding the side of the workpiece. 1. Workpiece 2 2. Bit 3. Guide roller 3 1 2 011994 And then mount the base protector on the trimmer base. 001998 8
-
 1
1 -
2
-
 3
3 -
 4
4 -
 5
5 -
 6
6 -
 7
7 -
 8
8 -
 9
9 -
 10
10 -
 11
11 -
 12
12 -
 13
13 -
14
-
15
-
16
-
17
-
18
-
19
-
20
-
21
-
22
-
23
-
24
-
25
-
26
-
27
-
28
-
29
-
30
-
31
-
32
-
33
-
34
-
35
-
36
-
37
-
38
-
39
-
40
-
41
-
42
-
43
-
44
-
45
-
46
-
47
-
48
 |
 |
