Marantz VP8000 VP8000 User Manual - English - Page 4
Projector Layout And Functional Overview
 |
View all Marantz VP8000 manuals
Add to My Manuals
Save this manual to your list of manuals |
Page 4 highlights
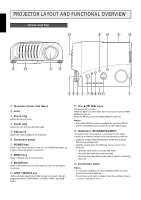
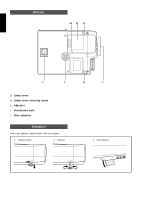
Y ENGLISH INTRODUCTION PROJECTOR LAYOUT AND FUNCTIONAL OVERVIEW Front and Top !3 o !0 y !3 A TEXAS INSTRUMENTS TECHNOLOGY t !3 VP8000 wt MENU ENTER STANDB UP POWER G WARNIN LEFT INPUT RIGHT DOWN w e r q u !2 i !3 !1 q q IR sensor (Front and Rear) w Lens e Focus ring Adjust the picture focus. r Zoom ring Adjust the size of the projected image. t Adjusters Adjust the vertical angle of the projector. y Connector panel u POWER key Press to turn the projector on and off. The POWER key lights up in green when the power is turned on. i MENU key Press to display the on-screen menu. o ENTER key Press to enter items in the menu when the menu is displayed on screen. !0 INPUT SELECT key Select an input signal. Each time the key is pressed, the unit toggles between COMPONENT, S-VIDEO, VIDEO, and RGB inputs. !1 The keys Control the menu cursor. Press the į key for more than three seconds to turn the HIGH BRIGHT mode on. Press the Ĭ key to turn the HIGH BRIGHT mode off. Notes • The HIGH BRIGHT mode is available for only the RGB IN and the DYNAMIC picture mode for a video signal input. !2 Indicators: STANDBY/WARING Turn green when the projector is connected to AC power. It lights up or flashes orange under the following conditions: • Lights up orange when temperature inside the projector becomes unusually high. • Flashes orange when the following errors occurs in the projector: - when the lamp cover is not secured firmly, - when the fan inside the projector stops, - when the lamp has failed or the lamp is almost completely worn-out. !3 Ventilation holes Notes • Do not place anything near the ventilation holes as it may cause internal heat build-up. • Do not place your hand or objects near the ventilation holes --- the air coming out is hot. 3
-
 1
1 -
 2
2 -
 3
3 -
 4
4 -
 5
5 -
 6
6 -
 7
7 -
 8
8 -
 9
9 -
 10
10 -
11
-
12
-
13
-
14
-
15
-
16
-
17
-
18
-
19
-
20
-
21
-
22
 |
 |
