Meade ETX-90 User Manual - Page 10
Moving Through AutoStar's Menus, Initializing AutoStar, Easy Two-Star Align - power
 |
View all Meade ETX-90 manuals
Add to My Manuals
Save this manual to your list of manuals |
Page 10 highlights
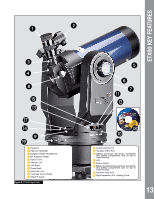
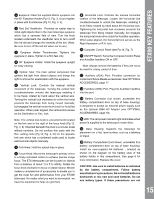
ALIGNING THE ETX90 10 horizontal lock. The tube is pointing True North and now in the Alt/Az home position. Moving Through AutoStar's Menus The AutoStar database is organized in levels for quick and easy navigation. • Press ENTER to go deeper into AutoStar's menu levels. • Press MODE to move back toward the top menu level. • Press the Scroll keys to move up and down through the options available for each level. • Press the Arrow keys to enter characters and digits. The Arrow keys are also used to move the telescope. Initializing AutoStar This section describes how to initialize AutoStar. Perform this procedure the first time you use AutoStar or after performing a RESET (see "RESET" page 31). 1. Verify that AutoStar is properly connected to your telescope. See "Getting Started" page 7. 2. Turn the telescope power switch to the ON position. The AutoStar beeps and the display screen is activated. Then AutoStar takes a few moments to start up the system. 3. "Press 0 to Align or Mode for Menu" displays. Press 0 to align your telescope using the "Easy Align" method, see "Easy (Two-Star) Align" on page 11. To skip the alignment process and access the AutoStar menus, press the Mode key. 4. The telescope then tests the motor function of the telescope by moving in the horizontal and vertical directions. 5. Set Your Location or Zip Code: The Location screen displays. This screen asks you if you wish to choose either the zip code of your observing location or the location (i.e., entering the city and state or country of your observing location). Press "1" to select the zip code option or "2" to enter the city and state. Note: The location settings (country/state/province and city, or zip code) are only asked for the first time you turn on the control panel. If you wish to change this setting later on, use the Site menu. See SITE, page 32 for more information. a. If you chose the zip code option, the left most "0" is highlighted. Use the Number keys to enter the digits. As you enter a digit, the next digit to the right will be highlighted. Enter the next digit. Repeat this process until all 5 digits of your zip code are entered. Press ENTER. b. If you chose the location option, the next screen asks for the country or state/province (listed alphabetically) of the observing site. i. Use the Scroll keys to scroll through the list of countries, states, and provinces. Press ENTER when the correct location displays. ii. The next screen asks for the city (listed alphabetically) closest to the observing site. Use the Scroll keys to scroll through the list of cities. Press ENTER when the correct city appears on screen. 6. The next screen requests the status of Daylight Savings Time. If Daylight Savings Time is active, press the "1" key. If Daylight Savings Time is not active, press the "2" key. Note: Daylight Savings Time may be referred to by a different name in various areas of the world. 7. AutoStar then asks for the Telescope Model. Using the scroll keys (Pg. 20, Fig. 10, 7) on the AutoStar locate the model of your telescope and press enter. 8. System initialization is now complete and AutoStar enters into the Easy Alignment routine. See "Easy (Two-Star) Alignment" for performing an alignment on the night sky. If you do not wish to begin an alignment on the night sky, press the MODE key to exit to the main AutoStar menu. Easy (Two-Star) Align The fastest and easiest way to locate objects with Autostar's GO TO capabilities is to use Easy Align.
-
 1
1 -
2
-
3
-
4
-
 5
5 -
 6
6 -
 7
7 -
 8
8 -
 9
9 -
 10
10 -
 11
11 -
 12
12 -
 13
13 -
 14
14 -
 15
15 -
16
-
17
-
18
-
19
-
20
-
21
-
22
-
23
-
24
-
25
-
26
-
27
-
28
-
29
-
30
-
31
-
32
-
33
-
34
-
35
-
36
-
37
-
38
-
39
-
40
-
41
-
42
-
43
-
44
-
45
-
46
-
47
-
48
-
49
-
50
-
51
-
52
-
53
-
54
-
55
-
56
-
57
-
58
-
59
-
60
 |
 |
