Meade ETX-90 User Manual - Page 11
How to perform the Easy Align, Procedure - observer
 |
View all Meade ETX-90 manuals
Add to My Manuals
Save this manual to your list of manuals |
Page 11 highlights
AutoStar automatically picks two stars from its database for the Easy Align procedure. During this procedure, AutoStar slews the telescope to a first alignment star. The user is asked to verify that the telescope is pointed at the chosen star and then prompted to center the star in the eyepiece. The process is repeated with a second star to complete the alignment. Note: Before aligning the telescope, first verify that "INITIALIZING AUTOSTAR", page 10, has been performed. See "Moving through Autostar's Menus", page 10, for a description of how Autostar's keys operate. How to perform the Easy Align Procedure If you have just powered on the telescope, follow the procedures listed in "Initializing AutoStar" on page 10. When completed, continue on to the steps below to perform the Easy Alignment procedure. If the telescope is already powered on and the correct site location, date, time and telescope model have already been entered, the Easy Alignment can be started by selecting in the menu Setup: Align: Easy and following the steps below. 1. When the Easy Alignment procedure is selected in the AutoStar's setup menu. See page 9, "The ETX90 Home Position" for a description on placing the ETX90 telescope into the home position. Note: The easiest way to set the telescope in the home position is using the Magnetic North method. Follow the steps on page 9 "Finding True North using a compass adjusted for local declination". 2. Star Alignment - The AutoStar then chooses two stars to align upon. When the telescope slews to the first star for alignment, it may not appear in the field of view in the eyepiece. The alignment star should be easily recognized and be the brightest star in the area of the sky where the telescope is pointing. While looking through the red dot finder, use the Arrow Keys to move the telescope to place the red dot on the top of the brightest nearby star. Now look through the eyepiece and use the Arrow Keys to move the star to the center of the eyepiece field. Press ENTER. If that area of the sky is obscured by an object, you can prompt AutoStar to chose an alternate star by pressing either one of the two Scroll Keys. Repeat procedure for the second alignment star. When the procedure is performed correctly, "Alignment Successful" displays. If AutoStar does not display this message, perform this procedure again. Note: AutoStar locates alignment stars based on the date, time, and location entered. The alignment stars may change from night to night. All that is required is for the observer to center the selected stars in the eyepiece when prompted. NOTE: The GO TO key also allows you to perform a "spiral search". A spiral search is useful when the telescope slews to an object, but that object is not visible in the eyepiece after the telescope finishes its search. (This sometimes occurs during an alignment procedure.) Press GO TO when the slew is finished and the telescope starts slewing in a spiral pattern at a very slow speed around the search area. Look through the eyepiece and when the object does become visible, press MODE to stop the spiral search. Then use the Arrow keys to center the object. Which One's the Alignment Star? If you're not familiar with objects in the night sky, how can you be sure if the star in your eyepiece is really the alignment star? The rule of thumb is that an alignment star is usually the brightest star in that area of the sky. If you perform a GoTo to an alignment star and you're not sure if you have located the alignment star or it isn't in the eyepiece, look through your viewfinder. When you view an alignment star in the viewfinder, it stands out dramatically from the rest of the stars in that portion of the sky. The viewfinder will help you locate a star more quickly than the eyepiece. Using AutoStar, set the slew speed to 6 (press Number key 6) or higher and use the Arrow keys to center the alignment star in the viewfinder. If your viewfinder has been aligned with the telescope, the alignment star should now be in the eyepiece. Set the slew speed to 4 or less and center the star in the eyepiece. Also see the Spiral Search tip, this page. ALIGNING THE ETX90 11
-
 1
1 -
2
-
3
-
4
-
5
-
 6
6 -
 7
7 -
 8
8 -
 9
9 -
 10
10 -
 11
11 -
 12
12 -
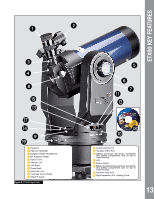 13
13 -
 14
14 -
 15
15 -
 16
16 -
17
-
18
-
19
-
20
-
21
-
22
-
23
-
24
-
25
-
26
-
27
-
28
-
29
-
30
-
31
-
32
-
33
-
34
-
35
-
36
-
37
-
38
-
39
-
40
-
41
-
42
-
43
-
44
-
45
-
46
-
47
-
48
-
49
-
50
-
51
-
52
-
53
-
54
-
55
-
56
-
57
-
58
-
59
-
60
 |
 |