Meade ETX-90 User Manual - Page 16
followed, batteries may explode, catch fire, or leak. - photography
 |
View all Meade ETX-90 manuals
Add to My Manuals
Save this manual to your list of manuals |
Page 16 highlights
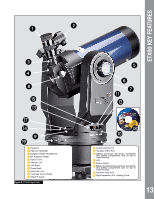
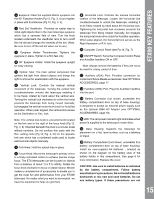
ETX90 KEY FEATURES followed, batteries may explode, catch fire, or leak. Improperly installed batteries void your Meade warranty. Always remove the batteries if they are not to be used for a long period of time. 1* AutoStar Suite DVD. 1( Right Ascension (R.A.) Setting Circle: See page 53 for detailed information. 2) Flip-Mirror and Flip-Mirror Control Knobs: ETX telescopes include an internal mirror. With the flipmirror control in the "up" position, as shown in Fig. 4, 20 light is diverted to the eyepiece. With the flip-mirror control in the "down" position light proceeds straight out the photo port for photography. Note: The flip-mirror control is in the "up" position when the control is vertical (perpendicular to the telescope tube). To place the flip-mirror in the "down" position, turn the control until it is horizontal. 2! Photo Port: Attach any 35mm camera with a removable lens to this port using an optional #64 TAdapter or attach the #932 Erecting Prism for correctly oriented images through the eyepiece. See OPTIONAL ACCESSORIES, page 19. 2@ Declination (Dec.) Setting Circle (on left fork arm): See page 53 for detailed information. 2# Viewfinder Alignment Screws: Adjust these screws to align the viewfinder. See pages 8 and 14 for more information. 2$ Dust Cap: Squeeze the two tabs on the sides of the dust cap to unlatch the cover from the front lens of the telescope. 2% Bubble Level/Compass: Used to aide in setting the telescope in the Home Position. See page 9. When placed in the 90° eyepiece holder (pg. 13, Fig. 3, 4) the bubble level compass can be used to level the telescope and determine the direction of magnetic North. . 16
-
 1
1 -
2
-
3
-
4
-
5
-
6
-
7
-
8
-
9
-
10
-
 11
11 -
 12
12 -
 13
13 -
 14
14 -
 15
15 -
 16
16 -
 17
17 -
 18
18 -
 19
19 -
 20
20 -
 21
21 -
22
-
23
-
24
-
25
-
26
-
27
-
28
-
29
-
30
-
31
-
32
-
33
-
34
-
35
-
36
-
37
-
38
-
39
-
40
-
41
-
42
-
43
-
44
-
45
-
46
-
47
-
48
-
49
-
50
-
51
-
52
-
53
-
54
-
55
-
56
-
57
-
58
-
59
-
60
 |
 |