Meade ETX-90 User Manual - Page 22
Observing Using AutoStar's Arrow - observer telescope
 |
View all Meade ETX-90 manuals
Add to My Manuals
Save this manual to your list of manuals |
Page 22 highlights
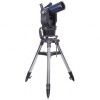
AutoStar #497 HANDBOX 22 appropriate key shown below. Nine available speeds are: Number Key "1" = 1x (Guide) Number Key "2" = 2x Number Key "3" = 8x Number Key "4" = 16x Number Key "5" = 64x Number Key "6" = 0.50°/sec Number Key "7" = 1.0°/sec Number Key "8" = 1.5°/sec Number Key "9" = 4.0°/sec (Max) Speeds "1","2", or "3" Best used for fine centering of an object in the field of view of a higher power eyepiece, such as a 12mm or a 9mm eyepiece. Speeds "4", "5", or "6": Enables centering an object in the field of a low-to-moderate power eyepiece, such as the standard Super Plössl 26mm. Speeds "7" or "8": Best used for rough centering of an object in the Red Dot Viewfinder. Speed "9": Moves the telescope quickly from one point in the sky to another. Scroll Keys: Accesses options within a selected menu. The menu is displayed on the first line of the screen. Options within the menu are displayed, one at a time, on the second line. Press the Scroll keys to move through the options. Press and hold a Scroll key to move quickly through the options. The Scroll keys also scroll through the letters of the alphabet and numerical digits. Note: The Scroll Down key and the Down Arrow key move forward through the alphabet & digits (A to Z, 0 to 9). The Scroll Up key and the Up Arrow key move backward (Z to A, 9 to 0). Common symbols are also available in the list. ? Key: Accesses the "Help" file. "Help" provides on-screen information on how to accomplish whatever task is currently active. Hold down the ? key and then follow the prompts on the display to access details of AutoStar functions in the Help feature. The Help system is essentially an on-screen instruction manual. If you have a question about an AutoStar operation, e.g., INITIALIZATION, ALIGNMENT, etc., hold down the ? key and follow the directions that scroll on the second line of the LCD screen. When a word appears in [brackets], press ENTER to access the AutoStar Glossary. A definition or more detailed information is displayed. Press MODE to return to the scrolling AutoStar Help display. When satisfied with the Help provided, press MODE to return to the original screen and continue with the chosen procedure. Coil Cord Port: Plug one end of the AutoStar coil cord into this port (pg. 20, Fig. 10, 9) located at the bottom of the AutoStar handbox. Coil Cord: Plug one end of the AutoStar coil cord into the HBX port (Pg. 20, Fig. 10, 10) of the computer control panel of the telescope and the other end into the coil cord port. Serial Port: plug an serial accessory (#505) cable into AutoStar for updating functions such as "Download" or "Clone". See page 19 for more details. Utility Light: Use this built-in red light to illuminate star charts and accessories without disturbing your eye's adaptation to darkness. Observing Using AutoStar's Arrow Keys You may observe land and astronomical objects using AutoStar's Arrow keys to move the telescope. 1. Verify the telescope is fully assembled and that AutoStar is properly connected to your telescope. See Getting Started on page 5. 2. Flip the telescope power switch to the ON position. The AutoStar screen is activated and a copyright message displays briefly, followed by a short beep. Then AutoStar takes a few moments to start up the system. "Press 0 to align or Mode for Menu" displays (if you select "0", Alignment will begin). 3. The Arrow keys are now activated. Press the Arrow keys (Pg. 20, Fig. 10, 5) to slew (move)
-
 1
1 -
2
-
3
-
4
-
5
-
6
-
7
-
8
-
9
-
10
-
11
-
12
-
13
-
14
-
15
-
16
-
 17
17 -
 18
18 -
 19
19 -
 20
20 -
 21
21 -
 22
22 -
 23
23 -
 24
24 -
 25
25 -
 26
26 -
 27
27 -
28
-
29
-
30
-
31
-
32
-
33
-
34
-
35
-
36
-
37
-
38
-
39
-
40
-
41
-
42
-
43
-
44
-
45
-
46
-
47
-
48
-
49
-
50
-
51
-
52
-
53
-
54
-
55
-
56
-
57
-
58
-
59
-
60
 |
 |