Meade ETX-90 User Manual - Page 53
Setting Circles
 |
View all Meade ETX-90 manuals
Add to My Manuals
Save this manual to your list of manuals |
Page 53 highlights
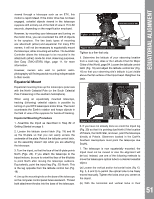
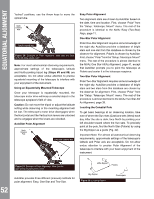
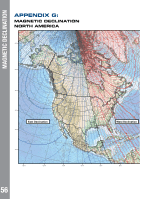
Setting Circles The ETX models are equipped with R.A. and Dec. setting circles (Pg 13, Fig. 3, 19 and 22) to aid in locating faint celestial objects when the telescope has been polar aligned. Setting circles emulate the celestial coordinates found on star charts or in sky catalogs. Any charted object is easily located by coordinates in R.A. (in hours, minutes and seconds, from 0h 0m 0s to 23h 59m 59s) and Dec. (in degrees from 0° to ±90°). With an ETX model polar aligned, use the Arrow keys to move the telescope in R.A. (left and right keys) and Dec. (up and down keys). Note: The Dec. setting circle is located on the left arm of the telescope fork mount. The right arm of the mount contains a graduated circle (mounted behind 40 40 30 20 10 0 30 10 20 12 11 10 12 13 14 Declination Setting Circle Right Ascension Setting Circle Figure 23: Setting Circles - Dec. and R.A. the knurled knob of the vertical lock), without Dec. numbers. • Declination Setting Circle: The Dec. setting circle (Fig. 13) has been factory set to read the correct Declination of celestial objects. Because the smooth knob on this fork mount arm need never be loosened, the Dec. setting circle should always remain calibrated. If for some reason this knob becomes loose and the Dec. setting circle must be recalibrated, level the optical tube so that it is parallel to the drive base. Loosen the smooth knob covering the Dec. setting circle until the setting circle moves freely. Reposition the setting circle so that the 0 setting aligns with the Dec. pointer (the molded triangle beneath the setting circle). Retighten the Dec. knob. • Right Ascension Setting Circle: Since celestial objects move in R.A., the R.A. setting circle (Fig. 13) must be reset as each object is located during an observing session. The R.A. pointer is located on the drive base. To use the setting circles to find astronomical objects, the ETX must first be polar aligned. It is advisable that the motor drive be turned on and that a low-power eyepiece (e.g., a 26mm eyepiece) be employed. Then use the following procedure: 1. Identify the celestial coordinates (R.A. and Dec.) of a bright, easy-to-find object, such as a bright star. (Avoid using Polaris or any object near Polaris.) Coordinates of bright stars are listed in astronomy magazines, text books or star charts. Center this object in the telescope's field of view. 2. Manually turn the R.A. circle to read the R.A. of the object at the R.A. pointer (the molded triangle beneath this setting circle). 3. The R.A. circle is now calibrated to read the correct R.A. of any object at which the telescope is pointed. The Dec. circle is already calibrated through polar alignment. 4. To find another object, again identify the R.A. and Dec. coordinates. Then, without touching the setting circles, move the telescope (manually, by unlocking the vertical and horizontal locks or by slewing the telescope using the Arrow keys) so that the R.A. and Dec. pointers read the coordinates of the second object. 5. If the above procedure has been followed carefully, the second object will now be in the telescope's field of view. Note: Since the second object (i.e., the object to be located) is in constant motion, once the R.A. circle is calibrated (step 2, above) the telescope should be moved rapidly to read the coordinates of the second object. Otherwise the second object will no longer be in the position indicated by the R.A. circle. Using setting circles requires a developed technique. When using the circles for the first time, try hopping from one bright star (the calibration star) to another bright star of known coordinates. Practice moving the telescope from one easy-to-find object to another. In this way the precision required for accurate object location becomes familiar. EQUATORIAL ALIGNMENT 53
-
 1
1 -
2
-
3
-
4
-
5
-
6
-
7
-
8
-
9
-
10
-
11
-
12
-
13
-
14
-
15
-
16
-
17
-
18
-
19
-
20
-
21
-
22
-
23
-
24
-
25
-
26
-
27
-
28
-
29
-
30
-
31
-
32
-
33
-
34
-
35
-
36
-
37
-
38
-
39
-
40
-
41
-
42
-
43
-
44
-
45
-
46
-
47
-
 48
48 -
 49
49 -
 50
50 -
 51
51 -
 52
52 -
 53
53 -
 54
54 -
 55
55 -
 56
56 -
 57
57 -
 58
58 -
59
-
60
 |
 |
