Meade EclipseView 82mm Instruction Manual - Page 16
Using the SunFinder, Step 2., Step 1.
 |
View all Meade EclipseView 82mm manuals
Add to My Manuals
Save this manual to your list of manuals |
Page 16 highlights
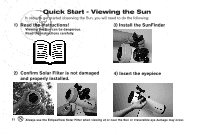
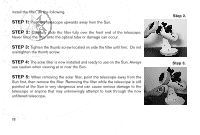
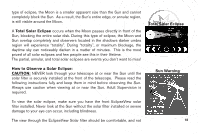
Using the SunFinder: STEP 1: To use the SunFinder point the telescope toward the Sun. The small pinhole in the front of the SunFinder will act as a projector. As the telescope moves closer to the Sun, a projection of the Sun will be displayed on the back plate of the SunFinder. STEP 2: Center the projection in the middle to the finder viewing circle. STEP 3: We recommend using the lowest power eyepiece, such as the 26mm eyepiece to initially find the Sun. You can then center the sun in the eyepiece, then switch to higher power eyepieces if desired to zoom in on detail such as Sunspots. This side toward Sun Step 1. Projection of Sun Step 2. 16 15
-
 1
1 -
2
-
3
-
4
-
5
-
6
-
7
-
8
-
9
-
10
-
 11
11 -
 12
12 -
 13
13 -
 14
14 -
 15
15 -
 16
16 -
 17
17 -
 18
18 -
 19
19 -
 20
20 -
 21
21 -
22
-
23
-
24
-
25
-
26
-
27
-
28
-
29
-
30
-
31
-
32
-
33
-
34
-
35
-
36
-
37
-
38
-
39
-
40
-
41
-
42
-
43
-
44
-
45
-
46
-
47
-
48
-
49
-
50
-
51
-
52
-
53
-
54
-
55
-
56
 |
 |

16
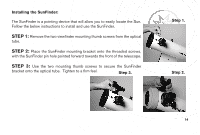
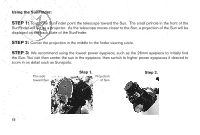
Using the SunFinder:
STEP 1:
To use the SunFinder point the telescope toward the Sun.
The small pinhole in the front of the
SunFinder will act as a projector.
As the telescope moves closer to the Sun, a projection of the Sun will be
displayed on the back plate of the SunFinder.
STEP 2:
Center the projection in the middle to the finder viewing circle.
STEP 3:
We recommend using the lowest power eyepiece, such as the 26mm eyepiece to initially find
the Sun. You can then center the sun in the eyepiece, then switch to higher power eyepieces if desired to
zoom in on detail such as Sunspots.
Step 2.
Step 1.
15
Projection
of Sun
This side
toward Sun