Meade EclipseView 82mm Instruction Manual - Page 24
Attaching your Accessories
 |
View all Meade EclipseView 82mm manuals
Add to My Manuals
Save this manual to your list of manuals |
Page 24 highlights
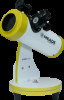
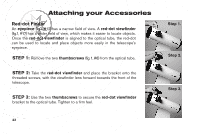
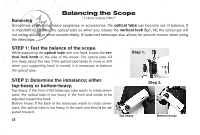
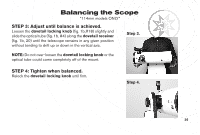
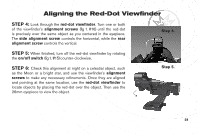
Attaching your Accessories Red-dot Finder An eyepiece (fig.1, #12) has a narrow field of view. A red-dot viewfinder (fig.1, #17) has a wider field of view, which makes it easier to locate objects. Once the red-dot viewfinder is aligned to the optical tube, the red-dot can be used to locate and place objects more easily in the telescope's eyepiece. STEP 1: Remove the two thumbscrews (fig. 1, #8) from the optical tube. STEP 2: Take the red-dot viewfinder and place the bracket onto the threaded screws, with the viewfinder lens forward towards the front of the telescope. STEP 3: Use the two thumbscrews to secure the red-dot viewfinder bracket to the optical tube. Tighten to a firm feel. 24 23 Step 1. Step 2. Step 3.
-
 1
1 -
2
-
3
-
4
-
5
-
6
-
7
-
8
-
9
-
10
-
11
-
12
-
13
-
14
-
15
-
16
-
17
-
18
-
 19
19 -
 20
20 -
 21
21 -
 22
22 -
 23
23 -
 24
24 -
 25
25 -
 26
26 -
 27
27 -
 28
28 -
 29
29 -
30
-
31
-
32
-
33
-
34
-
35
-
36
-
37
-
38
-
39
-
40
-
41
-
42
-
43
-
44
-
45
-
46
-
47
-
48
-
49
-
50
-
51
-
52
-
53
-
54
-
55
-
56
 |
 |

24
Attaching your Accessories
Red-dot Finder
An
eyepiece
(fig.1, #12) has a narrow field of view. A
red-dot viewfinder
(fig.1, #17) has a wider field of view, which makes it easier to locate objects.
Once the
red-dot viewfinder
is aligned to the optical tube, the red-dot
can be used to locate and place objects more easily in the telescope’s
eyepiece.
STEP 1:
Remove the two
thumbscrews
(fig. 1, #8) from the optical tube.
STEP 2:
Take the
red-dot viewfinder
and place the bracket onto the
threaded screws, with the viewfinder lens forward towards the front of the
telescope.
STEP 3:
Use the two
thumbscrews
to secure the
red-dot viewfinder
bracket to the optical tube. Tighten to a firm feel.
Step 1.
Step 2.
Step 3.
23