Memorex MVBD2535 User Guide - Page 13
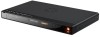
Back of the unit, compatible, television, HDMI IN, HDMI OUT, MI cable
 |
View all Memorex MVBD2535 manuals
Add to My Manuals
Save this manual to your list of manuals |
Page 13 highlights
CONNECTION (CONTINUED) CONNECTING THE PLAYER TO A TV AND RECEIVER USING THE HDMI OUTPUT JACK HDMI IN HDMI compatible amplifier/receiver HDMI compatible television HDMI OUT HDMI IN HDMI cable (not included) Back of the unit NOTES: • If your TV has an HDMI input, connect the player with the HDMI cable for best results, otherwise use the Component or Video OUT jack on the player. • Set the TV's TV/VIDEO button or switch to the VIDEO setting. • When connecting the Player, refer to the owner's manual of the TV and receiver, as well as this manual. • When connecting the Player to the TV and receiver, make sure the power is off and both units are unplugged before making any connections. • When using HDMI as your source, setup the HD resolution in the Video menu as described on page 32 and the Digital Output in the Audio menu as described on page 34. You can also press the TV RES button on the remote control to set the desired resolution. • Depending on your TV, some HDMI resolutions may not work. 12
-
 1
1 -
2
-
3
-
4
-
5
-
6
-
7
-
 8
8 -
 9
9 -
 10
10 -
 11
11 -
 12
12 -
 13
13 -
 14
14 -
 15
15 -
 16
16 -
 17
17 -
 18
18 -
19
-
20
-
21
-
22
-
23
-
24
-
25
-
26
-
27
-
28
-
29
-
30
-
31
-
32
-
33
-
34
-
35
-
36
-
37
-
38
-
39
-
40
-
41
-
42
-
43
-
44
-
45
-
46
-
47
-
48
-
49
-
50
-
51
-
52
-
53
-
54
-
55
-
56
-
57
-
58
-
59
-
60
-
61
-
62
-
63
-
64
-
65
-
66
-
67
-
68
-
69
-
70
-
71
-
72
-
73
-
74
-
75
-
76
-
77
-
78
-
79
-
80
-
81
-
82
-
83
-
84
-
85
-
86
-
87
-
88
-
89
-
90
-
91
-
92
-
93
-
94
-
95
-
96
-
97
-
98
-
99
-
100
-
101
-
102
-
103
-
104
-
105
-
106
-
107
-
108
-
109
-
110
-
111
-
112
-
113
-
114
-
115
-
116
-
117
-
118
-
119
-
120
-
121
-
122
-
123
-
124
-
125
-
126
-
127
-
128
-
129
-
130
-
131
-
132
-
133
-
134
-
135
-
136
-
137
-
138
-
139
-
140
-
141
-
142
-
143
-
144
-
145
-
146
-
147
-
148
-
149
-
150
-
151
-
152
-
153
-
154
-
155
-
156
-
157
-
158
-
159
-
160
-
161
-
162
-
163
-
164
-
165
-
166
-
167
-
168
-
169
-
170
-
171
-
172
-
173
-
174
-
175
-
176
-
177
-
178
-
179
-
180
-
181
-
182
-
183
-
184
-
185
-
186
-
187
-
188
-
189
-
190
-
191
-
192
-
193
-
194
 |
 |
