Metabo PE 12-175 Operating Instructions - Page 14
Cleaning, Troubleshooting, Accessories - set
 |
View all Metabo PE 12-175 manuals
Add to My Manuals
Save this manual to your list of manuals |
Page 14 highlights
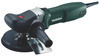
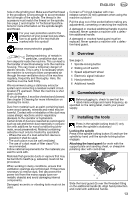
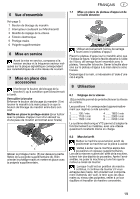
ENG ENGLISH 7.1 Installing support plate and sanding sheet To switch off: Press the rear end of the slide switch (2) and release it. 9 Cleaning Motor cleaning: blow compressed air through the rear ventilation slots of the machine regularly, frequently and thoroughly. Here, the machine must be held firmly. Only use the adjusting nut supplied with the support plate. Place the support plate on the spindle as shown in the illustration. Screw on sanding sheet with adjusting nut supplied with support plate. Lock the spindle. Tighten sanding sheet with support plate manually in a clockwise direction. Release by hand or with a two-hole spanner if necessary. 8 Use 10 Troubleshooting The electronic signal display (4) lights up and the load speed decreases. The coil temperature is too high! Run the machine in idling until the electronics signal indicator switches off. The electronic signal display (4) flashes and the machine does not start. The restart protection is active. If the mains plug is inserted with the machine switched on, or if the current supply is restored following an interruption, the machine does not start up. Switch the machine off and on again. 8.1 Setting speed The speed can be preset via the setting wheel (3)and is infinitely variable. Positions 1-6 correspond approximately to the following no-load speeds: 1 ......... 700 rpm 2 ......... 1100 rpm 3 ......... 1500 rpm 4 ........1800 rpm 5 ........2000 rpm 6 ........2200 rpm The VTC electronics make material-compatible work possible and an almost constant speed, even under load. 8.2 Switching On and Off Switch on first, then guide the accessory towards the workpiece. The machine must not be allowed to draw in additional dust and shavings. When switching the machine on and off, keep it away from dust deposits. After switching off the machine, only place it down when the motor has come to a standstill. In continuous operation, the machine continues running if it is forced out of your hands. Therefore, always hold the machine with both hands using the handles provided, stand in a safe position and concentrate. To switch on: Push the slide switch (2) forward. For continuous activation, now tilt downwards until it engages. 11 Accessories Use only genuine Metabo accessories. If you need any accessories, check with your dealer. For dealers to select the correct accessory, they need to know the exact model designation of your power tool. See page 4. A Polishing and sanding pads with Velcro fasteners (for attaching polishing and sanding accessories) B Foam polishing pad, coarse with Velcro fasteners (for buffing weathered paint) C Foam polishing pad, fine with Velcro fasteners (for polishing paint) D Foam polishing pad, profiled with Velcro fasteners (for polishing paint) E Felt polishing disc, hard with Velcro fasteners (for buffing paint, non-ferrous metals and stainless steel sheets) F Felt polishing disc, soft with Velcro fasteners (for buffing paint, non-ferrous metals and stainless steel sheets) G Sheepskin polishing disc with Velcro fasteners (for high-gloss polishing) H Sheepskin polishing disc with cord drive (for high-gloss polishing) I Sanding cloth with Velcro fasteners (for light sanding, cleaning, degreasing) 14
-
 1
1 -
2
-
3
-
4
-
5
-
6
-
7
-
8
-
 9
9 -
 10
10 -
 11
11 -
 12
12 -
 13
13 -
 14
14 -
 15
15 -
 16
16 -
 17
17 -
 18
18 -
 19
19 -
20
-
21
-
22
-
23
-
24
-
25
-
26
-
27
-
28
-
29
-
30
-
31
-
32
-
33
-
34
-
35
-
36
-
37
-
38
-
39
-
40
-
41
-
42
-
43
-
44
-
45
-
46
-
47
-
48
-
49
-
50
-
51
-
52
-
53
-
54
-
55
-
56
-
57
-
58
-
59
-
60
-
61
-
62
-
63
-
64
-
65
-
66
-
67
-
68
-
69
-
70
-
71
-
72
-
73
-
74
-
75
-
76
-
77
-
78
-
79
-
80
-
81
-
82
-
83
-
84
-
85
-
86
-
87
-
88
-
89
-
90
-
91
-
92
-
93
-
94
-
95
-
96
 |
 |
