Metabo RFEV 19-125 RT Operating Instructions - Page 12
Overview, Initial Operation
 |
View all Metabo RFEV 19-125 RT manuals
Add to My Manuals
Save this manual to your list of manuals |
Page 12 highlights
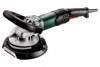
en ENGLISH The workpiece must lay flat and be secured against slipping, e.g. using clamps. Large workpieces must be supported adequately. If accessories with threaded inserts are used, the end of the spindle may not touch the base of the hole on the grinding tool. Make sure that the thread in the accessory is long enough to accommodate the full length of the spindle. The thread in the accessory must match the thread on the spindle. See page 3 and chapter 15. Technical Specifications for more information on the spindle length and thread. Impurities that manage to enter the machine may block the switching mechanism. This is why, when the machine is running, it is necessary to blow compressed air through the rear ventilation slots of the machine regularly, frequently and thoroughly. The machine must be held firmly in this case. Reduce dust exposure: Some dust created by using this power tool may contain chemicals known to cause cancer, allergic reaction, respiratory disease, birth defects or other reproductive harm. Some examples of these chemicals are: Lead from leadbased paints, crystalline silica from bricks and cement and other masonry products, arsenic and chromium from chemically-treated lumber, hard wood like oak or beech, metals, asbestos. The risk from these exposures depends on how long you or bystanders are being exposed. Do not let particles enter the body. To reduce your exposure to these chemicals: work in a well ventilated area, and work with approved safety equipment, such as dust masks that are specially designed to filter out microscopic particles. Observe the relevant guidelines for your material, staff, application and place of application (e.g. occupational health and safety regulations, disposal). Collect the generated particles at the source, avoid deposits in the surrounding area. Use suitable accessories for special work (see chapter 12.), thus less particles enter the environment in an uncontrolled manner. Use a suitable extraction unit. Reduce dust exposure with the following measures: - For efficient dust collection, use a suitable Metabo M-class vacuum cleaner together with this power tool. - Do not direct the escaping particles and the exhaust air stream at yourself or nearby persons or on dust deposits. - Use an extraction unit and/or air purifiers - Ensure good ventilation of the workplace and keep clean using a vacuum cleaner Sweeping or blowing stirs up dust - Vacuum or wash the protective clothing Do not blow, beat or brush 5. Overview 12 See page 2. 1 Bar auxiliary handle * 2 Thumb screws of the bar auxiliary handle * 3 Locking discs of the bar auxiliary handle * 4 Threaded holes on gear housing 5 2-hole spanner 6 Routing tool* 7 Spindle 8 Extractor connection piece 9 Spindle locking button 10 Clamping nut * 11 Diamond cup wheel* 12 Support flange * 13 Screw * 14 Safety disc* 15 Sliding on/off switch 16 Handle 17 Electronic signal indicator 18 Speed adjustment wheel 19 Safety guard 20 Flat area for working close to edges 21 Wing nut 22 Depth stop * depending on equipment/not in scope of delivery 6. Initial Operation Before plugging in the device, check that the rated mains voltage and mains frequency, as specified on the rating label, match your power supply. Australia: Always use a residual current device (RCD) protected supply with a rated residual current of 30 mA or less. 6.1 Fitting of bar auxiliary handle Always work with the bar auxiliary handle (1) attached! Fit the bar auxiliary handle as shown (see illustration A, page 2). - Fit locking discs (3) to the left and right of the gear housing. - Fit the bar auxiliary handle (1) at the gear housing. - Insert the thumb screws (2) left and right into the bar auxiliary handle (1) and turn gently. - Adjust the bar auxiliary handle (1) to the required angle. - Firmly tighten the thumb screws (2) to the left and right manually. 6.2 Adjusting the depth stop For safety reasons, only use the safety guard (19) provided. See figure, page 2. - Release wing screw (21). - Twist the depth stop (22) to adjust the height in relation to the accessory and the work task. - Hand-tighten the wing screw (21) securely. 6.3 Dust extraction Always use a suitable dust extraction system: Connect an M-class vacuum cleaner to the extractor connection piece (8).
-
 1
1 -
2
-
3
-
4
-
5
-
6
-
 7
7 -
 8
8 -
 9
9 -
 10
10 -
 11
11 -
 12
12 -
 13
13 -
 14
14 -
 15
15 -
 16
16 -
 17
17 -
18
-
19
-
20
-
21
-
22
-
23
-
24
-
25
-
26
-
27
-
28
-
29
-
30
-
31
-
32
-
33
-
34
-
35
-
36
-
37
-
38
-
39
-
40
-
41
-
42
-
43
-
44
-
45
-
46
-
47
-
48
-
49
-
50
-
51
-
52
-
53
-
54
-
55
-
56
-
57
-
58
-
59
-
60
-
61
-
62
-
63
-
64
-
65
-
66
-
67
-
68
-
69
-
70
-
71
-
72
-
73
-
74
-
75
-
76
-
77
-
78
-
79
-
80
-
81
-
82
-
83
-
84
-
85
-
86
-
87
-
88
-
89
-
90
-
91
-
92
 |
 |
