Miele Boost CX1 Operating instructions/Installation instructions - Page 14
en-US
 |
View all Miele Boost CX1 manuals
Add to My Manuals
Save this manual to your list of manuals |
Page 14 highlights
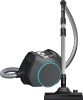
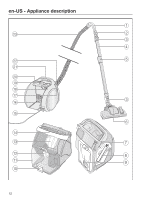
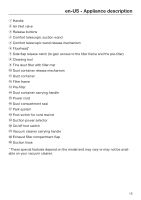
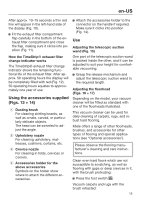
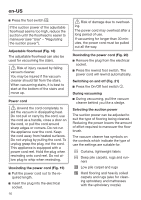
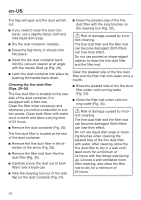
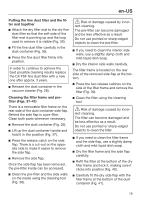
en-US References to illustrations The illustrations referred to in the text are shown on the fold-out pages at the end of these Operating Instructions. Connection Attaching the suction hose (Figs. 01 + 02) Insert the hose connector into the suction socket on the vacuum cleaner until it clicks into position. To do this, line up the guides on the two pieces. If you want to separate the pieces again, press the release catches at the side of the hose connector, and pull the suction hose out of the suction opening. Connecting the suction hose to the handle (Fig. 03) Insert the suction hose into the handle until it clicks into position. Connecting the handle to the suction wand (Fig. 04) Insert the handle into the suction wand until it clicks into position. To do this, line up the guides on the two pieces. To release the handle from the suction wand, press the release button and pull the handle out of the wand, twisting it slightly as you do so. Connect the telescopic suction wand to the floorhead (Fig. 05) Push the telescopic suction wand into the floorhead and turn it clockwise or counterclockwise until it clicks into position. To detach the floorhead from the suction wand press the release button and pull the suction wand away from the floorhead, twisting it slightly as you do so. Activating the TimeStrip® filter change indicator on the HEPA AirClean exhaust filter (Figs. 06-11) Depending on the model, your vacuum cleaner will be equipped as standard with one of the following exhaust filters: - Hygiene AirClean SF-HY 60 (turquoise) - HEPA AirClean SF-HA 60 (white) If your vacuum cleaner is fitted with a HEPA AirClean exhaust filter, you need to activate the TimeStrip® filter change indicator. You will recognize that the HEPA AirClean exhaust filter is fitted to the appliance by an indicator strip hanging out of the exhaust filter compartment (Fig. 06). Press the release catch on the exhaust filter compartment flap and remove the flap (Fig. 07). Remove the indicator strip from the HEPA AirClean exhaust filter (Fig. 08). Press the TimeStrip® filter change indicator on the HEPA AirClean exhaust filter (Fig. 09). 14
-
 1
1 -
2
-
3
-
4
-
5
-
6
-
7
-
8
-
 9
9 -
 10
10 -
 11
11 -
 12
12 -
 13
13 -
 14
14 -
 15
15 -
 16
16 -
 17
17 -
 18
18 -
 19
19 -
20
-
21
-
22
-
23
-
24
-
25
-
26
-
27
-
28
-
29
-
30
-
31
-
32
-
33
-
34
-
35
-
36
-
37
-
38
-
39
-
40
-
41
-
42
-
43
-
44
-
45
-
46
-
47
-
48
-
49
-
50
-
51
-
52
-
53
-
54
-
55
-
56
-
57
-
58
-
59
-
60
-
61
-
62
-
63
-
64
-
65
-
66
-
67
-
68
-
69
-
70
-
71
-
72
-
73
-
74
-
75
-
76
-
77
-
78
-
79
-
80
 |
 |
