Motorola MOTOROLA BRUTE i686 User Guide - Sprint - Page 141
Camera Options, Setting the Self Timer - review
 |
View all Motorola MOTOROLA BRUTE i686 manuals
Add to My Manuals
Save this manual to your list of manuals |
Page 141 highlights
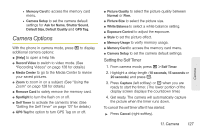
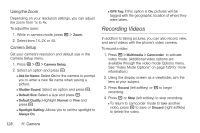
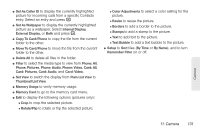
● Memory Card to access the memory card menu. ● Camera Setup to set the camera default settings for Ask for Name, Shutter Sound, Default Size, Default Quality and GPS Tag. Camera Options With the phone in camera mode, press / to display additional camera options: ⅷ [Help] to open a help file. ⅷ Record Video to switch to video mode. (See "Recording Videos" on page 128 for details.) ⅷ Media Center to go to the Media Center to review your saved pictures. ⅷ Zoom to zoom in on a subject. (See "Using the Zoom" on page 128 for details.) ⅷ Remove Card to safely remove the memory card. ⅷ Spotlight to turn the flash on or off. ⅷ Self Timer to activate the camera's timer. (See "Setting the Self Timer" on page 127 for details.) ⅷ GPS Tag the option to turn GPS Tag on or off. ⅷ Picture Quality to select the picture quality between Normal or Fine. ⅷ Picture Size to select the picture size. ⅷ White Balance to select a white balance setting. ⅷ Exposure Control to adjust the exposure. ⅷ Style to set the picture effect. ⅷ Memory Usage to verify memory usage. ⅷ Memory Card to access the memory card menu. ⅷ Camera Setup to set the camera default settings. Setting the Self Timer 1. From camera mode, press / > Self Timer. 2. Highlight a delay length (10 seconds, 15 seconds or 20 seconds) and press r. 3. Press Capture (left softkey) or r when you are ready to start the timer. (The lower portion of the display screen displays the countdown time.) 4. Get ready. The camera will automatically capture the picture when the timer runs down. To cancel the self timer after it has started: ᮣ Press Cancel (right softkey). 11. Camera 127 Camera
-
 1
1 -
2
-
3
-
4
-
5
-
6
-
7
-
8
-
9
-
10
-
11
-
12
-
13
-
14
-
15
-
16
-
17
-
18
-
19
-
20
-
21
-
22
-
23
-
24
-
25
-
26
-
27
-
28
-
29
-
30
-
31
-
32
-
33
-
34
-
35
-
36
-
37
-
38
-
39
-
40
-
41
-
42
-
43
-
44
-
45
-
46
-
47
-
48
-
49
-
50
-
51
-
52
-
53
-
54
-
55
-
56
-
57
-
58
-
59
-
60
-
61
-
62
-
63
-
64
-
65
-
66
-
67
-
68
-
69
-
70
-
71
-
72
-
73
-
74
-
75
-
76
-
77
-
78
-
79
-
80
-
81
-
82
-
83
-
84
-
85
-
86
-
87
-
88
-
89
-
90
-
91
-
92
-
93
-
94
-
95
-
96
-
97
-
98
-
99
-
100
-
101
-
102
-
103
-
104
-
105
-
106
-
107
-
108
-
109
-
110
-
111
-
112
-
113
-
114
-
115
-
116
-
117
-
118
-
119
-
120
-
121
-
122
-
123
-
124
-
125
-
126
-
127
-
128
-
129
-
130
-
131
-
132
-
133
-
134
-
135
-
 136
136 -
 137
137 -
 138
138 -
 139
139 -
 140
140 -
 141
141 -
 142
142 -
 143
143 -
 144
144 -
 145
145 -
 146
146 -
147
-
148
-
149
-
150
-
151
-
152
-
153
-
154
-
155
-
156
-
157
-
158
-
159
-
160
-
161
-
162
-
163
-
164
-
165
-
166
-
167
-
168
-
169
-
170
-
171
-
172
-
173
-
174
-
175
-
176
-
177
-
178
-
179
-
180
-
181
-
182
-
183
-
184
-
185
-
186
-
187
-
188
-
189
-
190
-
191
-
192
-
193
-
194
-
195
-
196
-
197
-
198
-
199
 |
 |
