NEC LT170 LT170 user's manual - Page 8
Part Names of the Remote Control - parts
 |
UPC - 050927243561
View all NEC LT170 manuals
Add to My Manuals
Save this manual to your list of manuals |
Page 8 highlights
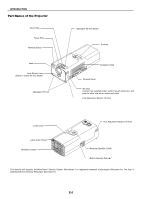
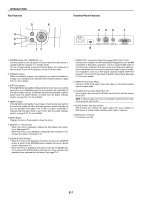
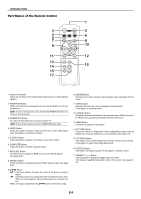
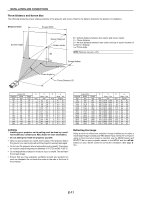
INTRODUCTION Part Names of the Remote Control 3 4 5 7 9 11 13 14 15 17 OFF P0WER ON VIDEO S-VIDEO COMPUTER COMP. AUTO ADJ. AUTO ASPECT ENTER MENU CANCEL HELP FREEZE PICTURE PC-MUTE MAGNIFY MUTE 1 2 6 8 10 12 16 1. Infrared Transmitter Direct the remote control toward the remote sensor on the projector cabinet. 2. POWER ON Button When the main power is supplied, you can use this button to turn your projector on. NOTE: To turn on the projector, press and hold the POWER ON button for a minimum of two seconds. 3. POWER OFF Button You can use this button to turn your projector off. NOTE: To turn off the projector, press the POWER OFF button twice. 4. VIDEO Button Press this button to select a video source from a VCR, DVD player, laser disc player or document camera. 5. S-VIDEO Button Press this button to select an S-Video source from a VCR. 6. COMPUTER Button Press this button to select Computer input. 7. AUTO ADJ. Button Use this button to adjust an RGB source for an optimal picture. See page E-21. 8. ASPECT Button Press this button to display the Aspect Ratio select screen. See page E-31. 9. ̆̄̇̈ Button ̆̄ : Use these buttons to select the menu of the item you wish to adjust. ̇̈ : Use these buttons to change the level of a selected menu item. When no menus appear, these buttons work as a volume control. When an image is magnified, the ̆̄̇̈ button moves the image. 10. ENTER Button Executes your menu selection and activates items selected from the menu. 11. MENU Button Displays the menu for various settings and adjustments. Press again to close the menu. 12. CANCEL Button Pressing this button will return to the previous menu. While you are in the Basic menu, pressing this button will close the menu. 13. HELP Button Provides the projector information. 14. PICTURE Button Press this button to display the Picture adjustment screen such as Brightness, Contrast, Sharpness, Color and Hue. See page E-32. 15. PIC-MUTE Button This button turns off the image and sound for a short period of time. Press again to restore the image and sound. 16. FREEZE Button This button will freeze a picture. Press again to resume motion. 17. MAGNIFY (+)(-) Button Use this button to adjust the image size up to 400%. The image is magnified about the center of the screen. See page E24. E-8
-
 1
1 -
2
-
 3
3 -
 4
4 -
 5
5 -
 6
6 -
 7
7 -
 8
8 -
 9
9 -
 10
10 -
 11
11 -
 12
12 -
 13
13 -
14
-
15
-
16
-
17
-
18
-
19
-
20
-
21
-
22
-
23
-
24
-
25
-
26
-
27
-
28
-
29
-
30
-
31
-
32
-
33
-
34
-
35
-
36
-
37
-
38
-
39
-
40
-
41
-
42
-
43
-
44
-
45
 |
 |
