NEC LT30 LT30/LT35 UM - Page 24
Connecting the Supplied Power Cable, To turn off the AC power supply when the projector is powered
 |
UPC - 050927250361
View all NEC LT30 manuals
Add to My Manuals
Save this manual to your list of manuals |
Page 24 highlights
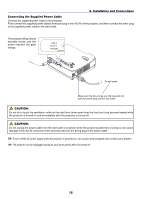
2. Installation and Connections Connecting the Supplied Power Cable Connect the supplied power cable to the projector. First connect the supplied power cable's three-pin plug to the AC IN of the projector, and then connect the other plug of the supplied power cable in the wall outlet. The projector will go into its standby mode and the power indicator will glow orange. LAMP STATUS POWER ON/STA COMPUTER IN VIDEO IN POWSETRATUSLAMP ON/STAND BY SOURCE AUTO ADJ. FOCUS S-VIDEO IN AUDIO IN PC CONTROL SELECT To wall outlet Make sure that the prongs are fully inserted into both the power plug and the wall outlet. CAUTION: Do not try to touch the ventilation outlet on the right front (when seen from the front) as it can become heated while the projector is turned on and immediately after the projector is turned off. CAUTION: Do not unplug the power cable from the wall outlet or projector when the project is powered on. Doing so can cause damage to the AC IN connector of the projector and (or) the prong plug of the power cable. TIP: To turn off the AC power supply when the projector is powered on, use a power strip equipped with a switch and a breaker. TIP: The projector can be unplugged during its cool down period after it is turned off. 16
-
 1
1 -
2
-
3
-
4
-
5
-
6
-
7
-
8
-
9
-
10
-
11
-
12
-
13
-
14
-
15
-
16
-
17
-
18
-
 19
19 -
 20
20 -
 21
21 -
 22
22 -
 23
23 -
 24
24 -
 25
25 -
 26
26 -
 27
27 -
 28
28 -
 29
29 -
30
-
31
-
32
-
33
-
34
-
35
-
36
-
37
-
38
-
39
-
40
-
41
-
42
-
43
-
44
-
45
-
46
-
47
-
48
-
49
-
50
-
51
-
52
-
53
-
54
-
55
-
56
-
57
-
58
-
59
-
60
-
61
-
62
-
63
-
64
-
65
-
66
-
67
-
68
-
69
-
70
-
71
-
72
 |
 |
