NEC LT80 User Manual - Page 29
Volume, Brightness, Contrast, Image Adjustment, Color, Sharpness, Image Mode
 |
View all NEC LT80 manuals
Add to My Manuals
Save this manual to your list of manuals |
Page 29 highlights
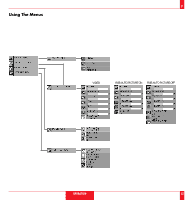
55 Image Adjustment Menu Provides access to controls for your image and sound. Use the "Select" button on the projector cabinet or (v) (w) buttons on your remote control to highlight the menu for the item you want to adjust. The volume, brightness, contrast, color, tint, sharpness and Image Mode controls are available for Video or S-Video sources. The volume, brightness, contrast, horizontal position, vertical position and auto picture controls are available for RGB source. Volume Use the "Adjust" (+) or (-) buttons to adjust the volume. Brightness Use the "Adjust" (+) or (-) buttons to adjust the brightness. Contrast Use the "Adjust" (+) or (-) buttons to adjust the contrast. Color* Use the "Adjust" (+) or (-) buttons to adjust the color. Tint* Use the "Adjust" (+) or (-) buttons to adjust the tint. Sharpness* Use the "Adjust" (+) or (-) buttons to adjust the sharpness. Image Mode* Use the "Adjust" (+) or (-) buttons to choose "Normal" for a regular picture "Natural" for true color reproduction, or "Document Camera" for a document camera or other low APL picture. NOTE: 1) Flicker may appear on a freeze-frame picture with a Video or S-Video source. If this happens, select the Document Camera mode using the Image mode icon on the Image Adjustment Menu, and then adjust the contrast and other items for an optimal image. 2) A frame may freeze for a brief period of time when a video is played back in fast-forward or fast-rewind with a Video or S-Video source. If this happens, select the Natural mode (for cinema) using the Image Mode icon on the Image Adjustment Menu. OPERATION 56
-
 1
1 -
2
-
3
-
4
-
5
-
6
-
7
-
8
-
9
-
10
-
11
-
12
-
13
-
14
-
15
-
16
-
17
-
18
-
19
-
20
-
21
-
22
-
23
-
 24
24 -
 25
25 -
 26
26 -
 27
27 -
 28
28 -
 29
29 -
 30
30 -
 31
31 -
 32
32 -
 33
33 -
 34
34 -
35
-
36
-
37
-
38
-
39
-
40
-
41
-
42
-
43
-
44
-
45
 |
 |
