NEC PX-61XM2A 42VP4/42XM2/50XM3/61XM2 - Page 34
Example: Setting the CINEMA MODE to OFF, PLE Peak Luminance Enhancement, Example: Setting PLE
 |
View all NEC PX-61XM2A manuals
Add to My Manuals
Save this manual to your list of manuals |
Page 34 highlights
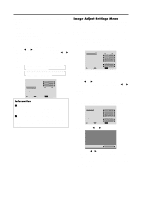
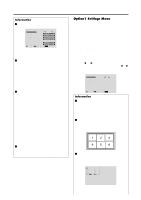
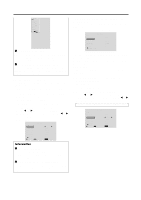
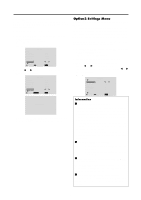
POWER/STANDBY indicator Power POWER/ management STANDBY mode indicator Power Description management operating status Turning the picture back on On Green Not activated. Horizontal and vertical Picture already on. synchronizing signals are present from the computer. Off Red Activated. Horizontal and/or Operate the keyboard or vertical synchronizing mouse. The picture signals are not sent reappears. from the computer. Setting the picture to suit the movie The film image is automatically discriminated and projected in an image mode suited to the picture. [NTSC, PAL, PAL60, 480I (60Hz), 525I (60Hz), 576I (50Hz), 625I (50Hz), 1035I (60Hz), 1080I (60Hz) only] Example: Setting the "CINEMA MODE" to "OFF" Set "ADVANCED OSM" to "ON" in the main menu (1/ 2), then perform the following operations. 1. On the MAIN MENU, select "OPTION2", then press the MENU/ENTER button. The "OPTION2" screen appears. 2. Use the v and w buttons to select "CINEMA MODE". 3. To set the CINEMA MODE to "OFF" ... Use the ᮤ and ᮣ buttons to select "OFF". The mode switches as follows each time the ᮤ or ᮣ button is pressed: ON ↔ OFF OPTION2 2 / 3 PREVIOUS PAGE POWER MGT. : OFF CINEMA MODE : OFF LONG LIFE GRAY LEVEL : 3 S1/S2 : OFF NEXT PAGE SEL. ADJ. EXIT RETURN Information Ⅵ CINEMA MODE ON Automatic discrimination of the image and projection in cinema mode. OFF Cinema mode does not function. Ⅵ Restoring the factory default settings Select "ALL RESET" under the OPTION1 menu. Note that this also restores other settings to the factory defaults. Reducing burn-in of the screen The brightness of the screen, the position of the picture, positive/negative mode and screen wiper are adjusted to reduce burn-in of the screen. Set "ADVANCED OSM" to "ON" in the main menu (1/ 2), then perform the following operations. 1. On the MAIN MENU, select "OPTION2", then press the MENU/ENTER button. The "OPTION2" screen appears. 2. Use the v and w buttons to select "LONG LIFE", then press the MENU/ENTER button. The "LONG LIFE" screen appears. LONG LIFE PLE : ORBITER : INVERSE : SCREEN WIPER : SOFT FOCUS : AUTO OFF OFF OFF OFF SEL. ADJ. EXIT RETURN 3. Set the LONG LIFE mode using vwᮤ and ᮣ buttons. See page 27 to set PLE. See page 28 to set ORBITER. See page 28 to set INVERSE. See page 29 to set SCREEN WIPER. See page 30 to set SOFT FOCUS. Information Ⅵ Restoring the factory default settings Select "ALL RESET" under the OPTION1 menu. Note that this also restores other settings to the factory defaults. PLE (Peak Luminance Enhancement) Use this to activate the brightness limiter. Example: Setting "PLE" to "LOCK1" Perform Steps 1-2 of LONG LIFE, then... 3. Use the v and w buttons to select "PLE". 4. Use the ᮤ and ᮣ buttons to select "LOCK1". The mode switches as follows each time the ᮤ or ᮣ button is pressed: →AUTO ↔ LOCK1 ↔ LOCK2 ↔ LOCK3← LONG LIFE PLE : ORBITER : INVERSE : SCREEN WIPER : SOFT FOCUS : LOCK1 OFF OFF OFF OFF SEL. ADJ. EXIT RETURN Information Ⅵ PLE settings AUTO The brightness of the screen is adjusted automatically to suit the picture quality. 27
-
 1
1 -
2
-
3
-
4
-
5
-
6
-
7
-
8
-
9
-
10
-
11
-
12
-
13
-
14
-
15
-
16
-
17
-
18
-
19
-
20
-
21
-
22
-
23
-
24
-
25
-
26
-
27
-
28
-
 29
29 -
 30
30 -
 31
31 -
 32
32 -
 33
33 -
 34
34 -
 35
35 -
 36
36 -
 37
37 -
 38
38 -
 39
39 -
40
-
41
-
42
-
43
-
44
-
45
-
46
-
47
-
48
-
49
-
50
-
51
-
52
 |
 |
