NEC PX-61XM2A 42VP4/42XM2/50XM3/61XM2 - Page 40
Setting the power on mode
 |
View all NEC PX-61XM2A manuals
Add to My Manuals
Save this manual to your list of manuals |
Page 40 highlights
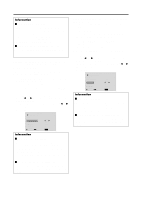
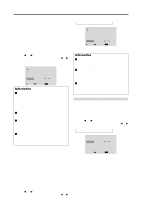
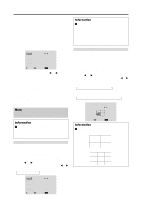
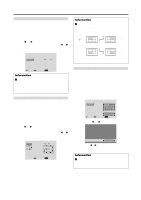
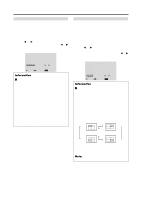
PROGRAM TIMER FUNCTION Set the LONG LIFE function. This sets the day and time at which the power will be switched ON/OFF as well as the input mode. Example: Setting so that the power will be switched on at 8:30 A.M., Monday, displaying RGB2 source, and switched off at 10:30 A.M. Perform Steps 1-2 of TIMER, then... 3. Use the v and w buttons to select "PROGRAM". PRESENT TIME PROGRAM TIMER : OFF Ⅵ To reset the program Align the cursor with the DATE field that you wish to reset, then press the CLEAR button. Ⅵ To reset the data Align the cursor with the field (ON/OFF/INPUT/ FUNCTION) that you wish to reset, then press the CLEAR button. Ⅵ Special characters in the PROGRAM TIMER screen SEL. ADJ. EXIT RETURN 4. Use the ᮤ and ᮣ buttons to select "ON", then press the MENU/ENTER button. The "PROGRAM TIMER" screen appears. 5. Adjust using the vwᮤ and ᮣ buttons and ZOOM button. PROGRAM TIMER DATE ON OFF INPUT FUNCTION MON 08 : 30 10 : 30 RGB2 INVERSE - - - - - - - - - - - SEL. ZOOM ADJ. EXIT RETURN PROGRAM TIMER DATE ON OFF INPUT FUNCTION MON 08 : 30 10 : 30 RGB2 INVERSE TUE - - : - - 18 : 15 - - SAT 08 : 30 12 : 15 VIDEO1 WHITE *FRI 08 : 30 10 : 00 HD/DVD1 - - - SAT 08 : 30 12 : 15 VIDEO1 WHITE * 15 : 30 16 : 00 RGB1 - SEL. ZOOM ADJ. EXIT RETURN • An asterisk "*" in the DATE field An asterisk "*" means "every". For example, "*FRI" means every Friday and "*" means everyday. • A hyphen "-" in the ON field or OFF field If any hyphen remains in the ON field or OFF field, the FUNCTION can not be set. • A hyphen "-" in the FUNCTION field A hyphen "-" means last mode (the mode that was last selected at the time the power was switched off). The mode switches as follows each time the ZOOM button is pressed: • Date Setting the power on mode This function sets the input mode at the time the power is switched on. → - ↔ SUN ↔ MON SAT ↔ * ↔ *SUN ↔ *MON SAT← Example: Setting "VIDEO2" • ON/OFF Hour → 00 ↔ 01 ↔ 02 21 ↔ 22 ↔ 23← • Minute → 00 ↔ 01 ↔ 02 57 ↔ 58 ↔ 59← • INPUT → - ↔ LAST ↔ VIDEO1 ↔ VIDEO2 ↔ VIDEO3 ↔ HD/DVD1 ← → RGB3 ↔ RGB2 ↔ RGB1 ↔ HD/DVD2 ← Set "ADVANCED OSM" to "ON" in the main menu (1/ 2), then perform the following operations. 1. On the MAIN MENU, select "OPTION3", then press the MENU/ENTER button. The "OPTION3" screen appears. 2. Use the v and w buttons to select "PWR. ON MODE". 3. To set the PWR. ON MODE to "VIDEO2"... Use the ᮤ and ᮣ buttons to select "VIDEO2". The mode switches as follows each time the ᮤ or ᮣ • FUNCTION → - ↔ ORBITER ↔ INVERSE ↔ WHITE ↔ WIPER← button is pressed: The available inputs depend on the setting of "BNC INPUT". RGB: → LAST ↔ VIDEO1 ↔ VIDEO2 ↔ VIDEO3 ← → RGB3 ↔ RGB2 ↔ RGB1 ↔ HD/DVD1 ← Information Ⅵ PROGRAM TIMER settings DATE Set the day of the week (e.g. Sunday). ON (hour, minutes) .... Set the time at which the power will be turned on in the 24-hour format. OFF (hour, minutes) ... Set the time at which the power will be turned off in the 24-hour format. INPUT Set the input mode that will be displayed when the timer is on. 33 COMP: → LAST ↔ VIDEO1 ↔ VIDEO2 ↔ VIDEO3 ← → RGB3 ↔ RGB1 ↔ HD/DVD2 ↔ HD/DVD1 ← OPTION3 3 / 3 PREVIOUS PAGE TIMER PWR. ON MODE : VIDEO2 CONTROL LOCK : OFF IR REMOTE : ON LOOP OUT : OFF ID NUMBER : ALL VIDEO WALL SEL. ADJ. EXIT RETURN
-
 1
1 -
2
-
3
-
4
-
5
-
6
-
7
-
8
-
9
-
10
-
11
-
12
-
13
-
14
-
15
-
16
-
17
-
18
-
19
-
20
-
21
-
22
-
23
-
24
-
25
-
26
-
27
-
28
-
29
-
30
-
31
-
32
-
33
-
34
-
 35
35 -
 36
36 -
 37
37 -
 38
38 -
 39
39 -
 40
40 -
 41
41 -
 42
42 -
 43
43 -
 44
44 -
 45
45 -
46
-
47
-
48
-
49
-
50
-
51
-
52
 |
 |
